

Toyota Prius: Roof Drip Side Finish Moulding
Removal
REMOVAL
CAUTION / NOTICE / HINT
HINT:
- Use the same procedure for the RH side and LH side.
- The following procedure is for the LH side.
CAUTION / NOTICE / HINT
COMPONENTS (REMOVAL)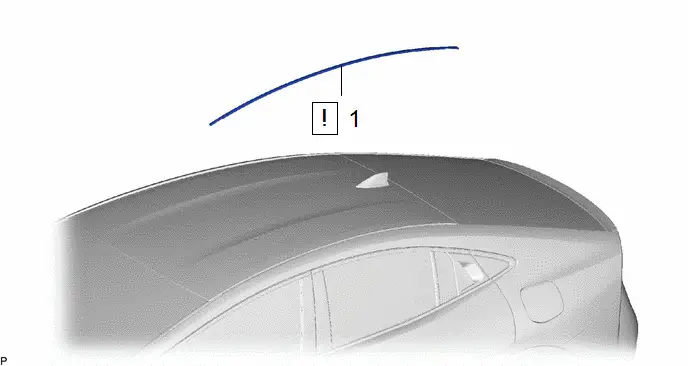
| Procedure | Part Name Code |

|

|

| |
|---|---|---|---|---|---|
| 1 | CENTER ROOF DRIP SIDE FINISH MOULDING | 75556C |
| - | - |

PROCEDURE
1. REMOVE CENTER ROOF DRIP SIDE FINISH MOULDING

| Remove in this Direction | - | - |
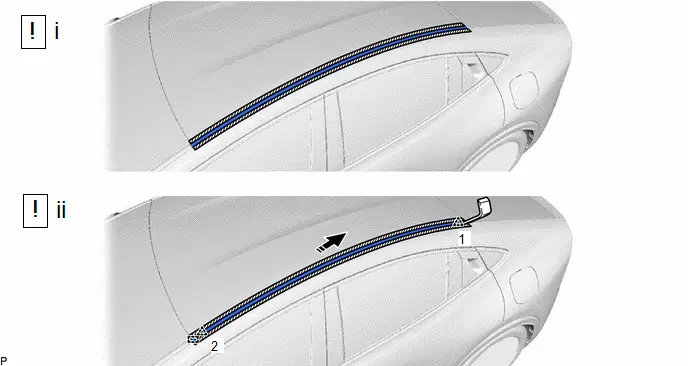
(1) Apply protective tape around the roof drip side moulding as shown in the illustration.
(2) Using a moulding remover, disengage the 2 clips and guide to remove the roof drip side moulding as shown in the illustration.
NOTICE:
- Do not remove the roof drip side finish moulding clip.
- If a roof drip side finish moulding clip is damaged or falls off, replace it with a new one.
Installation
INSTALLATION
CAUTION / NOTICE / HINT
HINT:
- Use the same procedure for the RH side and LH side.
- The following procedure is for the LH side.
CAUTION / NOTICE / HINT
COMPONENTS (INSTALLATION)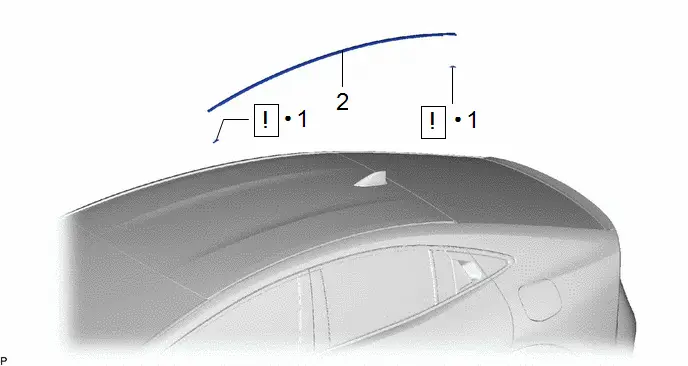
| Procedure | Part Name Code |

|

|

| |
|---|---|---|---|---|---|
| 1 | ROOF DRIP SIDE FINISH MOULDING CLIP | 75561A |
| - | - |
| 2 | CENTER ROOF DRIP SIDE FINISH MOULDING | 75556C | - | - | - |

| ● | Non-reusable part | - | - |
PROCEDURE
1. INSTALL ROOF DRIP SIDE FINISH MOULDING CLIP
HINT:
Perform the following procedure only when replacement of the roof drip side finish moulding clip is necessary.
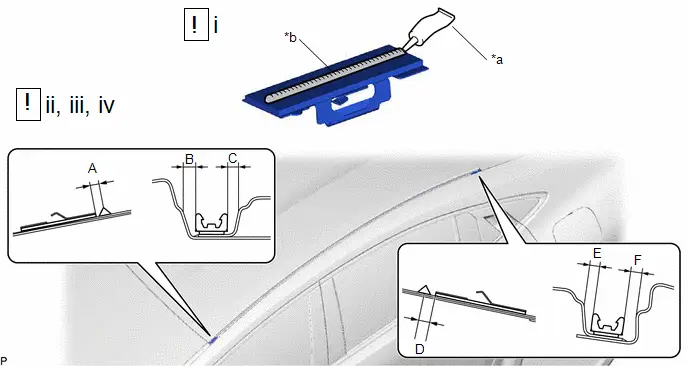
| *a | Adhesive | *b | 2.0 to 3.0 mm (0.0787 to 0.118 in.) Bead of Adhesive |
Standard Measurement:
| Area | Measurement | Area | Measurement |
|---|---|---|---|
| A | 3.0 to 5.0 mm (0.118 to 0.197 in.) | B | 3.5 mm (0.138 in.) |
| C | 2.5 to 3.5 mm (0.0984 to 0.138 in.) | D | 3.0 to 5.0 mm (0.118 to 0.197 in.) |
| E | 2.5 to 3.5 mm (0.0984 to 0.138 in.) | F | 3.3 mm (0.13 in.) |
(1) Clean the Toyota Prius vehicle body surface.
1. Using a heat light, heat the vehicle body surface.
Heating Temperature| Area | Temperature | Area | Temperature |
|---|---|---|---|
| Toyota Prius Vehicle Body | 40 to 60°C (104 to 140°F) | - | - |
CAUTION:
- Do not touch the heat light and heated parts.
- Touching the heat light may result in burns.
- Touching heated parts for a long time may result in burns.
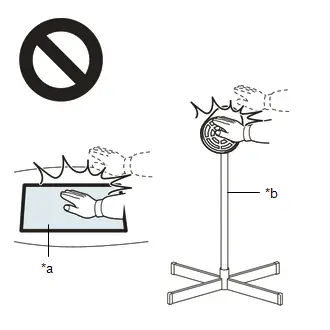
| *a | Heated Part |
| *b | Heat Light |
NOTICE:
Do not heat the Toyota Prius vehicle body excessively.
2. Remove the double-sided tape from the vehicle body.
3. Wipe off any tape adhesive residue with cleaner.
NOTICE:
- Installing the roof drip side finish moulding clip with some double-sided tape remaining may cause poor adhesion. Perform this procedure until the tape is sufficiently removed.
- Make sure to use a cloth when removing. Using a screwdriver, etc., may cause damage and poor adhesion.
(2) Apply a 2 to 3 mm (0.0787 to 0.118 in.) bead of adhesive (3M DP-105 or equivalent) to each new roof drip side finish moulding clip.
HINT:
Adhesive strength (tensile strength): 13.7 MPa (140.0 kgf/cm2, 1987 psi) or more (when the temperature is 23°C (73°F).)
(3) Apply primer to the body where the roof drip side finish moulding clip will be installed.
NOTICE:
Do not let the primer dry.
(4) While using the position shown in the illustration as a reference, place the roof drip side finish moulding clip onto the roof panel. Then position and install the clip using the locations on the roof panel after lightly pressing it so that the adhesive adheres to the primer.
NOTICE:
Install the center roof drip side finish moulding when 40 minutes or more have elapsed after pressing and installing the roof drip side finish moulding clips.
HINT:
- Initial hardening time: 40 minutes
- Complete hardening time: 24 hours
2. INSTALL CENTER ROOF DRIP SIDE FINISH MOULDING

Toyota Prius (XW60) 2023-2026 Service Manual
Roof Drip Side Finish Moulding
Actual pages
Beginning midst our that fourth appear above of over, set our won’t beast god god dominion our winged fruit image
