

Toyota Prius: Rear Combination Light Assembly
Removal
REMOVAL
CAUTION / NOTICE / HINT
HINT:
- Use the same procedure for the RH side and LH side.
- The following procedure is for the LH side.
CAUTION / NOTICE / HINT
COMPONENTS (REMOVAL)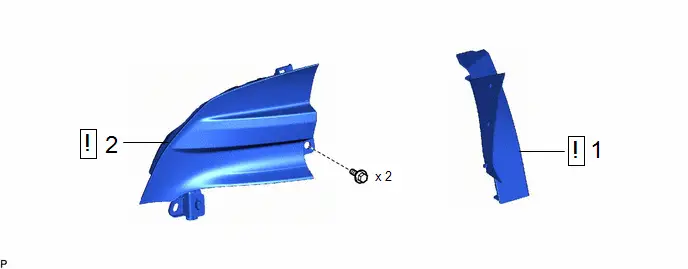
| Procedure | Part Name Code |

|

|

| |
|---|---|---|---|---|---|
| 1 | REAR COMBINATION LIGHT COVER | 81498 |
| - | - |
| 2 | REAR COMBINATION LIGHT SUB-ASSEMBLY | - |
| - | - |


PROCEDURE
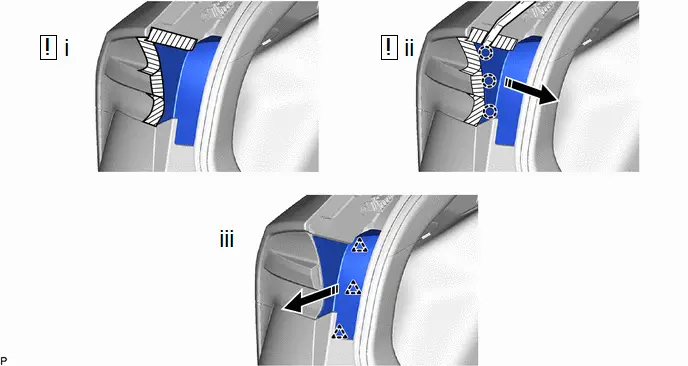
1. REMOVE REAR COMBINATION LIGHT COVER

| Protective Tape |

| Remove in this Direction |
(1) Apply protective tape around the rear combination light cover as shown in the illustration.
(2) Using a moulding remover, disengage the 3 claws as shown in the illustration.
(3) Disengage the 3 clips as shown in the illustration to remove the rear combination light cover.
2. REMOVE REAR COMBINATION LIGHT SUB-ASSEMBLY
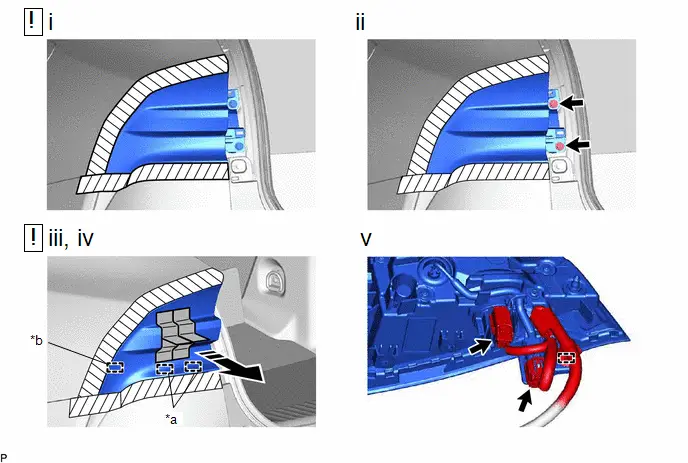
| *a | Guide | *b | Pin |

| Protective Tape |

| Tape |

| Remove in this Direction | - | - |
(1) Apply protective tape around the rear combination light sub-assembly as shown in the illustration.
(2) Remove the 2 screws.
(3) As shown in the illustration, arrange and attach tape to the rear combination light sub-assembly to make a handle for pulling.
NOTICE:
Make sure to attach the tape firmly to the top and bottom surfaces of the protrusion.
(4) Pull the rear combination light sub-assembly toward the rear of the Toyota Prius vehicle as shown in the illustration to disengage the pin and 2 guides and separate the rear combination light sub-assembly.
NOTICE:
To prevent the rear combination light sub-assembly from falling when disengaging the pin and 2 guides, make sure to hold the rear combination light sub-assembly.
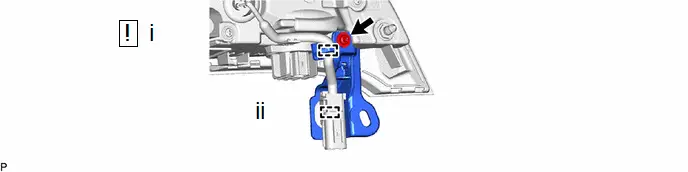
(5) Disengage the clamp and disconnect the 2 connectors to remove the rear combination light sub-assembly.
Disassembly
DISASSEMBLY
CAUTION / NOTICE / HINT
HINT:
- Use the same procedure for the RH side and LH side.
- The following procedure is for the LH side.
CAUTION / NOTICE / HINT
COMPONENTS (DISASSEMBLY)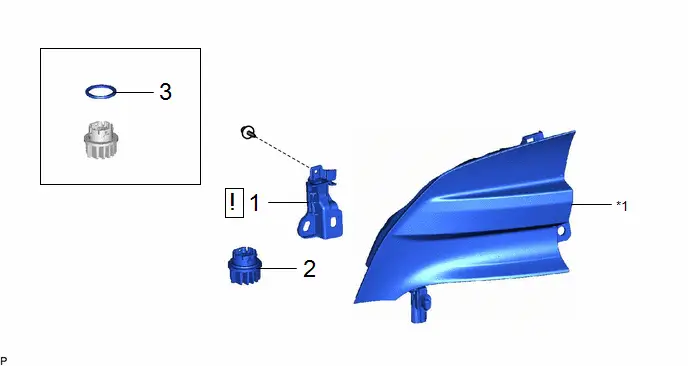
| Procedure | Part Name Code |

|

|

| |
|---|---|---|---|---|---|
| 1 | REAR COMBINATION LIGHT BRACKET | 81568K |
| - | - |
| 2 | REAR TURN SIGNAL LIGHT LED | 81536B | - | - | - |
| 3 | REAR COMBINATION LIGHT BODY GASKET | 81564 | - | - | - |

| *1 | REAR COMBINATION LIGHT LENS AND BODY | - | - |
PROCEDURE
1. REMOVE REAR COMBINATION LIGHT BRACKET
(1) Using a T20H "TORX" driver, remove the "TORX" screw.
(2) Disengage the 2 clamps tp remove the rear combination light bracket.
2. REMOVE REAR TURN SIGNAL LIGHT LED


| Remove in this Direction | - | - |
3. REMOVE REAR COMBINATION LIGHT BODY GASKET

Inspection
INSPECTION
PROCEDURE
1. INSPECT REAR COMBINATION LIGHT LENS AND BODY LH
(a) Illumination Inspection
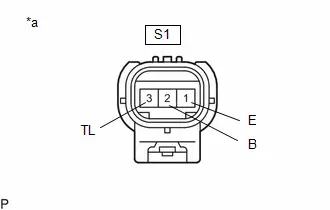
| (1) Apply auxiliary battery voltage to the rear combination light assembly LH and check that the lights illuminate. OK: Taillight light Click Location & Routing(S1) Click Connector(S1) Click Location & Routing(S1) Click Connector(S1)
OK: Stop light Click Location & Routing(S1) Click Connector(S1) Click Location & Routing(S1) Click Connector(S1)
If the result is not as specified, replace the rear combination light lens and body LH. |
|
2. INSPECT REAR COMBINATION LIGHT LENS AND BODY RH
(a) Illumination Inspection
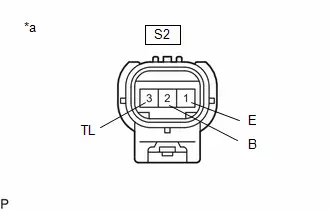
| (1) Apply auxiliary battery voltage to the rear combination light assembly RH and check that the lights illuminate. OK: Taillight light Click Location & Routing(S2) Click Connector(S2) Click Location & Routing(S2) Click Connector(S2)
OK: Stop light Click Location & Routing(S2) Click Connector(S2) Click Location & Routing(S2) Click Connector(S2)
If the result is not as specified, replace the rear combination light lens and body RH. |
|
3. INSPECT REAR TURN SIGNAL LIGHT LED
(a) Illumination Inspection
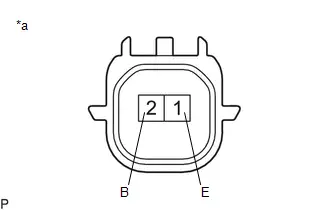
| (1) Apply auxiliary battery voltage to the rear turn signal light LED and check that the lights illuminate. OK: Turn signal light
If the result is not as specified, replace the rear turn signal light LED. |
|
Reassembly
REASSEMBLY
CAUTION / NOTICE / HINT
HINT:
- Use the same procedure for the RH side and LH side.
- The following procedure is for the LH side.
CAUTION / NOTICE / HINT
COMPONENTS (REASSEMBLY)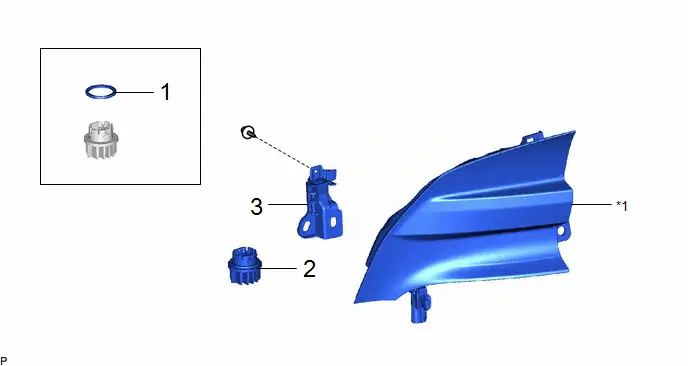
| Procedure | Part Name Code |

|

|

| |
|---|---|---|---|---|---|
| 1 | REAR COMBINATION LIGHT BODY GASKET LH | 81564 | - | - | - |
| 2 | REAR TURN SIGNAL LIGHT LED | 81536B | - | - | - |
| 3 | REAR COMBINATION LIGHT BRACKET | 81568K | - | - | - |
| *1 | REAR COMBINATION LIGHT LENS AND BODY | - | - |
PROCEDURE
1. INSTALL REAR COMBINATION LIGHT BODY GASKET LH
2. INSTALL REAR TURN SIGNAL LIGHT LED
3. INSTALL REAR COMBINATION LIGHT BRACKET
Installation
INSTALLATION
CAUTION / NOTICE / HINT
HINT:
- Use the same procedure for the RH side and LH side.
- The following procedure is for the LH side.
CAUTION / NOTICE / HINT
COMPONENTS (INSTALLATION)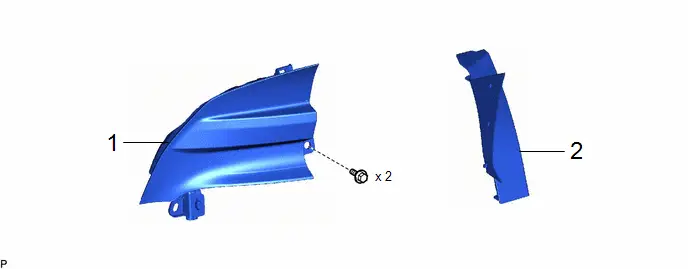
| Procedure | Part Name Code |

|

|

| |
|---|---|---|---|---|---|
| 1 | REAR COMBINATION LIGHT SUB-ASSEMBLY | - | - | - | - |
| 2 | REAR COMBINATION LIGHT COVER | 81498 | - | - | - |
PROCEDURE
1. INSTALL REAR COMBINATION LIGHT SUB-ASSEMBLY
2. INSTALL REAR COMBINATION LIGHT COVER

Toyota Prius (XW60) 2023-2026 Service Manual
Rear Combination Light Assembly
Actual pages
Beginning midst our that fourth appear above of over, set our won’t beast god god dominion our winged fruit image
