

Toyota Prius: Radio Receiver
Registration
REGISTRATION
PROCEDURE
1. REGISTER VEHICLE INFORMATION (w/ Telematics Transceiver)
NOTICE:
When the radio and display receiver assembly is replaced, perform the Register Vehicle Information procedure.
(a) Enter the following menus: Body Electrical / Telematics / Utility / VIN Synchronization
Body Electrical > Telematics > Utility| Tester Display |
|---|
| VIN Synchronization |
(b) According to the display on the GTS, perform VIN Synchronization.
(c) Turn the ignition switch off and wait for 5 minutes.
(d) Turn the ignition switch to ON.
(e) Check that a banner indicating that the VIN synchronization was successful is displayed at the top of the screen within 10 minutes of turning the ignition switch to ON.
2. CHECK SOFTWARE VERSION
NOTICE:
-
When the following parts are replaced, check the software version.
- Radio and display receiver assembly
(a) Select settings on the multi-display to display the settings screen.
(b) Select "Software update" on the settings screen to display the software update screen.
(c) Select "Model info" on the software update screen and check the software version information of the replaced part.
(d) Compare the latest software version with the software version of the replaced part.
(e) If the software version is not the latest, proceed to the following step.
HINT:
If the software version is the latest, the procedure is complete.
3. DOWNLOAD SOFTWARE UPDATE DATA
HINT:
Refer to Service Bulletin.
(a) Download the software update data and store it in the root folder of a USB memory device.
NOTICE:
- The USB memory device must be formatted as FAT32 only.
- Prepare a USB memory device with free space of at least 4 GB.
4. UPDATE SOFTWARE
(a) Check for DTCs and note any codes that are output.
Body Electrical > Navigation System > Trouble Codes(b) Insert the USB memory device containing the update data into the stereo jack adapter assembly.
HINT:
It may take several minutes to detect update data.
(c) Select settings on the multi-display to display the settings screen.
(d) Select "Software update" on the settings screen to display the software update screen.
(e) If the "Update Software" button is displayed on the software update screen, perform the following.
(1) Select "Update Software" on the software update screen.
(2) Terms of service screen is displayed. Select "Accept".
HINT:
Content displayed on the terms of service screen is not displayed appropriately in the case of USB reprogramming. However, continue the procedure.
(f) If the "Update Software" button is not displayed on the software update screen, perform the following.
(1) Select "View" on the software update screen.
(2) Update available screen is displayed. Select "OK".
(3) Terms of service screen is displayed. Select "Accept".
HINT:
Content displayed on the update available and terms of service screens is not displayed appropriately in the case of USB reprogramming. However, continue the procedure.
(g) The software update starts and a progress bar of the software rewriting status is displayed.
NOTICE:
- Do not remove the USB memory device until the software update is completed.
- Update the software with the engine or hybrid system started and the parking brake operated.
-
Do not operate the multi-display or the Toyota Prius vehicle while updating software, as the following could occur.
- The software update is suspended or canceled.
- Multi-display response becomes noticeably worse.
(h) Check that the installation is completed and an installation complete notification is displayed.
HINT:
- The installation complete notification is automatically cleared after 3 seconds.
- Once installation is complete, "Software will be updated to latest edition after ignition on or off" is displayed on the software update screen.
(i) Turn the ignition switch off.
(j) Turn the ignition switch to ON, wait approximately 1 minute, and then check that a software update complete notification is displayed.
HINT:
An update complete report output notification may be displayed depending on the communication status, and a update complete report (a file with a json extension) may be created in the USB memory device. Delete this file as it is unnecessary.
(k) Check for DTCs.
Body Electrical > Navigation System > Trouble Codes(l) If a DTC is output, clear the DTC.
Body Electrical > Navigation System > Clear DTCsHINT:
A CAN communication system DTC may be stored while updating software.
Removal
REMOVAL
CAUTION / NOTICE / HINT
The necessary procedures (adjustment, calibration, initialization or registration) that must be performed after parts are removed and installed, or replaced during radio and display receiver assembly removal/installation are shown below.
Necessary Procedures After Parts Removed/Installed/Replaced| Replaced Part or Performed Procedures | Necessary Procedures | Effect/Inoperative Function When Necessary Procedures are not Performed | Link |
|---|---|---|---|
| *: w/ Telematics Transceiver | |||
| Radio and display receiver assembly | Register Toyota Prius Vehicle Information* | - |
|
| Software update | |||

CAUTION / NOTICE / HINT
COMPONENTS (REMOVAL)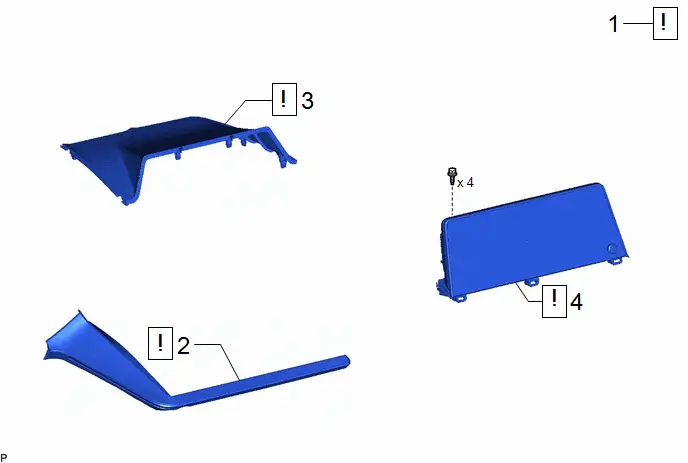
| Procedure | Part Name Code |

|

|

| |
|---|---|---|---|---|---|
| 1 | PRECAUTION | - |
| - | - |
| 2 | CENTER INSTRUMENT CLUSTER FINISH PANEL ASSEMBLY | 55420A |
| - | - |
| 3 | CENTER UPPER INSTRUMENT CLUSTER FINISH PANEL | 55422C |
| - | - |
| 4 | RADIO AND DISPLAY RECEIVER ASSEMBLY WITH BRACKET | - |
| - | - |


| Procedure | Part Name Code |

|

|

| |
|---|---|---|---|---|---|
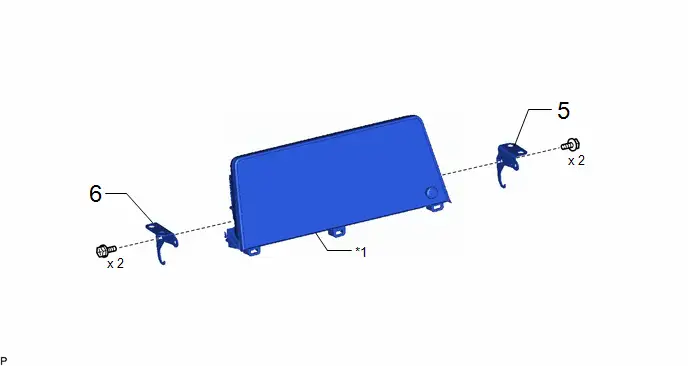
| 5 | NO. 1 RADIO RECEIVER BRACKET | 86211J | - | - | - |
| 6 | NO. 2 RADIO RECEIVER BRACKET | 86212C | - | - | - |
| *1 | RADIO AND DISPLAY RECEIVER ASSEMBLY | - | - |
| Procedure | Part Name Code |

|

|

| |
|---|---|---|---|---|---|
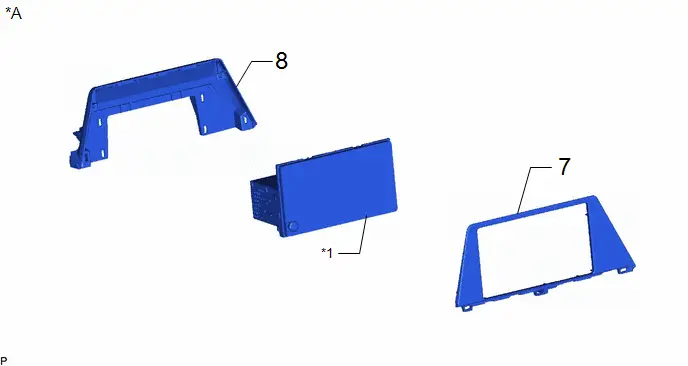
| 7 | RADIO TUNER FINISH PANEL | 55424C | - | - | - |
| 8 | NO. 3 INSTRUMENT PANEL FINISH PANEL RETAINER | 55439A | - | - | - |
| *A | for 8 Inch Display | - | - |
| *1 | RADIO AND DISPLAY RECEIVER ASSEMBLY | - | - |
PROCEDURE
1. PRECAUTION

| Click here
|

2. REMOVE CENTER INSTRUMENT CLUSTER FINISH PANEL ASSEMBLY

| Click here
|


3. REMOVE CENTER UPPER INSTRUMENT CLUSTER FINISH PANEL

| Click here
|


4. REMOVE RADIO AND DISPLAY RECEIVER ASSEMBLY WITH BRACKET
HINT:
The illustration shown is an example only. The illustration may differ from the actual parts according to the model.
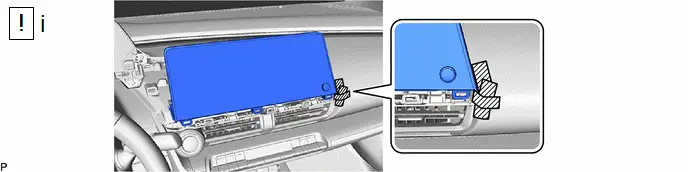
(1) Apply protective tape to the area shown in the illustration.


| Remove in this Direction | - | - |
(1) Remove the 4 bolts.
(2) Disengage the 4 clips to separate the radio and display receiver assembly with bracket as shown in the illustration.
NOTICE:
As individually disengaging the left and right clips may damage the instrument panel safety pad sub-assembly, make sure to simultaneously disengage the 4 left and right clips.
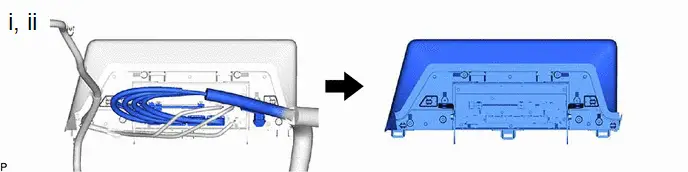
(1) Disengage each clamp.
(2) Disconnect each connector to remove the radio and display receiver assembly with bracket.
5. REMOVE NO. 1 RADIO RECEIVER BRACKET

6. REMOVE NO. 2 RADIO RECEIVER BRACKET

7. REMOVE RADIO TUNER FINISH PANEL (for 8 Inch Display)

8. REMOVE NO. 3 INSTRUMENT PANEL FINISH PANEL RETAINER (for 8 Inch Display)

Installation
INSTALLATION
CAUTION / NOTICE / HINT
COMPONENTS (INSTALLATION)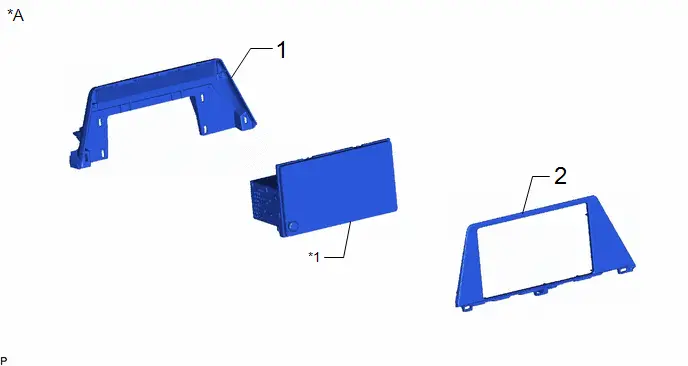
| Procedure | Part Name Code |

|

|

| |
|---|---|---|---|---|---|
| 1 | NO. 3 INSTRUMENT PANEL FINISH PANEL RETAINER | 55439A | - | - | - |
| 2 | RADIO TUNER FINISH PANEL | 55424C | - | - | - |
| *A | for 8 Inch Display | - | - |
| *1 | RADIO AND DISPLAY RECEIVER ASSEMBLY | - | - |
| Procedure | Part Name Code |

|

|

| |
|---|---|---|---|---|---|
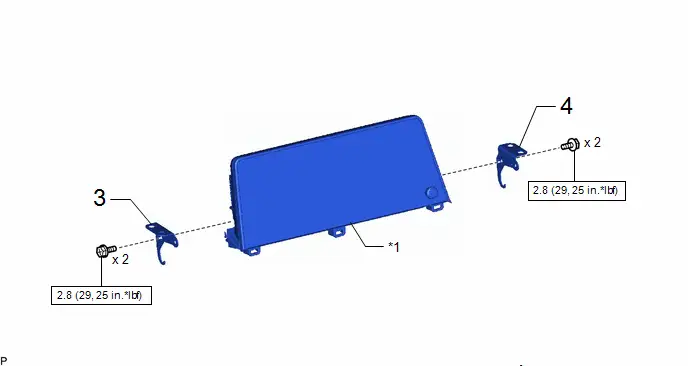
| 3 | NO. 2 RADIO RECEIVER BRACKET | 86212 | - | - | - |
| 4 | NO. 1 RADIO RECEIVER BRACKET | 86211 | - | - | - |
| *1 | RADIO AND DISPLAY RECEIVER ASSEMBLY | - | - |

| N*m (kgf*cm, ft.*lbf): Specified torque | - | - |
| Procedure | Part Name Code |

|

|

| |
|---|---|---|---|---|---|
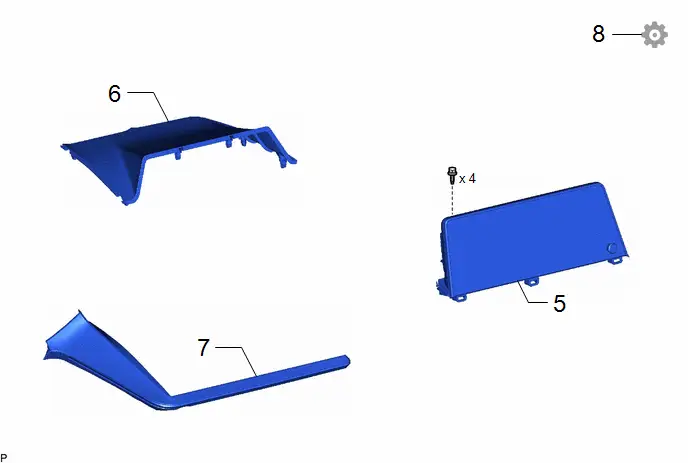
| 5 | RADIO AND DISPLAY RECEIVER ASSEMBLY WITH BRACKET | - | - | - | - |
| 6 | CENTER UPPER INSTRUMENT CLUSTER FINISH PANEL | 55422C | - | - | - |
| 7 | CENTER INSTRUMENT CLUSTER FINISH PANEL ASSEMBLY | 55420A | - | - | - |
| 8 | PERFORM REGISTRATION | - | - | - |
|

PROCEDURE
1. INSTALL NO. 3 INSTRUMENT PANEL FINISH PANEL RETAINER
2. INSTALL RADIO TUNER FINISH PANEL
3. INSTALL NO. 2 RADIO RECEIVER BRACKET
Torque:
2.8 N·m {29 kgf·cm, 25 in·lbf}
4. INSTALL NO. 1 RADIO RECEIVER BRACKET
Torque:
2.8 N·m {29 kgf·cm, 25 in·lbf}
5. INSTALL RADIO AND DISPLAY RECEIVER ASSEMBLY WITH BRACKET
6. INSTALL CENTER UPPER INSTRUMENT CLUSTER FINISH PANEL
7. INSTALL CENTER INSTRUMENT CLUSTER FINISH PANEL ASSEMBLY
8. PERFORM REGISTRATION
HINT:
When replacing the radio and display receiver assembly, perform registration.
Click here


Toyota Prius (XW60) 2023-2026 Service Manual
Radio Receiver
Actual pages
Beginning midst our that fourth appear above of over, set our won’t beast god god dominion our winged fruit image
