

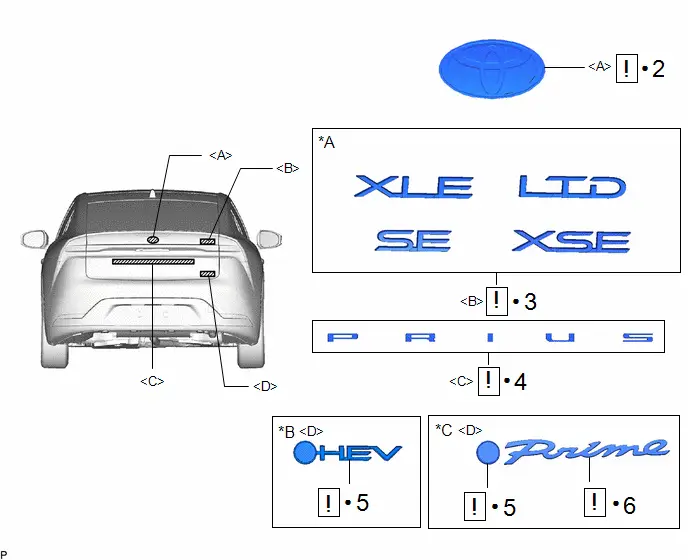
Toyota Prius: Name Plate
Removal
REMOVAL
CAUTION / NOTICE / HINT
COMPONENTS (REMOVAL)
| Procedure | Part Name Code |

|

|

| |
|---|---|---|---|---|---|
| 1 | RADIATOR GRILLE (OR FRONT PANEL) EMBLEM | 75311 |
| - | - |

| ● | Non-reusable part | - | - |
| Procedure | Part Name Code |

|

|

| |
|---|---|---|---|---|---|
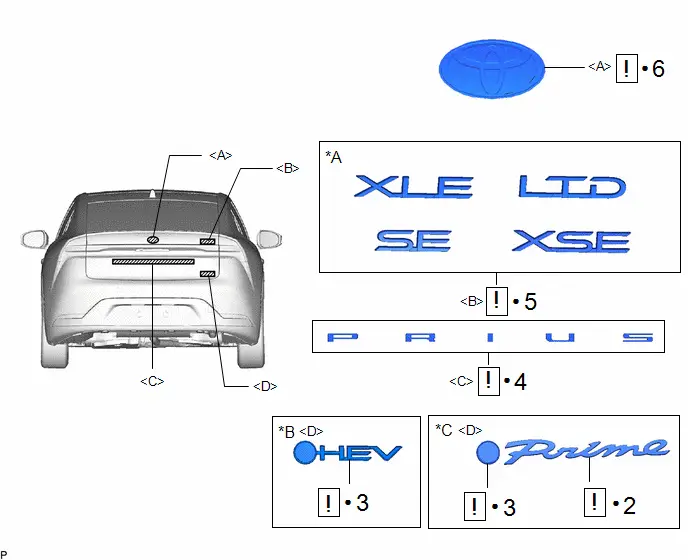
| 2 | NO. 1 BACK DOOR EMBLEM | 75431A |
| - | - |
| 3 | NO. 4 BACK DOOR NAME PLATE | 75444A |
| - | - |
| 4 | NO. 1 BACK DOOR NAME PLATE | 75441E |
| - | - |
| 5 | NO. 3 BACK DOOR EMBLEM | 75443 |
| - | - |
| 6 | NO. 2 BACK DOOR NAME PLATE | 75442A |
| - | - |


| *A | w/ No. 4 Back Door Name Plate | *B | for HEV Model |
| *C | for PHEV Model | - | - |
| ● | Non-reusable part | - | - |
| Procedure | Part Name Code |

|

|

| |
|---|---|---|---|---|---|
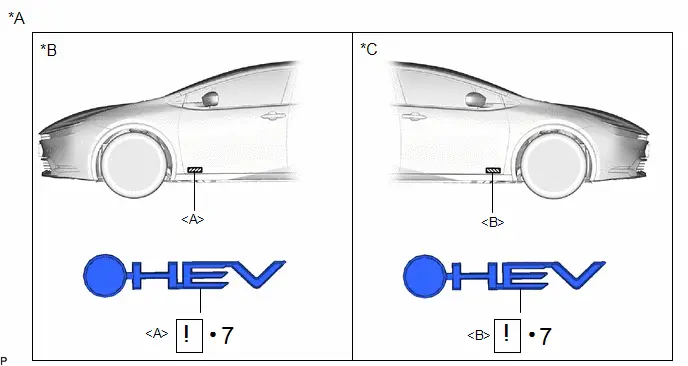
| 7 | SIDE PANEL EMBLEM | 75374 |
| - | - |

| *A | w/ Side Panel Emblem | *B | for LH Side |
| *C | for RH Side | - | - |
| ● | Non-reusable part | - | - |
PROCEDURE
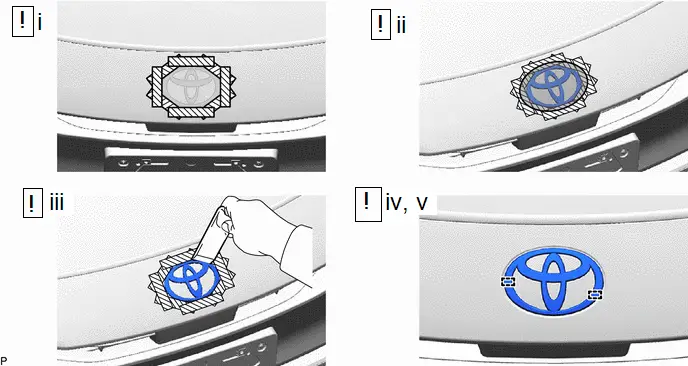
1. REMOVE RADIATOR GRILLE (OR FRONT PANEL) EMBLEM

| Heated Part | - | - |
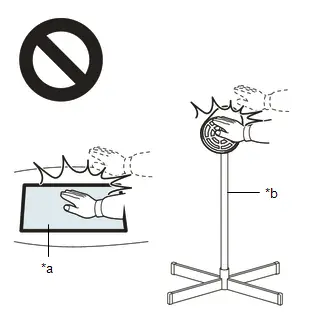
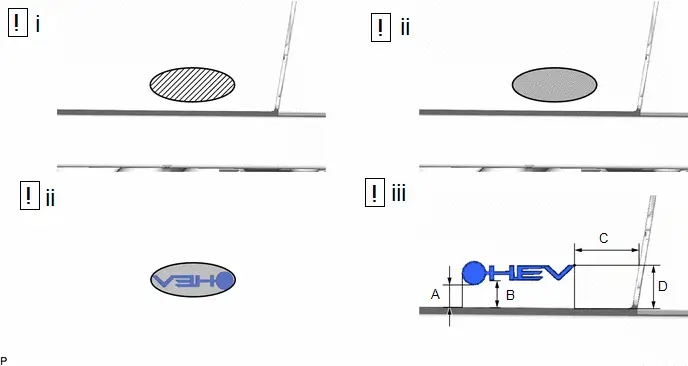
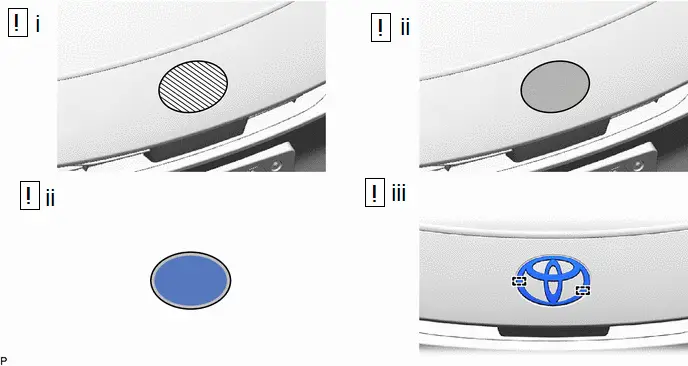
(1) Apply protective tape around the radiator grille (or front panel) emblem as shown in the illustration.
(2) Using a heat light, heat the front bumper cover and radiator grille (or front panel) emblem.
CAUTION:
- Do not touch the heat light and heated parts, touching the heat light may result in burns.
- Touching heated parts for a long time may result in burns.

| *a | Heated Part |
| *b | Heat Light |
NOTICE:
Do not heat the front bumper cover and radiator grille (or front panel) emblem excessively.
Standard:
| Item | Temperature |
|---|---|
| Front Bumper Cover | 20 to 30 °C (68 to 86 °F) |
(3) Using a moulding remover, separate the double-sided tape and disengage the 2 pins to remove the radiator grille (or front panel) emblem.
NOTICE:
Be careful not to damage the front bumper cover.
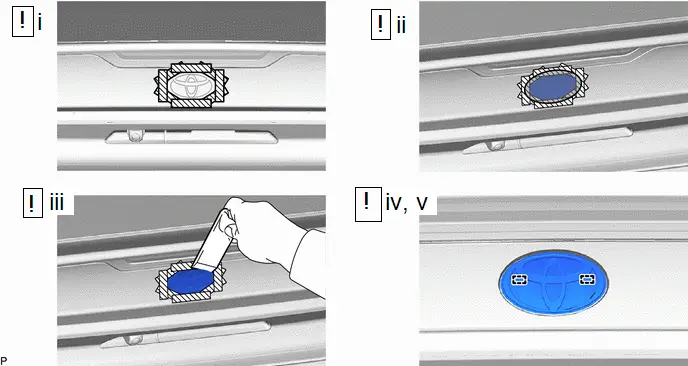
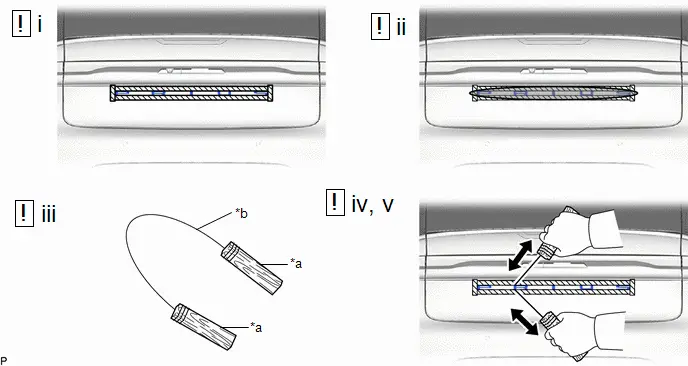
2. REMOVE NO. 1 BACK DOOR EMBLEM

| Heated Part | - | - |
(1) Apply protective tape around the No. 1 back door emblem as shown in the illustration.
(2) Using a heat light, heat the rear light assembly and No. 1 back door emblem.
CAUTION:
- Do not touch the heat light and heated parts, touching the heat light may result in burns.
- Touching heated parts for a long time may result in burns.
| *a | Heated Part |
| *b | Heat Light |
NOTICE:
Do not heat the rear light assembly or No. 1 back door emblem excessively.
Standard:
| Item | Temperature |
|---|---|
| Rear Light Assembly | 20 to 30 °C (68 to 86 °F) |
(3) Tie objects that can serve as handles (for example, wooden blocks) to both wire ends.
(4) Insert a piano wire between the rear light assembly and No. 1 back door emblem.
(5) Pull the piano wire and cut the double-sided tape that holds the No. 1 back door emblem to the rear light assembly.
NOTICE:
Be careful not to damage the rear light assembly.
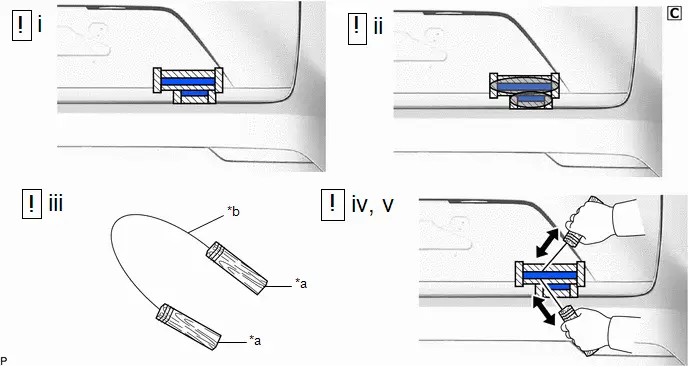
3. REMOVE NO. 4 BACK DOOR NAME PLATE (w/ No. 4 Back Door Name Plate)

| *a | Wooden Blocks | *b | Piano Wire |

| Heated Part |

| Protective Tape |
(1) Apply protective tape around the No. 4 back door name plate as shown in the illustration.
(2) Using a heat light, heat the rear light assembly and No. 4 back door name plate.
CAUTION:
- Do not touch the heat light and heated parts, touching the heat light may result in burns.
- Touching heated parts for a long time may result in burns.

| *a | Heated Part |
| *b | Heat Light |
NOTICE:
Do not heat the rear light assembly or No. 4 back door name plate excessively.
Standard:
| Item | Temperature |
|---|---|
| Rear Light Assembly | 20 to 30 °C (68 to 86 °F) |
(3) Tie objects that can serve as handles (for example, wooden blocks) to both wire ends.
(4) Insert a piano wire between the rear light assembly and No. 4 back door name plate.
(5) Pull the piano wire and cut the double-sided tape that holds the No. 4 back door name plate to the rear light assembly.
NOTICE:
Be careful not to damage the rear light assembly.
4. REMOVE NO. 1 BACK DOOR NAME PLATE
| *a | Wooden Blocks | *b | Piano Wire |

| Heated Part |

| Protective Tape |
(1) Apply protective tape around the No. 1 back door name plate as shown in the illustration.
(2) Using a heat light, heat the back door panel and No. 1 back door name plate.
CAUTION:
- Do not touch the heat light and heated parts, touching the heat light may result in burns.
- Touching heated parts for a long time may result in burns.

| *a | Heated Part |
| *b | Heat Light |
NOTICE:
Do not heat the back door panel or No. 1 back door name plate excessively.
Standard:
| Item | Temperature |
|---|---|
| Back Door Panel | 40 to 60°C (104 to 140°F) |
(3) Tie objects that can serve as handles (for example, wooden blocks) to both wire ends.
(4) Insert a piano wire between the back door panel and No. 1 back door name plate.
(5) Pull the piano wire and cut the double-sided tape that holds the No. 1 back door name plate to the back door panel.
NOTICE:
Be careful not to damage the back door panel.
5. REMOVE NO. 3 BACK DOOR EMBLEM

| *a | Wooden Blocks | *b | Piano Wire |

| Heated Part |

| Protective Tape |
(1) Apply protective tape around the No. 3 back door emblem as shown in the illustration.
(2) Using a heat light, heat the back door panel and No. 3 back door emblem.
CAUTION:
- Do not touch the heat light and heated parts, touching the heat light may result in burns.
- Touching heated parts for a long time may result in burns.

| *a | Heated Part |
| *b | Heat Light |
NOTICE:
Do not heat the back door panel or emblem excessively.
Standard:
| Item | Temperature |
|---|---|
| Back Door Panel | 40 to 60°C (104 to 140°F) |
(3) Tie objects that can serve as handles (for example, wooden blocks) to both wire ends.
(4) Insert a piano wire between the back door panel and No. 3 back door emblem.
(5) Pull the piano wire and cut the double-sided tape that holds the No. 3 back door emblem to the back door panel.
NOTICE:
Be careful not to damage the back door panel.
6. REMOVE NO. 2 BACK DOOR NAME PLATE (for PHEV Model)
| *a | Wooden Blocks | *b | Piano Wire |

| Heated Part |

| Protective Tape |
(1) Apply protective tape around the No. 2 back door name plate as shown in the illustration.
(2) Using a heat light, heat the back door panel and No. 2 back door name plate.
CAUTION:
- Do not touch the heat light and heated parts, touching the heat light may result in burns.
- Touching heated parts for a long time may result in burns.

| *a | Heated Part |
| *b | Heat Light |
NOTICE:
Do not heat the back door panel or emblem excessively.
Standard:
| Item | Temperature |
|---|---|
| Back Door Panel | 40 to 60°C (104 to 140°F) |
(3) Tie objects that can serve as handles (for example, wooden blocks) to both wire ends.
(4) Insert a piano wire between the back door panel and No. 2 back door name plate.
(5) Pull the piano wire and cut the double-sided tape that holds the No. 2 back door name plate to the back door panel.
NOTICE:
Be careful not to damage the back door panel.
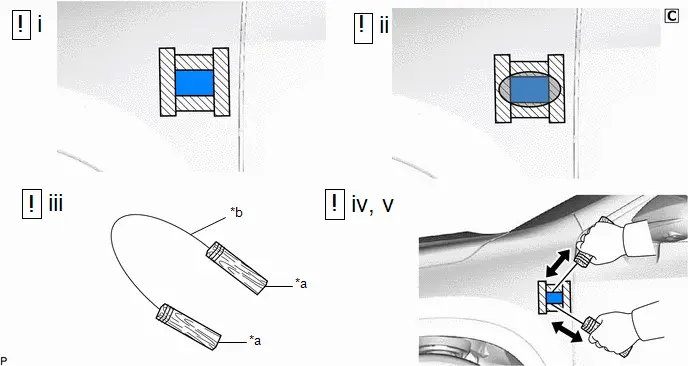
7. REMOVE SIDE PANEL EMBLEM (w/ Side Panel Emblem)
HINT:
Use the same procedure for the RH side and LH side.
| *a | Wooden Blocks | *b | Piano Wire |

| Heated Part |

| Protective Tape |
(1) Apply protective tape around the side panel emblem as shown in the illustration.
(2) Using a heat light, heat the front door panel and side panel emblem.
CAUTION:
- Do not touch the heat light and heated parts, touching the heat light may result in burns.
- Touching heated parts for a long time may result in burns.

| *a | Heated Part |
| *b | Heat Light |
NOTICE:
Do not heat the front door panel or side panel emblem excessively.
Standard:
| Item | Temperature |
|---|---|
| Front Door Panel | 40 to 60°C (104 to 140°F) |
(3) Tie objects that can serve as handles (for example, wooden blocks) to both wire ends.
(4) Insert a piano wire between the front door panel and front side panel emblem.
(5) Pull the piano wire and cut the double-sided tape that holds the side panel emblem to the front door panel.
NOTICE:
Be careful not to damage the front door panel.
Installation
INSTALLATION
CAUTION / NOTICE / HINT
COMPONENTS (INSTALLATION)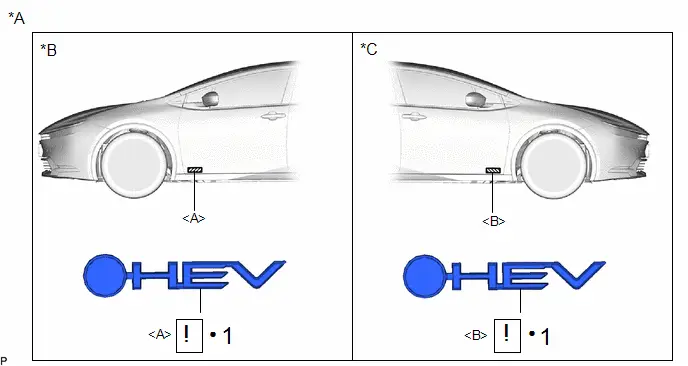
| Procedure | Part Name Code |

|

|

| |
|---|---|---|---|---|---|
| 1 | SIDE PANEL EMBLEM | 75374 |
| - | - |

| *A | w/ Side Panel Emblem | *B | for LH Side |
| *C | for RH Side | - | - |
| ● | Non-reusable part | - | - |
| Procedure | Part Name Code |

|

|

| |
|---|---|---|---|---|---|
| 2 | NO. 2 BACK DOOR NAME PLATE | 75442A |
| - | - |
| 3 | NO. 3 BACK DOOR EMBLEM | 75443 |
| - | - |
| 4 | NO. 1 BACK DOOR NAME PLATE | 75441E |
| - | - |
| 5 | NO. 4 BACK DOOR NAME PLATE | 75444A |
| - | - |
| 6 | NO. 1 BACK DOOR EMBLEM | 75431A |
| - | - |


| *A | w/ No. 4 Back Door Name Plate | *B | for HEV Model |
| *C | for PHEV Model | - | - |
| ● | Non-reusable part | - | - |
| Procedure | Part Name Code |

|

|

| |
|---|---|---|---|---|---|
| 7 | RADIATOR GRILLE (OR FRONT PANEL) EMBLEM | 75311 |
| - | - |

| ● | Non-reusable part | - | - |
PROCEDURE
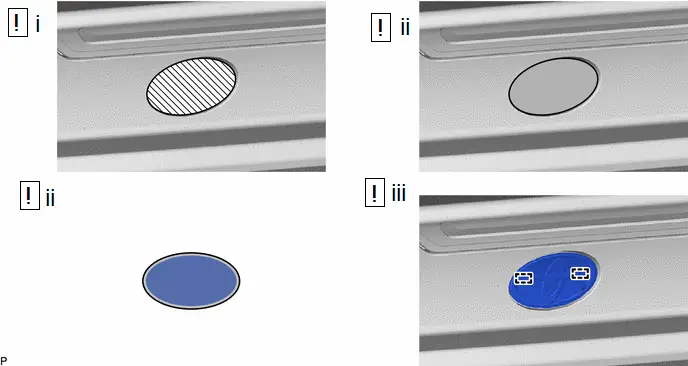
1. INSTALL SIDE PANEL EMBLEM (w/ Side Panel Emblem)
(a) for LH Side:


| Cleaning Area |

| Heating Area |
Standard Measurement:
| Area | Measurement | Area | Measurement |
|---|---|---|---|
| A | 19.5 mm (0.768 in.) | B | 52.1 mm (2.05 in.) |
| C | 23.2 mm (0.913 in.) | D | 36.7 mm (1.44 in.) |
(1) Clean the front door panel surface.
1. Using a heat light, heat the double-sided tape remaining on the front door panel and side panel emblem.
Heating Temperature| Area | Temperature | Area | Temperature |
|---|---|---|---|
| Front Door Panel | 40 to 60°C (104 to 140°F) | Side Panel Emblem | 20 to 30 °C (68 to 86 °F) |
CAUTION:
- Do not touch the heat light and heated parts, touching the heat light may result in burns.
- Touching heated parts for a long time may result in burns.

| *a | Heated Part |
| *b | Heat Light |
NOTICE:
Do not heat the front door panel excessively.
2. Remove any remaining double-sided tape from the front door panel.
3. Wipe off any tape adhesive residue with cleaner.
(2) Using a heat light, heat the front door panel and a new side panel emblem.
(3) Install a new side panel emblem.
1. Using a heat light, heat the front door panel surface.
2. Remove the release paper from the side panel emblem.
HINT:
After removing the release paper, keep the exposed adhesive free from foreign matter.
3. Install the side panel emblem as shown in the illustration.
HINT:
Press the side panel emblem firmly to install it.
(b) for RH Side:

| Cleaning Area |

| Heating Area |
Standard Measurement:
| Area | Measurement | Area | Measurement |
|---|---|---|---|
| A | 18.8 mm (0.74 in.) | B | 22.9 mm (0.902 in.) |
| C | 54.8 mm (2.16 in.) | D | 37.6 mm (1.48 in.) |
(1) Clean the front door panel surface.
1. Using a heat light, heat the double-sided tape remaining on the front door panel and side panel emblem.
Heating Temperature| Area | Temperature | Area | Temperature |
|---|---|---|---|
| Front Door Panel | 40 to 60°C (104 to 140°F) | Side Panel Emblem | 20 to 30 °C (68 to 86 °F) |
CAUTION:
- Do not touch the heat light and heated parts, touching the heat light may result in burns.
- Touching heated parts for a long time may result in burns.

| *a | Heated Part |
| *b | Heat Light |
NOTICE:
Do not heat the front door panel excessively.
2. Remove any remaining double-sided tape from the front door panel.
3. Wipe off any tape adhesive residue with cleaner.
(2) Using a heat light, heat the front door panel and a new side panel emblem.
(3) Install a new side panel emblem.
1. Using a heat light, heat the front door panel surface.
2. Remove the release paper from the side panel emblem.
HINT:
After removing the release paper, keep the exposed adhesive free from foreign matter.
3. Install the side panel emblem as shown in the illustration.
HINT:
Press the side panel emblem firmly to install it.
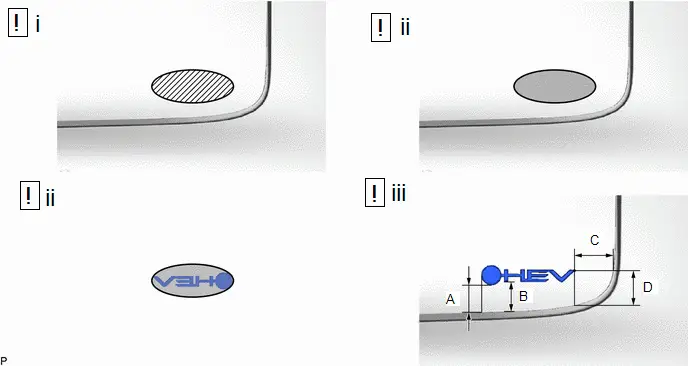
2. INSTALL NO. 2 BACK DOOR NAME PLATE (for PHEV Model)

| Cleaning Area |

| Heating Area |
Standard Measurement:
| Area | Measurement | Area | Measurement |
|---|---|---|---|
| A | 29.8 mm (1.17 in.) | B | 39.5 mm (1.56 in.) |
| C | 28.7 mm (1.13 in.) | - | - |
(1) Clean the back door panel surface.
1. Using a heat light, heat the double-sided tape remaining on the back door panel and No. 2 back door name plate.
Heating Temperature| Area | Temperature | Area | Temperature |
|---|---|---|---|
| Back Door Panel | 40 to 60°C (104 to 140°F) | No. 2 Back Door Name Plate | 20 to 30 °C (68 to 86 °F) |
CAUTION:
- Do not touch the heat light and heated parts, touching the heat light may result in burns.
- Touching heated parts for a long time may result in burns.

| *a | Heated Part |
| *b | Heat Light |
NOTICE:
Do not heat the back door panel excessively.
2. Remove any remaining double-sided tape from the back door panel.
3. Wipe off any tape adhesive residue with cleaner.
(2) Using a heat light, heat the back door panel and a new No. 2 back door name plate.
(3) Install a new No. 2 back door name plate.
1. Using a heat light, heat the back door panel surface.
2. Remove the release paper from the No. 2 back door name plate.
HINT:
After removing the release paper, keep the exposed adhesive free from foreign matter.
3. Install the No. 2 back door name plate as shown in the illustration.
HINT:
Press the No. 2 back door name plate firmly to install it.
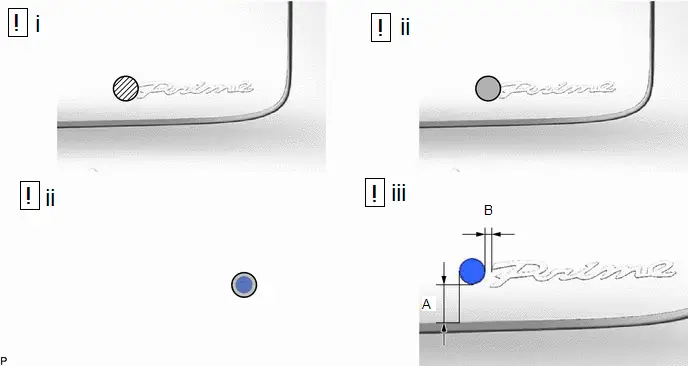
3. INSTALL NO. 3 BACK DOOR EMBLEM
(a) for HEV Model:

| Cleaning Area |

| Heating Area |
Standard Measurement:
| Area | Measurement | Area | Measurement |
|---|---|---|---|
| A | 30.2 mm (1.19 in.) | B | 33 mm (1.3 in.) |
| C | 39.7 mm (1.56 in.) | D | 39 mm (1.54 in.) |
(1) Clean the back door panel surface.
1. Using a heat light, heat the double-sided tape remaining on the back door panel and No. 3 back door emblem.
Heating Temperature| Area | Temperature | Area | Temperature |
|---|---|---|---|
| Back Door Panel | 40 to 60°C (104 to 140°F) | No. 3 Back Door Emblem | 20 to 30 °C (68 to 86 °F) |
CAUTION:
- Do not touch the heat light and heated parts, touching the heat light may result in burns.
- Touching heated parts for a long time may result in burns.

| *a | Heated Part |
| *b | Heat Light |
NOTICE:
Do not heat the back door panel excessively.
2. Remove any remaining double-sided tape from the back door panel.
3. Wipe off any tape adhesive residue with cleaner.
(2) Using a heat light, heat the back door panel and a new No. 3 back door emblem.
(3) Install a new No. 3 back door emblem.
1. Using a heat light, heat the back door panel surface.
2. Remove the release paper from the No. 3 back door emblem.
HINT:
After removing the release paper, keep the exposed adhesive free from foreign matter.
3. Install the No. 3 back door emblem as shown in the illustration.
HINT:
Press the No. 3 back door emblem firmly to install it.
(b) for PHEV Model:

| Cleaning Area |

| Heating Area |
Standard Measurement:
| Area | Measurement | Area | Measurement |
|---|---|---|---|
| A | 31.6 mm (1.24 in.) | B | 4.9 mm (0.193 in.) |
(1) Clean the back door panel surface.
1. Using a heat light, heat the double-sided tape remaining on the back door panel and No. 3 back door emblem.
Heating Temperature| Area | Temperature | Area | Temperature |
|---|---|---|---|
| Back Door Panel | 40 to 60°C (104 to 140°F) | No. 3 Back Door Emblem | 20 to 30 °C (68 to 86 °F) |
CAUTION:
- Do not touch the heat light and heated parts, touching the heat light may result in burns.
- Touching heated parts for a long time may result in burns.

| *a | Heated Part |
| *b | Heat Light |
NOTICE:
Do not heat the back door panel excessively.
2. Remove any remaining double-sided tape from the back door panel.
3. Wipe off any tape adhesive residue with cleaner.
(2) Using a heat light, heat the back door panel and a new No. 3 back door emblem.
(3) Install a new No. 3 back door emblem.
1. Using a heat light, heat the back door panel surface.
2. Remove the release paper from the No. 3 back door emblem.
HINT:
After removing the release paper, keep the exposed adhesive free from foreign matter.
3. Install the No. 3 back door emblem as shown in the illustration.
HINT:
Press the No. 3 back door emblem firmly to install it.
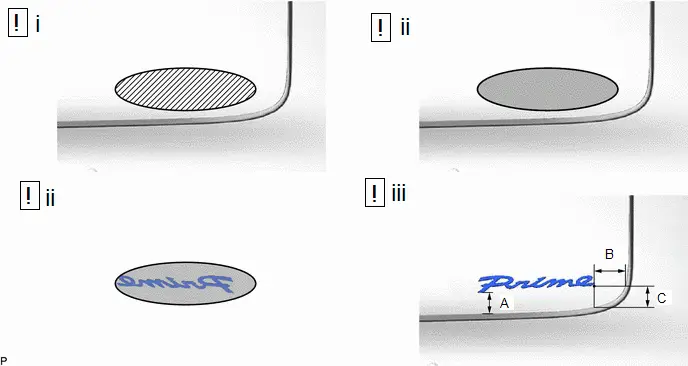
4. INSTALL NO. 1 BACK DOOR NAME PLATE


| Cleaning Area |

| Heating Area |
(1) Clean the back door panel surface.
1. Using a heat light, heat the double-sided tape remaining on the back door panel and No. 1 back door name plate.
Heating Temperature| Area | Temperature | Area | Temperature |
|---|---|---|---|
| Back Door Panel | 40 to 60°C (104 to 140°F) | No. 1 Back Door Name Plate | 20 to 30 °C (68 to 86 °F) |
CAUTION:
- Do not touch the heat light and heated parts, touching the heat light may result in burns.
- Touching heated parts for a long time may result in burns.

| *a | Heated Part |
| *b | Heat Light |
NOTICE:
Do not heat the back door panel excessively.
2. Remove any remaining double-sided tape from the back door panel.
3. Wipe off any tape adhesive residue with cleaner.
(2) Using a heat light, heat the back door panel and a new No. 1 back door name plate.
(b) Install a new No. 1 back door name plate.
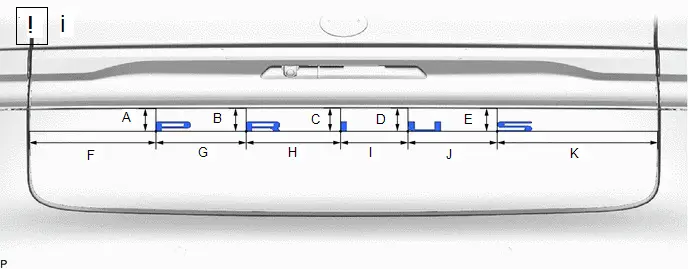
Standard Measurement:
| Area | Measurement | Area | Measurement |
|---|---|---|---|
| A | 35.8 mm (1.41 in.) | B | 36.2 mm (1.43 in.) |
| C | 36.4 mm (1.43 in.) | D | 36.3 mm (1.43 in.) |
| E | 36 mm (1.42 in.) | F | 213.6 mm (8.41 in.) |
| G | 152.6 mm (6.01 in.) | H | 159.6 mm (6.28 in.) |
| I | 114.8 mm (4.52 in.) | J | 150.1 mm (5.91 in.) |
| K | 272.1 mm (10.7 in.) | - | - |
(1) 1. Using a heat light, heat the back door panel surface.
2. Remove the release paper from the No. 1 back door name plate.
HINT:
After removing the release paper, keep the exposed adhesive free from foreign matter.
3. Install the No. 1 back door name plate as shown in the illustration.
HINT:
Press the No. 1 back door name plate firmly to install it.
5. INSTALL NO. 4 BACK DOOR NAME PLATE (w/ No. 4 Back Door Name Plate)
(a) for XLE Plate:
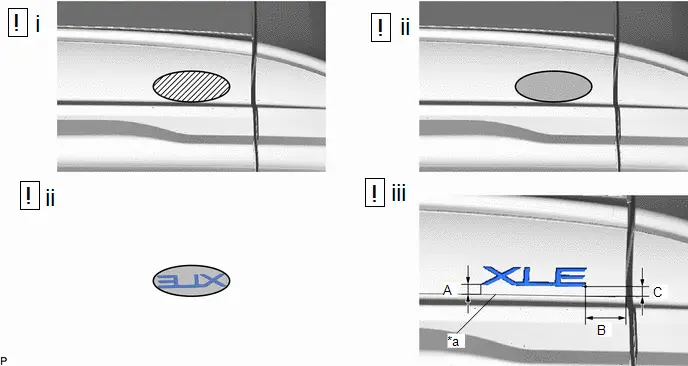
| *a | R End | - | - |

| Cleaning Area |

| Heating Area |
Standard Measurement:
| Area | Measurement | Area | Measurement |
|---|---|---|---|
| A | 6.7 mm (0.264 in.) | B | 36.9 mm (1.45 in.) |
| C | 7.1 mm (0.28 in.) | - | - |
(1) Clean the No. 4 back door name plate surface.
1. Using a heat light, heat the double-sided tape remaining on the rear light assembly and No. 4 back door name plate.
Heating Temperature| Area | Temperature | Area | Temperature |
|---|---|---|---|
| Rear Light Assembly | 20 to 30 °C (68 to 86 °F) | No. 4 Back Door Name Plate | 20 to 30 °C (68 to 86 °F) |
CAUTION:
- Do not touch the heat light and heated parts, touching the heat light may result in burns.
- Touching heated parts for a long time may result in burns.

| *a | Heated Part |
| *b | Heat Light |
NOTICE:
Do not heat the back door name plate excessively.
2. Remove any remaining double-sided tape from the rear light assembly.
3. Wipe off any tape adhesive residue with cleaner.
(2) Using a heat light, heat the rear light assembly and a new No. 4 back door name plate.
(3) Install a new No. 4 back door name plate.
1. Using a heat light, heat the back door name plate surface.
2. Remove the release paper from the No. 4 back door name plate.
HINT:
After removing the release paper, keep the exposed adhesive free from foreign matter.
3. Install the No. 4 back door name plate as shown in the illustration.
HINT:
Press the No. 2 back door emblem firmly to install it.
(b) for LTD Plate:

| *a | R End | - | - |

| Cleaning Area |

| Heating Area |
Standard Measurement:
| Area | Measurement | Area | Measurement |
|---|---|---|---|
| A | 6.7 mm (0.264 in.) | B | 36.9 mm (1.45 in.) |
| C | 7.1 mm (0.28 in.) | - | - |
(1) Clean the No. 4 back door name plate surface.
1. Using a heat light, heat the double-sided tape remaining on the rear light assembly and No. 4 back door name plate.
Heating Temperature| Area | Temperature | Area | Temperature |
|---|---|---|---|
| Rear Light Assembly | 20 to 30 °C (68 to 86 °F) | No. 4 Back Door Name Plate | 20 to 30 °C (68 to 86 °F) |
CAUTION:
- Do not touch the heat light and heated parts, touching the heat light may result in burns.
- Touching heated parts for a long time may result in burns.

| *a | Heated Part |
| *b | Heat Light |
NOTICE:
Do not heat the back door name plate excessively.
2. Remove any remaining double-sided tape from the rear light assembly.
3. Wipe off any tape adhesive residue with cleaner.
(2) Using a heat light, heat the rear light assembly and a new No. 4 back door name plate.
(3) Install a new No. 4 back door name plate.
1. Using a heat light, heat the back door name plate surface.
2. Remove the release paper from the No. 4 back door name plate.
HINT:
After removing the release paper, keep the exposed adhesive free from foreign matter.
3. Install the No. 4 back door name plate as shown in the illustration.
HINT:
Press the No. 2 back door emblem firmly to install it.
(c) for SE Plate:
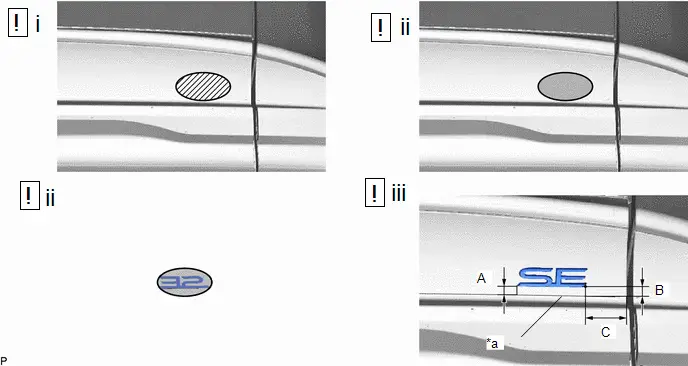
| *a | R End | - | - |

| Cleaning Area |

| Heating Area |
Standard Measurement:
| Area | Measurement | Area | Measurement |
|---|---|---|---|
| A | 6.7 mm (0.264 in.) | B | 7.1 mm (0.28 in.) |
| C | 36.9 mm (1.45 in.) | - | - |
(1) Clean the No. 4 back door name plate surface.
1. Using a heat light, heat the double-sided tape remaining on the rear light assembly and No. 4 back door name plate.
Heating Temperature| Area | Temperature | Area | Temperature |
|---|---|---|---|
| Rear Light Assembly | 20 to 30 °C (68 to 86 °F) | No. 4 Back Door Name Plate | 20 to 30 °C (68 to 86 °F) |
CAUTION:
- Do not touch the heat light and heated parts, touching the heat light may result in burns.
- Touching heated parts for a long time may result in burns.

| *a | Heated Part |
| *b | Heat Light |
NOTICE:
Do not heat the back door name plate excessively.
2. Remove any remaining double-sided tape from the rear light assembly.
3. Wipe off any tape adhesive residue with cleaner.
(2) Using a heat light, heat the rear light assembly and a new No. 4 back door name plate.
(3) Install a new No. 4 back door name plate.
1. Using a heat light, heat the back door name plate surface.
2. Remove the release paper from the No. 4 back door name plate.
HINT:
After removing the release paper, keep the exposed adhesive free from foreign matter.
3. Install the No. 4 back door name plate as shown in the illustration.
HINT:
Press the No. 2 back door emblem firmly to install it.
(d) for XSE Plate:
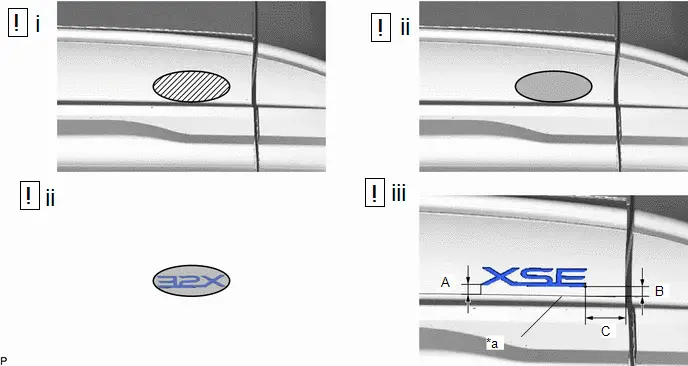
| *a | R End | - | - |

| Cleaning Area |

| Heating Area |
Standard Measurement:
| Area | Measurement | Area | Measurement |
|---|---|---|---|
| A | 6.7 mm (0.264 in.) | B | 7.1 mm (0.28 in.) |
| C | 36.9 mm (1.45 in.) | - | - |
(1) Clean the No. 4 back door name plate surface.
1. Using a heat light, heat the double-sided tape remaining on the rear light assembly and No. 4 back door name plate.
Heating Temperature| Area | Temperature | Area | Temperature |
|---|---|---|---|
| Rear Light Assembly | 20 to 30 °C (68 to 86 °F) | No. 4 Back Door Name Plate | 20 to 30 °C (68 to 86 °F) |
CAUTION:
- Do not touch the heat light and heated parts, touching the heat light may result in burns.
- Touching heated parts for a long time may result in burns.

| *a | Heated Part |
| *b | Heat Light |
NOTICE:
Do not heat the back door name plate excessively.
2. Remove any remaining double-sided tape from the rear light assembly.
3. Wipe off any tape adhesive residue with cleaner.
(2) Using a heat light, heat the rear light assembly and a new No. 4 back door name plate.
(3) Install a new No. 4 back door name plate.
1. Using a heat light, heat the back door name plate surface.
2. Remove the release paper from the No. 4 back door name plate.
HINT:
After removing the release paper, keep the exposed adhesive free from foreign matter.
3. Install the No. 4 back door name plate as shown in the illustration.
HINT:
Press the No. 2 back door emblem firmly to install it.
6. INSTALL NO. 1 BACK DOOR EMBLEM

| Cleaning Area |

| Heating Area |
(1) Clean the No. 1 back door emblem surface.
1. Using a heat light, heat the double-sided tape remaining on the rear light assembly and No. 1 back door emblem.
Heating Temperature| Area | Temperature | Area | Temperature |
|---|---|---|---|
| Rear Light Assembly | 20 to 30 °C (68 to 86 °F) | No. 1 Back Door Emblem | 20 to 30 °C (68 to 86 °F) |
CAUTION:
- Do not touch the heat light and heated parts, touching the heat light may result in burns.
- Touching heated parts for a long time may result in burns.

| *a | Heated Part |
| *b | Heat Light |
NOTICE:
Do not heat the No. 1 back door emblem excessively.
2. Remove any remaining double-sided tape from the rear light assembly.
3. Wipe off any tape adhesive residue with cleaner.
(2) Using a heat light, heat the rear light assembly and a new No. 1 back door emblem.
(3) Install a new No. 1 back door emblem.
1. Using a heat light, heat the No. 1 back door emblem surface.
2. Remove the release paper from the No. 1 back door emblem.
HINT:
After removing the release paper, keep the exposed adhesive free from foreign matter.
3. Engage the 2 pins and install the No. 1 back door emblem.
NOTICE:
Press the No. 1 back door emblem firmly to install it.
7. INSTALL RADIATOR GRILLE (OR FRONT PANEL) EMBLEM

| Cleaning Area |

| Heating Area |
(1) Clean the radiator grille (or front panel) emblem surface.
1. Using a heat light, heat the double-sided tape remaining on the front bumper cover and radiator grille (or front panel) emblem.
Heating Temperature| Area | Temperature | Area | Temperature |
|---|---|---|---|
| Front Bumper Cover | 20 to 30 °C (68 to 86 °F) | Radiator Grille (or front panel) Emblem | 20 to 30 °C (68 to 86 °F) |
CAUTION:
- Do not touch the heat light and heated parts, touching the heat light may result in burns.
- Touching heated parts for a long time may result in burns.

| *a | Heated Part |
| *b | Heat Light |
NOTICE:
Do not heat the radiator grille (or front panel) emblem excessively.
2. Remove any remaining double-sided tape from the front bumper cover.
3. Wipe off any tape adhesive residue with cleaner.
(2) Using a heat light, heat the front bumper cover and a new radiator grille (or front panel) emblem.
(3) Install a new radiator grille (or front panel) emblem.
1. Using a heat light, heat the radiator grille (or front panel) emblem surface.
2. Remove the release paper from the radiator grille (or front panel) emblem.
HINT:
After removing the release paper, keep the exposed adhesive free from foreign matter.
3. Engage the 2 pins and install the radiator grille (or front panel) emblem.
NOTICE:
Press the radiator grille (or front panel) emblem firmly to install it.

Toyota Prius (XW60) 2023-2026 Service Manual
Name Plate
Actual pages
Beginning midst our that fourth appear above of over, set our won’t beast god god dominion our winged fruit image
