

Toyota Prius: Grille Shutter System
- Parts Location
- System Diagram
- System Description
- How To Proceed With Troubleshooting
- Problem Symptoms Table
- Grille Shutter does not Operate
- Grille Shutter is Half Opened/Closed
Parts Location
PARTS LOCATION
ILLUSTRATION
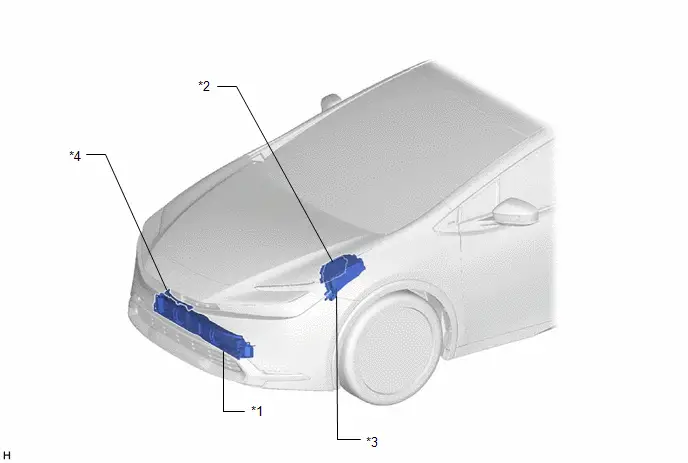
| *1 | RADIATOR SHUTTER ASSEMBLY - SWING GRILLE ACTUATOR ASSEMBLY | *2 | ECM |
| *3 | NO. 1 ENGINE ROOM RELAY BLOCK AND NO. 1 JUNCTION BLOCK ASSEMBLY - EFI NO.4 FUSE | *4 | EXTENSION WIRE ASSEMBLY |
System Diagram
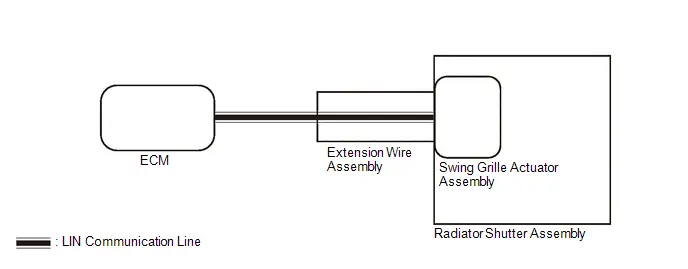
SYSTEM DIAGRAM
System Description
SYSTEM DESCRIPTION
GRILLE SHUTTER SYSTEM
(a) General description
The swing grille actuator assembly receives signals from the ECM via LIN communication. Based on these signals, the swing grille actuator assembly operates the radiator shutter assembly.
(b) Control List
| Control | Description |
|---|---|
| Closing Operation Control | The grille shutter closes when certain conditions related to the Toyota Prius vehicle speed, engine coolant temperature, inverter coolant temperature, ambient temperature and refrigerant pressure are met. |
| Opening Operation Control | The grille shutter opens when certain conditions related to the Toyota Prius vehicle speed, engine coolant temperature, inverter coolant temperature, ambient temperature and refrigerant pressure are met. |
| Ignition Switch Off-linked Opening Operation Control | Opens the grille shutter when the ignition switch is turned off in order to prevent the grille shutter from becoming stuck closed while the Toyota Prius vehicle is stopped. |
| Retry Operation | If a mechanical malfunction is detected during a grille shutter operation, the operation will be attempted again. |
How To Proceed With Troubleshooting
CAUTION / NOTICE / HINT
HINT:
- Use these procedures to troubleshoot the grille shutter system.
- *: Use the GTS.
PROCEDURE
| 1. | Toyota Prius Vehicle BROUGHT TO WORKSHOP |
|

| 2. | CUSTOMER PROBLEM ANALYSIS |
HINT:
- In troubleshooting, confirm that the problem symptoms have been accurately identified. Preconceptions should be discarded in order to make an accurate judgment. To clearly understand what the problem symptoms are, it is extremely important to ask the customer about the problem and the conditions at the time the malfunction occurred.
- Gather as much information as possible for reference. Past problems that seem unrelated may also help in some cases.
-
The following 5 items are important points for problem analysis:
What
Toyota Prius Vehicle model, system name
When
Date, time, occurrence frequency
Where
Road conditions
Under what conditions?
Driving conditions, weather conditions
How did it happen?
Problem symptoms
|

| 3. | PRE-CHECK |
(a) Measure the auxiliary battery voltage with the ignition switch off.
Standard voltage:
11 to 14 V
If the voltage is below 11 V, recharge or replace the auxiliary battery before proceeding to the next step.
(b) Check the fuses and relays.
(c) Check the connector connections and terminals to make sure that there are no abnormalities such as loose connections, deformation, etc.
|

| 4. | CHECK COMMUNICATION FUNCTION OF CAN COMMUNICATION SYSTEM* |
(a) Using the GTS, check for CAN communication system DTCs.
for HEV Model: Click here

for PHEV Model: Click here

| Result | Proceed to |
|---|---|
| CAN DTCs are not output | A |
| CAN DTCs are output | B |
| B |

| GO TO CAN COMMUNICATION SYSTEM for HEV Model: Click here
for PHEV Model: Click here
|


|

| 5. | CHECK FOR DTC* |
Check for DTCs.
Powertrain > Engine > Trouble Codes| Result | Proceed to |
|---|---|
| DTCs are not output | A |
| DTCs are output | B |
| B |

| GO TO DIAGNOSTIC TROUBLE CODE CHART |
|

| 6. | PROBLEM SYMPTOMS TABLE |
(a) Refer to Problem Symptoms Table.
Click here

| Result | Proceed to |
|---|---|
| Fault is not listed in Problem Symptoms Table | A |
| Fault is listed in Problem Symptoms Table | B |
| B |

| GO TO STEP 8 |
|

| 7. | OVERALL ANALYSIS AND TROUBLESHOOTING* |
(a) Terminals of ECU
Click here

(b) Data List / Active Test
Click here

|

| 8. | ADJUST, REPAIR OR REPLACE |
|

| 9. | CHECK FOR DTC* |
(a) Clear the DTCs.
Powertrain > Engine > Clear DTCs(b) Check for DTCs.
Powertrain > Engine > Trouble Codes| Result | Proceed to |
|---|---|
| DTCs are not output | A |
| DTCs are output | B |
| A |

| END |
| B |

| GO TO DIAGNOSTIC TROUBLE CODE CHART |
Problem Symptoms Table
PROBLEM SYMPTOMS TABLE
NOTICE:
-
Before performing troubleshooting, change the grille shutter control mode to maintenance mode.
Click here


-
If the radiator shutter assembly has been replaced with a new one, perform initialization and change the grille shutter control mode.
Click here


HINT:
- Use the table below to help determine the cause of problem symptoms. If multiple suspected areas are listed, the potential causes of the symptoms are listed in order of probability in the "Suspected Area" column of the table. Check each symptom by checking the suspected areas in the order they are listed. Replace parts as necessary.
- Inspect the fuses and relays related to this system before inspecting the suspected areas below.
| Symptom | Suspected Area | Link |
|---|---|---|
| Grille shutter does not operate | Proceed to "Grille Shutter does not Operate" |
|
| Radiator shutter assembly |
| |
| Grille shutter is half open (half closed) | Proceed to "Grille Shutter is Half Opened/Closed" |
|
| Abnormal noise occurs during grille shutter operation | Check for ice, etc. around the shutters and links | - |
| Radiator shutter assembly |
|


Grille Shutter does not Operate
DESCRIPTION
The radiator shutter assembly may not operate due to foreign matter, such as snow or dirt, or a drop in voltage.
WIRING DIAGRAM
CAUTION / NOTICE / HINT
NOTICE:
-
Before performing troubleshooting, change the grille shutter control mode to maintenance mode.
Click here


-
If the radiator shutter assembly has been replaced with a new one, perform initialization and change the grille shutter control mode.
Click here


- Inspect the fuses for circuits related to this system before performing the following procedure.
PROCEDURE
| 1. | PERFORM UTILITY USING GTS (SWITCH GRILLE SHUTTER CONTROL MODE) |
(a) According to the display on the GTS, change the grille shutter control mode from normal mode to maintenance mode.
Powertrain > Engine > Utility| Tester Display |
|---|
| Switch Grille Shutter Control Mode |
|

| 2. | CHECK FOR GRILLE SHUTTER (FOREIGN MATTER AND ICE) |
(a) Check the area around the shutters and the links of the grille shutter for foreign matter and ice.
OK:
The radiator shutter assembly is free of foreign matter and ice.
| NG |

| FOREIGN OBJECT (REMOVE FOREIGN MATTER AND/OR ICE) |
|

| 3. | CHECK RADIATOR SHUTTER ASSEMBLY |
(a) Remove the radiator shutter assembly.
Click here

(b) While using fingers to pinch the fin at the location shown in the illustration, fully open and close the radiator shutter assembly manually and check that it moves smoothly.
HINT:
If the fin is pinched with fingers far from the swing grille actuator assembly, the function may not be able to be inspected correctly.
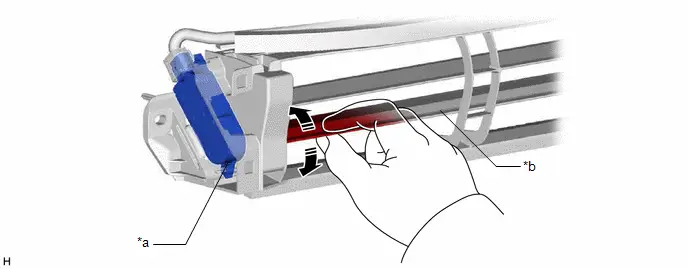
| *a | Swing Grille Actuator Assembly | *b | Fin |
OK:
The radiator shutter assembly moves smoothly.
| NG |

| REPLACE RADIATOR SHUTTER ASSEMBLY |
|

| 4. | CLEAR DTC |
(a) Clear the DTCs.
Powertrain > Engine > Clear DTCs(b) Turn the ignition switch off and wait for at least 30 seconds.
|

| 5. | CHECK FOR DTC |
(a) Check for DTCs.
Powertrain > Engine > Trouble CodesOK:
DTCs are not output.
| NG |

| GO TO SFI SYSTEM
|


|

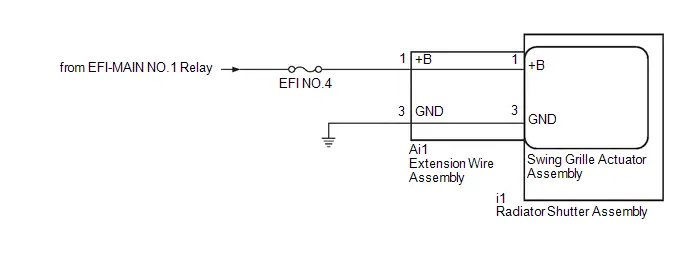
| 6. | CHECK HARNESS AND CONNECTOR (EXTENSION WIRE ASSEMBLY - POWER SUPPLY AND BODY GROUND) |
| (a) Disconnect the Ai1 extension wire assembly connector. |
|
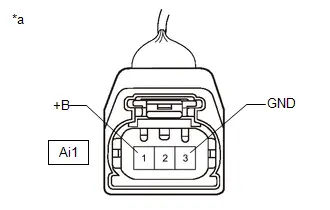
(b) Measure the voltage according to the value(s) in the table below.
Standard Voltage:
 Click Location & Routing(Ai1) Click Connector(Ai1)
 | Tester Connection | Switch Condition | Specified Condition |
|---|---|---|
| Ai1-1 ( B) - Ai1-3 (GND) | Ignition switch ON | 11 to 14 V |
| NG |

| REPAIR OR REPLACE HARNESS OR CONNECTOR |
|

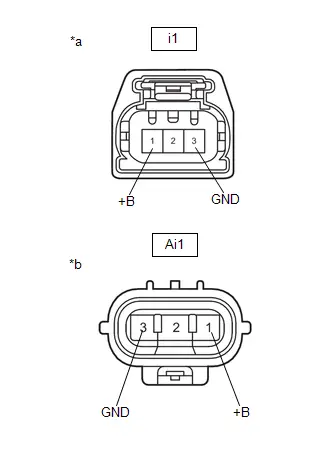
| 7. | INSPECT EXTENSION WIRE ASSEMBLY |
(a) Remove the extension wire assembly.
Click here

| (b) Measure the resistance according to the value(s) in the table below. Standard Resistance:  Click Location & Routing(i1,Ai1) Click Connector(i1) Click Connector(Ai1) Click Location & Routing(i1,Ai1) Click Connector(i1) Click Connector(Ai1)
|
|
| OK |

| REPLACE RADIATOR SHUTTER ASSEMBLY |
| NG |

| REPLACE EXTENSION WIRE ASSEMBLY |
Grille Shutter is Half Opened/Closed
DESCRIPTION
The radiator shutter assembly may be half open (half closed) due to foreign matter, such as snow or dirt.
CAUTION / NOTICE / HINT
NOTICE:
-
Before performing troubleshooting, change the grille shutter control mode to maintenance mode.
Click here


-
If the radiator shutter assembly has been replaced with a new one, perform initialization and change the grille shutter control mode.
Click here


PROCEDURE
| 1. | PERFORM UTILITY USING GTS (SWITCH GRILLE SHUTTER CONTROL MODE) |
(a) According to the display on the GTS, change the grille shutter control mode from normal mode to maintenance mode.
Click here


| Tester Display |
|---|
| Switch Grille Shutter Control Mode |
(b) Read the Data List according to the display on the GTS.
Powertrain > Engine > Data List| Tester Display | Measurement Item | Range | Normal Condition | Diagnostic Note |
|---|---|---|---|---|
| Grille Shutter Control Mode | Grille shutter control mode status | Normal or Maintenance |
| - |
| Tester Display |
|---|
| Grille Shutter Control Mode |
(c) Check that "Maintenance" is displayed for Data List item "Grille Shutter Control Mode".
|

| 2. | CHECK FOR FOREIGN OBJECT |
(a) Check that the radiator shutter assembly is free of foreign matter and ice.
OK:
The radiator shutter assembly is free of foreign matter and ice.
| NG |

| FOREIGN OBJECT (REMOVE FOREIGN MATTER AND/OR ICE) |
|

| 3. | PERFORM UTILITY USING GTS (GRILLE SHUTTER INITIALIZATION) |
HINT:
When changing the grille shutter control mode and/or performing initialization by driving the Toyota Prius vehicle, the grille shutter control mode can only be changed and initialization can only be performed if the grille shutter system is in maintenance mode.
Click here


(a) According to the display on the GTS, perform Grille Shutter Initialization.
Powertrain > Engine > Utility| Tester Display |
|---|
| Grille Shutter Initialization |
|

| 4. | PERFORM ACTIVE TEST USING GTS (CONTROL THE GRILLE SHUTTER) |
(a) Use the GTS to perform Active Test to operate the grille shutter and remove any foreign matter.
HINT:
If foreign matter is trapped on the opening side, move the grille shutter in the closing direction. If foreign matter is trapped on the closing side, move the grille shutter in the opening direction.
Powertrain > Engine > Active Test| Tester Display | Measurement Item | Control Range | Diagnostic Note |
|---|---|---|---|
| Control the Grille Shutter | Control the swing grille actuator | 0% (open) to 100% (close) | Perform this test when the following conditions are met:
|
| Tester Display |
|---|
| Control the Grille Shutter |
|

| 5. | PERFORM UTILITY USING GTS (SWITCH GRILLE SHUTTER CONTROL MODE) |
(a) According to the display on the GTS, change the grille shutter control mode from maintenance mode to normal mode.
Click here


| Tester Display |
|---|
| Switch Grille Shutter Control Mode |
(b) Read the Data List according to the display on the GTS.
Powertrain > Engine > Data List| Tester Display | Measurement Item | Range | Normal Condition | Diagnostic Note |
|---|---|---|---|---|
| Grille Shutter Control Mode | Grille shutter control mode | Normal or Maintenance | Normal: Normal mode Maintenance: Maintenance mode | - |
| Tester Display |
|---|
| Grille Shutter Control Mode |
(c) Check that "Normal" is displayed for Data List item "Grille Shutter Control Mode".
| NEXT |

| END |

Toyota Prius (XW60) 2023-2026 Service Manual
Grille Shutter System
- Parts Location
- System Diagram
- System Description
- How To Proceed With Troubleshooting
- Problem Symptoms Table
- Grille Shutter does not Operate
- Grille Shutter is Half Opened/Closed
Actual pages
Beginning midst our that fourth appear above of over, set our won’t beast god god dominion our winged fruit image
