

Toyota Prius: High Mounted Stop Light Assembly
Removal
REMOVAL
CAUTION / NOTICE / HINT
The necessary procedures (adjustment, calibration, initialization or registration) that must be performed after parts are removed and installed, or replaced during high mounted stop light assembly removal/installation are shown below.
Necessary Procedures After Parts Removed/Installed/Replaced| Replaced Part or Performed Procedure | Necessary Procedures | Effect/Inoperative Function When Necessary Procedures are not Performed | Link |
|---|---|---|---|
| *1: Even when not replacing the part, it is necessary to perform the specified necessary procedures after installation. | |||
| Reset back door close position | Power Back Door System |
|

CAUTION / NOTICE / HINT
COMPONENTS (REMOVAL)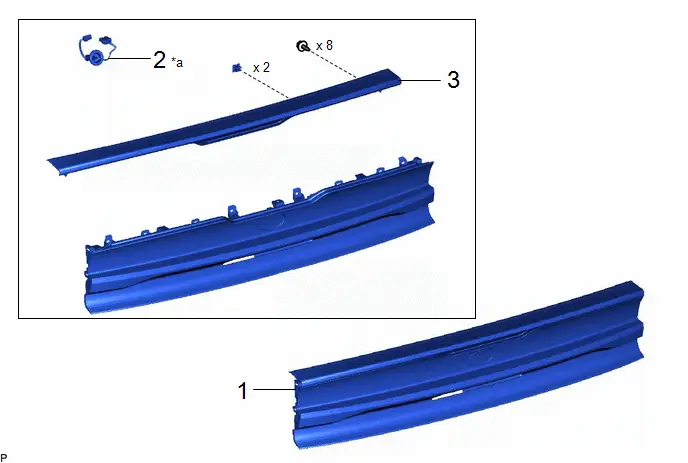
| Procedure | Part Name Code |

|

|

| |
|---|---|---|---|---|---|
| 1 | REAR LIGHT ASSEMBLY | - | - | - | - |
| 2 | CENTER STOP LIGHT CORD ASSEMBLY | 81935D | - | - | - |
| 3 | CENTER STOP LIGHT ASSEMBLY | 81570 | - | - | - |
| *a | The illustration shown is an example only. The illustration may differ from the actual parts according to the model. | - | - |
PROCEDURE
1. REMOVE REAR LIGHT ASSEMBLY
Click here

2. REMOVE CENTER STOP LIGHT CORD ASSEMBLY
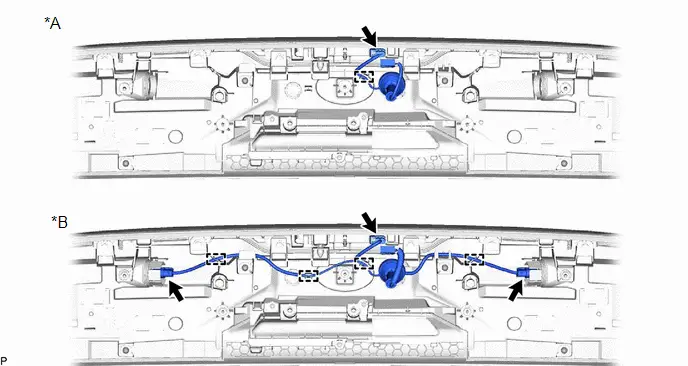
| *A | w/o Tail Light LED | *B | w/ Tail Light LED |
3. REMOVE CENTER STOP LIGHT ASSEMBLY

| *a | Screw | *b | Grommet |
Inspection
INSPECTION
PROCEDURE
1. INSPECT CENTER STOP LIGHT ASSEMBLY
(a) Illumination Inspection
| (1) Apply auxiliary battery voltage to the center stop light assembly and check that the light illuminates. OK:
If the result is not as specified, replace the center stop light assembly. |
|
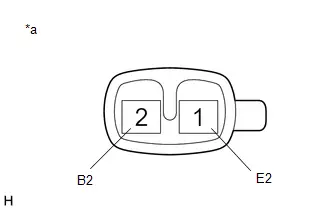
2. INSPECT CENTER STOP LIGHT CORD ASSEMBLY
(a) Measure the resistance according to the value(s) in the table below.
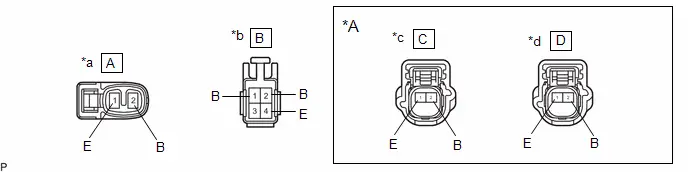
| *A | w/ Tail Light LED | - | - |
| *a | Component without harness connected (to Center Stop Light Assembly) | *b | Component without harness connected (to Wire Harness) |
| *c | Component without harness connected (to Tail Light LED LH) | *d | Component without harness connected (to Tail Light LED RH) |
(1) Inspect the center stop light circuit.
Standard Resistance:
| Tester Connection | Condition | Specified Condition | Result |
|---|---|---|---|
| A-1 - B-4 | Always | Below 1 Ω | Ω |
| A-2 - B-2 | Always | Below 1 Ω | Ω |
If the result is not as specified, replace the center stop light cord.
(2) w/ Tail Light LED:
Inspect the tail light circuit.
Standard Resistance:
| Tester Connection | Condition | Specified Condition | Result |
|---|---|---|---|
| B-1 - C-2 | Always | Below 1 Ω | Ω |
| B-1 - D-2 | Always | Below 1 Ω | Ω |
| B-4 - C-1 | Always | Below 1 Ω | Ω |
| B-4 - D-1 | Always | Below 1 Ω | Ω |
If the result is not as specified, replace the center stop light cord.
Installation
INSTALLATION
CAUTION / NOTICE / HINT
COMPONENTS (INSTALLATION)
| Procedure | Part Name Code |

|

|

| |
|---|---|---|---|---|---|
| 1 | CENTER STOP LIGHT ASSEMBLY | 81570 | - | - | - |
| 2 | CENTER STOP LIGHT CORD ASSEMBLY | 81935D | - | - | - |
| 3 | REAR LIGHT ASSEMBLY | - | - | - | - |
| *a | The illustration shown is an example only. The illustration may differ from the actual parts according to the model. | - | - |
PROCEDURE
1. INSTALL CENTER STOP LIGHT ASSEMBLY
2. INSTALL CENTER STOP LIGHT CORD ASSEMBLY
3. INSTALL REAR LIGHT ASSEMBLY
Click here


Toyota Prius (XW60) 2023-2026 Service Manual
High Mounted Stop Light Assembly
Actual pages
Beginning midst our that fourth appear above of over, set our won’t beast god god dominion our winged fruit image
