

Toyota Prius: General Maintenance
Outside Vehicle
OUTSIDE VEHICLE
- These are maintenance and inspection items that are considered to be the
owner's responsibility.
The owner can do them or they can have them done at a service center.
These items include those that should be checked on a daily basis, those that in most cases do not require special tools, and those that are considered to be reasonable for the owner to do.
General maintenance items and procedures are as follows:
GENERAL NOTES
- Maintenance requirements vary depending on country.
- Check the maintenance schedule in the owner's manual.
- Following the maintenance schedule is mandatory.
- Determine the appropriate time to service the vehicle using either miles driven or time (months) elapsed, whichever reaches the specification first.
- Failing to check each vehicle part could lead to poor engine performance and increased exhaust emissions.
TIRES
(a) Check the tire inflation pressure with a gauge. Make adjustments if necessary.
(b) Check the surfaces of the tires for cuts, damage or excessive wear.
WHEEL NUTS
(a) Check for nuts that are loose or missing. Tighten them if necessary.
TIRE ROTATION
(a) Check the maintenance schedule in the owner's manual.
WINDSHIELD WIPER BLADES
(a) Check the wiper blades for wear or cracks whenever they are unable to wipe the windshield clean. Replace them if necessary.
FLUID LEAKS
(a) Check under the vehicle for leaking fuel, oil, coolant and other fluids.
NOTICE:
If you smell fuel or notice any leaks, locate the cause and correct it.
DOORS AND ENGINE HOOD
(a) Check that all of the doors and the hood operate smoothly, and that all of the latches lock securely.
(b) When the primary latch is released, check that the engine hood secondary latch prevents the hood from opening.
Inside Vehicle
INSIDE VEHICLE
- These are maintenance and inspection items that are considered to be the
owner's responsibility.
The owner can do them or they can have them done at a service center.
These items include those that should be checked on a daily basis, those that in most cases do not require special tools, and those that are considered to be reasonable for the owner to do.
General maintenance items and procedures are as follows:
GENERAL NOTES
- Maintenance requirements vary depending on country.
- Check the maintenance schedule in the owner's manual.
- Following the maintenance schedule is mandatory.
- Determine the appropriate time to service the vehicle using either miles driven or time (months) elapsed, whichever reaches the specification first.
- Maintain similar intervals between periodic maintenance unless noted.
- Failing to check each vehicle part could lead to poor engine performance and increased exhaust emissions.
LIGHTS
(a) Check that the headlights, stop lights, taillights, turn signal lights, and other lights illuminate or blink properly. Also, check if they are sufficiently bright.
(b) Check that the headlights are aimed properly.
WARNING LIGHTS AND BUZZERS
(a) Check that all of the warning lights and buzzers work.
HORN
(a) Check if the horn is working correctly.
WINDSHIELD GLASS
(a) Check for scratches, pits or abrasions.
WINDSHIELD WIPERS AND WASHER
(a) Check that the washers are aimed properly. Also, check that the washer fluid hits the center of the operating range of each wiper on the windshield.
(b) Check if the wipers streak. Replace them if necessary.
WINDSHIELD DEFROSTER
(a) When the air conditioning is on the defroster setting, check that air comes out of the defroster outlets.
REAR VIEW MIRROR
(a) Check that the rear view mirrors are securely installed.
SUN VISORS
(a) Check that the sun visors move freely and are securely installed.
STEERING WHEEL
(a) Check that the steering wheel has the proper amount of free play. Also check for steering difficulty and unusual noises.
Click here

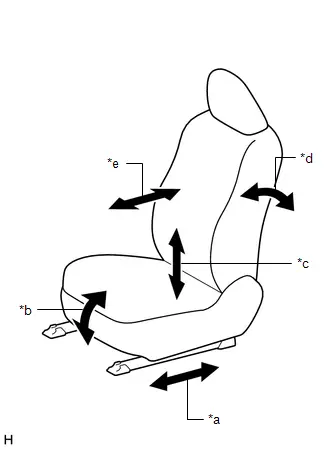
SEATS
(a) Check that the seat adjusters, seatback recliner and other seat controls operate smoothly.
(b) Check that all of the latches lock securely in all positions.
(c) Check that the locks hold securely in all positions.
(d) Check that the headrests move up and down smoothly and that the locks hold securely in all latched positions.
(e) Check the basic functions. (for FRONT POWER SEAT CONTROL SYSTEM (w/ Memory))

|
*a |
Slide Function |
|
*b |
Front Vertical Function |
|
*c |
Lifter Function |
|
*d |
Reclining Function |
|
*e |
Lumbar Support Adjustment Function (forward - back) |
(1) Operate the power seat switches and check that each seat function operates properly:
- Slide function
- Front vertical function
- Lifter function
- Reclining function
- Lumbar support adjustment function (forward - back)
(f) Check the basic functions. (for FRONT POWER SEAT CONTROL SYSTEM (w/o Memory)):
|
*a |
Slide Function |
|
*b |
Front Vertical Function |
|
*c |
Lifter Function |
|
*d |
Reclining Function |
|
*e |
Lumbar Support Adjustment Function |
(1) Operate the power seat switches and check that each seat function operates properly:
- Slide function
- Front vertical function
- Lifter function
- Reclining function
- Lumbar support adjustment function
SEAT BELTS
(a) Check that the seat belt components, such as the buckles, retractors and anchors, operate properly and smoothly.
(b) Check that the belt webbing is not cut, frayed, worn or damaged.
ACCELERATOR PEDAL
(a) Check that the pedal operates smoothly. Check that the pedal does not have uneven resistance or stick in certain positions.
BRAKE PEDAL
(a) Check that the brake pedal operates smoothly.
(b) Check that the pedal has the proper reserve distance and free play.
Click here

(c) Turn the ignition switch to ON (READY) and check the brake booster function.
(d) Turn the ignition switch to ON (READY) and check the brake system indicator.
BRAKES
(a) In a safe place, check that the vehicle does not pull or lead to the side when applying the brakes.
PARKING BRAKE
(a) On a slight grade, check that the parking brake alone can hold the vehicle in place.
HYBRID TRANSAXLE "PARK" MECHANISM
(a) Check the operation of the P position switch.
(b) Check that park (P) can be disengaged by operating the shift lever.
(c) With park (P) selected, release all brakes in an area that has a slight grade and check that the vehicle is stable.
FLOOR MATS
(a) Check that the correct floor mats are used, and that they are properly installed.
Under Hood
UNDER HOOD
GENERAL NOTES
- Maintenance requirements vary depending on country.
- Check the maintenance schedule in the owner's manual.
- Following the maintenance schedule is mandatory.
- Determine the appropriate time to service the vehicle using either miles driven or time (months) elapsed, whichever reaches the specification first.
- Maintain similar intervals between periodic maintenance unless noted.
- Failing to check each vehicle part could lead to poor engine performance and increased exhaust emissions.
WINDSHIELD WASHER FLUID
(a) Check that there is sufficient fluid in the tank.
ENGINE COOLANT LEVEL
(a) Check that the coolant level is between the "FULL" and "LOW" lines on the see-through reservoir.
INVERTER COOLANT LEVEL
(a) Check that there is sufficient fluid in the tank.
RADIATOR AND HOSES
(a) Check that the front of the radiator is clean and not blocked by leaves, dirt or insects.
(b) Check the radiator and hoses for:
- Damage
- Cracks
- Kinks
- Corrosion
- Rot
- Clogging
- Leaks
AUXILIARY BATTERY ELECTROLYTE LEVEL
(a) Check that the electrolyte level of all the auxiliary battery cells is between the upper and lower level lines on the case.
HINT:
If the electrolyte level is difficult to see, lightly shake the vehicle.
BRAKE FLUID LEVEL
(a) Check that the brake fluid level is near the upper level line on the see-through reservoir.
ENGINE OIL LEVEL
(a) Check that the engine oil level is between the full level and low level marks on the dipstick with the ignition switch off.
HYBRID TRANSAXLE FLUID LEVEL
(a) Check the level of the hybrid transaxle fluid.
for PA10/PB10/PB12: Click here


for Q810: Click here

EXHAUST SYSTEM
(a) Visually inspect for severe corrosion, cracks, holes or loose supports.
HINT:
If any change in the sound of the exhaust or smell of the exhaust fumes is noticed, inspect and repair the exhaust system.
Engine
ENGINE
HINT:
Perform these procedures after the engine has cooled down.
INSPECT ENGINE OIL
(a) Inspect the engine oil.
for 2ZR-FXE: Click here

for M20A-FXS: Click here

REPLACE ENGINE OIL AND OIL FILTER
(a) Replace the engine oil and oil filter.
for 2ZR-FXE: Click here

for M20A-FXS: Click here

INSPECT COOLING AND HEATER SYSTEM
(a) Inspect that the radiator and condenser are not blocked with leaves, dirt or insects, and clean them if necessary. Also check the hose connection for the installation condition, corrosion, etc.
for 2ZR-FXE: Click here

for M20A-FXS (for HEV Model): Click here

for M20A-FXS (for PHEV Model): Click here

INSPECT ENGINE COOLANT
(a) Inspect the engine coolant.
for 2ZR-FXE: Click here

for M20A-FXS: Click here

REPLACE ENGINE COOLANT
(a) Replace the engine coolant.
for 2ZR-FXE: Click here

for M20A-FXS: Click here

INSPECT SPARK PLUGS
(a) Inspect the spark plugs.
for 2ZR-FXE: Click here

for M20A-FXS: Click here

INSPECT AUXILIARY BATTERY
(a) Inspect the auxiliary battery.
for 2ZR-FXE: Click here

for M20A-FXS: Click here

INSPECT AIR CLEANER FILTER ELEMENT
(a) Remove the air cleaner filter element.
(b) Check that the air cleaner filter element is not excessively dirty.
If the air cleaner filter element is excessively dirty, replace the air cleaner filter element.
(c) If cleaning the air cleaner filter element, blow compressed air as shown in the illustration to clean it.
(d) Reinstall the air cleaner filter element.
INSPECT EXHAUST PIPES AND MOUNTINGS
(a) Visually check the pipes, hangers and connections for severe corrosion, leaks or damage.
INSPECT FUEL TANK CAP GASKET
(a) Inspect the fuel tank cap gasket.
for 2ZR-FXE: Click here

for M20A-FXS: Click here

INSPECT FUEL LINES, CONNECTIONS, AND FUEL TANK VAPOR VENT SYSTEM HOSES
(a) Visually check the fuel lines and hoses for cracks, leaks, loose connections, or deformation.
INSPECT CHARCOAL CANISTER
(a) Inspect the charcoal canister.
for 2ZR-FXE: Click here

for M20A-FXS (for HEV Model): Click here

for M20A-FXS (for PHEV Model): Click here

Brake
BRAKE
INSPECT BRAKE LINE PIPES AND HOSES
HINT:
Work in a well-lighted area. Turn the front wheels fully to the right or left before beginning the inspection.
(a) Using a mirror, check the entire circumference and length of the brake lines and hoses for:
- Damage
- Wear
- Deformation
- Cracks
- Kinks
- Corrosion
- Leaks
- Twists
(b) Check all the clamps for tightness and check the connections for leakage.
(c) Check that the hoses and lines are not near sharp edges, moving parts or the exhaust system.
(d) Check that the lines are installed properly and pass through the center of the grommets.
INSPECT BRAKE PEDAL
(a) Inspect the brake pedal.
Click here

INSPECT PARKING BRAKE
(a) Inspect the parking brake.
INSPECT FRONT BRAKE
(a) Inspect the front brake pads and discs.
Click here


INSPECT REAR BRAKE PADS AND DISCS
(a) Inspect the rear brake pads and discs.
Click here

INSPECT OR CHANGE BRAKE FLUID
(a) Inspect or change the brake fluid.
Click here

Fluid:
SAE J1703 or FMVSS No. 116 DOT3
SAE J1704 or FMVSS No. 116 DOT4
Chassis
CHASSIS
INSPECT STEERING LINKAGE AND GEAR HOUSING
(a) Inspect the steering wheel free play.
Click here

(b) Inspect the steering linkage for looseness or damage.
(1) Check that the tie rod ends do not have any play.
(2) Check that the dust seals and boots are not damaged.
(3) Check that the boot clamps are not loose.
(4) Check that the steering gear housing is not damaged.
INSPECT BALL JOINTS AND DUST COVERS
(a) Inspect the ball joints for excessive looseness.
(1) Jack up the front of the vehicle and place wooden blocks with a height of 180 to 200 mm (7.09 to 7.87 in.) under the front tires.
(2) Lower the vehicle until the front coil spring has about half its ordinary load. Place stands under the vehicle for safety.
(3) Check that the front wheels are pointing straight ahead. Use wheel chocks on all 4 wheels.
(4) Using a lever, pry up the end of the lower arm. Check the amount of play.
Maximum Ball Joint Vertical Play:
0 mm (0 in.)
If there is any play, replace the ball joint.
(b) Check the dust cover for damage.
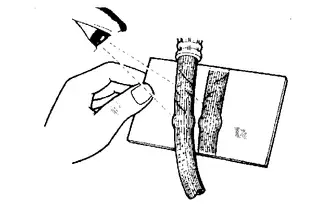
INSPECT DRIVE SHAFT BOOTS
(a) Inspect the drive shaft boots for loose clamps, cracks, grease leaks, kinks or damage.
INSPECT HYBRID TRANSAXLE
(a) Visually check the transaxle for fluid leaks. If fluid is leaking, find the cause and repair it.
INSPECT HYBRID TRANSAXLE FLUID COOLER HOSE AND CONNECTIONS
(a) (a) Inspect the hybrid transaxle fluid cooler hoses (oil cooler hoses) for cracks, leakage, loose connections and deformation.
INSPECT REAR TRACTION MOTOR
(a) Visually check the rear traction motor for fluid leaks. If fluid is leaking, find the cause and repair it.
INSPECT FRONT AND REAR SUSPENSION
(a) Inspect the front and rear suspension.
for Front suspension:

for Rear suspension:

Body
BODY
TIGHTEN BOLTS AND NUTS ON CHASSIS AND BODY
(a) If necessary, tighten the bolts and nuts on the chassis parts listed below.
- Front axle and suspension
- Drivetrain
- Rear axle and suspension
- Brake system
- Engine mounts
- Other chassis parts
(b) If necessary, tighten the bolts and nuts on the body parts listed below.
- Seat belt system
- Seats
- Doors and hood
- Body mounts
- Fuel tank
- Exhaust system
- Other body parts
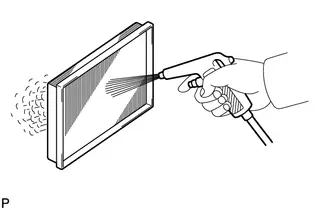
CLEAN OR REPLACE AIR CONDITIONING FILTER
(a) Remove the air conditioning filter.
Click here

(b) Visually inspect the surface of the air conditioning filter.
(c) If the air conditioning filter is contaminated with foreign matter, clean or replace it according to the maintenance schedule.
NOTICE:
Some filters are not able to be cleaned.
ROAD TEST
(a) Check the engine and chassis for abnormal noises.
(b) Check that the vehicle does not wander or pull to one side.
(c) Check that the brakes work properly and do not drag.
(d) Bed-in the parking brake pads.
BODY INSPECTION
(a) Check the body exterior for dents, scratches and rust.
(b) Check the underbody for rust and damage.
If necessary, replace any damaged parts or repair any damaged areas.
FINAL INSPECTION
(a) Check the operation of the body parts.
(1) Hood
- Auxiliary catch operates properly.
- Hood locks securely when closed.
(2) Front and rear doors
- Door locks operate properly.
- Doors close properly.
(3) Back door
Door lock operates properly.
(4) Seats
- Seats adjust easily and lock securely in any position.
- Front seatbacks lock securely in any position.
- Fold-down rear seatbacks lock securely.
(5) Be sure to deliver a clean car. Make sure to check the following:
- Steering wheel
- Shift lever knob
- All switches and knobs
- Door handles
- Seats

Toyota Prius (XW60) 2023-2026 Service Manual
General Maintenance
Actual pages
Beginning midst our that fourth appear above of over, set our won’t beast god god dominion our winged fruit image
