

Toyota Prius: Front Door Window Frame Moulding
Removal
REMOVAL
CAUTION / NOTICE / HINT
The necessary procedures (adjustment, calibration, initialization or registration) that must be performed after parts are removed and installed, or replaced during front door window frame moulding removal/installation are shown below.
Necessary Procedures After Parts Removed/Installed/Replaced| Replaced Part or Performed Procedure | Necessary Procedures | Effect/Inoperative Function When Necessary Procedures are not Performed | Link |
|---|---|---|---|
| *: Even when not replacing the part, it is necessary to perform the specified necessary procedures after installation. | |||
| Side television camera view adjustment | Parking Support Brake system |
|
| Panoramic View Monitor System |
| ||
| Advanced Park |
| ||
| Replacement or removal and installation of 2 or more parts:
| Television camera view adjustment | Panoramic View Monitor System |
|
| Initialize power window control system |
|
|


CAUTION / NOTICE / HINT
NOTICE:
-
After the ignition switch is turned off, the radio and display receiver assembly recordsvarious types of memory and settings. As a result, after turning the ignition switch off,make sure to wait at least 3 minutes before disconnecting the cable from the negative(-) auxiliary battery terminal.
Click here

-
When the cable is disconnected from the negative (-) auxiliary battery terminal and thesecurity lock setting has been enabled, multi-display operations will be disabled uponnext startup unless the password is entered. Be sure to check the security lock settingbefore disconnecting the cable from the negative (-) auxiliary battery terminal.
Click here

CAUTION / NOTICE / HINT
HINT:
-
When the cable is disconnected / reconnected to the auxiliary battery terminal, systems temporarily stop operating. However, each system has a function that completes learning the first time the system is used. Learning completes when Toyota Prius vehicle is driven
Learning completes when vehicle is operated normallyEffect/Inoperative Function When Necessary Procedures are not Performed
Necessary Procedures
Link
Front Camera System
- Drive the Toyota Prius vehicle straight ahead at 35 km/h (22 mph) or more for 5 seconds or more.

Effect/Inoperative Function When Necessary Procedures are not Performed
Necessary Procedures
Link
*1: w/o Power Back Door System *2: w/ Power Back Door System
Power Door Lock Control System*1
- Back door opener
Perform door unlock operation with door control switch or electrical key transmitter sub-assembly switch.

Power Back Door System*2
Reset back door close position

Air Conditioning System
for HEV Model:- After the ignition switch is turned to ON, the servo motor standard position is recognized.
for PHEV Model:- After the ignition switch is turned to ON, the servo motor and expansion valve standard position is recognized.
-
- Use the same procedure for the RH side and LH side.
- The following procedure is for the LH side.
CAUTION / NOTICE / HINT
COMPONENTS (REMOVAL)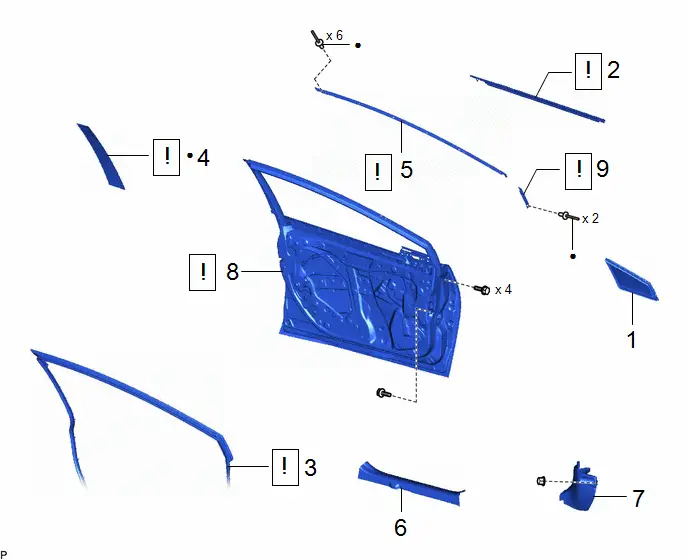
| Procedure | Part Name Code |

|

|

| |
|---|---|---|---|---|---|
| 1 | FRONT DOOR FIX WINDOW GLASS | 68126 | - | - | - |
| 2 | FRONT DOOR BELT MOULDING ASSEMBLY | 75720 |
| - | - |
| 3 | FRONT DOOR WEATHERSTRIP | 67862 |
| - | - |
| 4 | FRONT DOOR WINDOW FRAME REAR MOULDING | 75756C |
| - | - |
| 5 | FRONT DOOR WINDOW FRAME UPPER MOULDING | 75754A |
| - | - |
| 6 | FRONT DOOR SCUFF PLATE | 67914 | - | - | - |
| 7 | COWL SIDE TRIM BOARD | 62112 | - | - | - |
| 8 | FRONT DOOR SUB-ASSEMBLY | - |
| - | - |
| 9 | FRONT DOOR WINDOW FRAME FRONT MOULDING | 75752C |
| - | - |


| ● | Non-reusable part | - | - |
PROCEDURE
1. REMOVE FRONT DOOR FIX WINDOW GLASS
Click here

2. REMOVE FRONT DOOR BELT MOULDING ASSEMBLY

| Click here
|

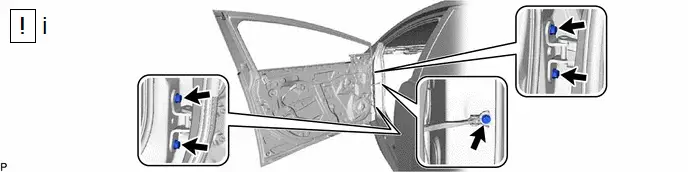
3. DISCONNECT FRONT DOOR WEATHERSTRIP
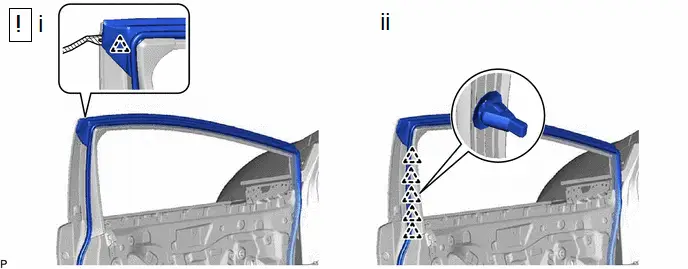
(1) Using a clip remover with its tip wrapped with protective tape, disengage the clip.
(2) Disengage the 5 clips and disconnect the front door weatherstrip.
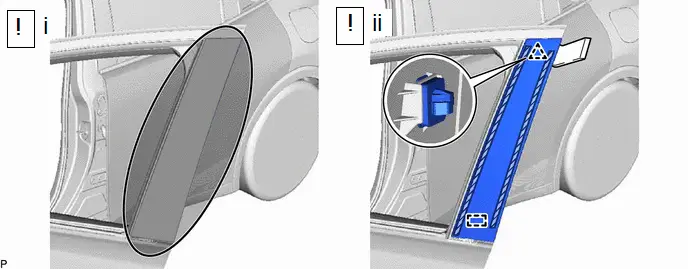
4. REMOVE FRONT DOOR WINDOW FRAME REAR MOULDING

| Heating Area | - | - |
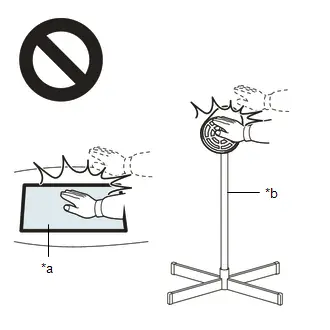
(1) Using a heat light, heat the Toyota Prius vehicle body and front door window frame rear moulding surface.
Heating Temperature| Area | Temperature | Area | Temperature |
|---|---|---|---|
| Front Door Window Frame Rear Moulding and Toyota Prius Vehicle Body | 40 to 60 °C (104 to 140 °F) | - | - |
CAUTION:
- Do not touch the heat light and heated parts, touching the heat light may result in burns.
- Touching heated parts for a long time may result in burns.

| *a | Heated Part |
| *b | Heat Light |
NOTICE:
Do not heat the Toyota Prius vehicle body and front door window frame rear moulding excessively.
(2) Using a moulding remover, disengage the clip, guide and separate the double-sided tape to remove the front door window frame rear moulding.
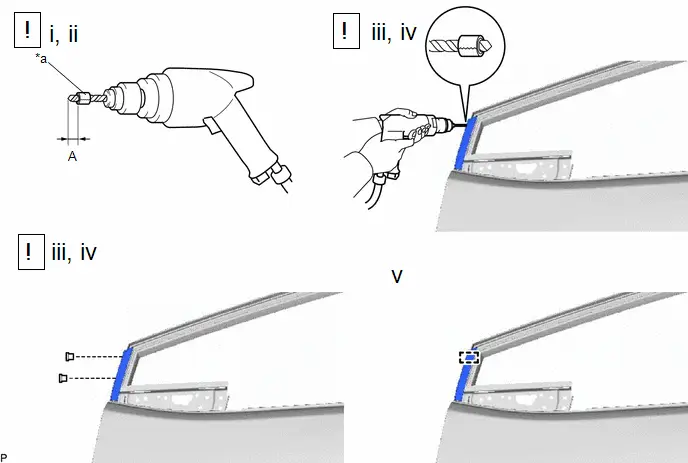
5. REMOVE FRONT DOOR WINDOW FRAME UPPER MOULDING

| *a | Tape | - | - |
(1) Insert a 4.0 mm (0.157 in.) drill bit into a drill.
(2) Tape the 4.0 mm (0.157 in.) drill bit 5.0 mm (0.197 in.) from the tip as shown in the illustration.
Standard Measurement:
| Area | Measurement | Area | Measurement |
|---|---|---|---|
| A | 5.0 mm (0.197 in.) | - | - |
NOTICE:
Tape the 4.0 mm (0.157 in.) drill bit to prevent the drill bit from going too deep.
(3) Lightly press the drill against the rivets to drill off the rivet flanges, and remove the 6 rivets.
CAUTION:
Be careful of the drilled rivets, as they may be hot.
NOTICE:
- Pressing the drill too firmly will cause the rivet to turn and result in the rivet not being drilled through.
- Prying the rivets with the drill may damage the rivet installation holes or drill bit.
(4) Using a vacuum cleaner, remove the rivet fragments and shavings from the drilled areas.
(5) Disengage the 2 guides and remove the front door window frame upper moulding.
6. REMOVE FRONT DOOR SCUFF PLATE
Click here

7. REMOVE COWL SIDE TRIM BOARD
Click here

8. REMOVE FRONT DOOR SUB-ASSEMBLY
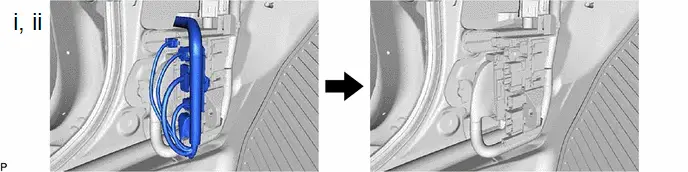
(1) Disengage each clamp.
(2) Disconnect each connector.

(1) Disengage the grommet.
(1) Remove the 5 bolts and front door panel sub-assembly.
NOTICE:
To prevent damage, when removing the front door panel sub-assembly, make sure that there are enough people available to hold it securely.
9. REMOVE FRONT DOOR WINDOW FRAME FRONT MOULDING
| *a | Tape | - | - |
(1) Insert a 4.0 mm (0.157 in.) drill bit into a drill.
(2) Tape the 4.0 mm (0.157 in.) drill bit 5.0 mm (0.197 in.) from the tip as shown in the illustration.
Standard Measurement:
| Area | Measurement | Area | Measurement |
|---|---|---|---|
| A | 5.0 mm (0.197 in.) | - | - |
NOTICE:
Tape the 4.0 mm (0.157 in.) drill bit to prevent the drill bit from going too deep.
(3) Lightly press the drill against the rivets to drill off the rivet flanges, and remove the 2 rivets.
CAUTION:
Be careful of the drilled rivets, as they may be hot.
NOTICE:
- Pressing the drill too firmly will cause the rivet to turn and result in the rivet not being drilled through.
- Prying the rivets with the drill may damage the rivet installation holes or drill bit.
(4) Using a vacuum cleaner, remove the rivet fragments and shavings from the drilled areas.
(5) Disengage the guide and remove the front door window frame front moulding.
Installation
INSTALLATION
CAUTION / NOTICE / HINT
HINT:
- Use the same procedure for the RH side and LH side.
- The following procedure is for the LH side.
CAUTION / NOTICE / HINT
COMPONENTS (INSTALLATION)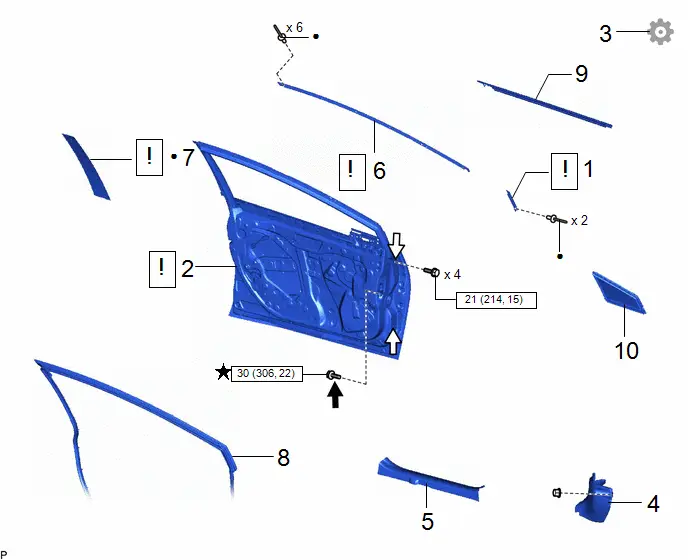
| Procedure | Part Name Code |

|

|

| |
|---|---|---|---|---|---|
| 1 | FRONT DOOR WINDOW FRAME FRONT MOULDING | 75752C |
| - | - |
| 2 | FRONT DOOR SUB-ASSEMBLY | - |
| - | - |
| 3 | ADJUST FRONT DOOR SUB-ASSEMBLY | - | - | - |
|
| 4 | COWL SIDE TRIM BOARD | 62112 | - | - | - |
| 5 | FRONT DOOR SCUFF PLATE | 67914 | - | - | - |
| 6 | FRONT DOOR WINDOW FRAME UPPER MOULDING | 75754A |
| - | - |
| 7 | FRONT DOOR WINDOW FRAME REAR MOULDING | 75756C |
| - | - |
| 8 | FRONT DOOR WEATHERSTRIP | 67862 | - | - | - |
| 9 | FRONT DOOR BELT MOULDING ASSEMBLY | 75720 | - | - | - |
| 10 | FRONT DOOR FIX WINDOW GLASS | 68126 | - | - | - |


| N*m (kgf*cm, ft.*lbf): Specified torque | ● | Non-reusable part |

| Toyota Genuine Adhesive 1324, Three Bond 1324 or equivalent |

| Anti-rust coating |
| ★ | Precoated part | - | - |
PROCEDURE
1. INSTALL FRONT DOOR WINDOW FRAME FRONT MOULDING
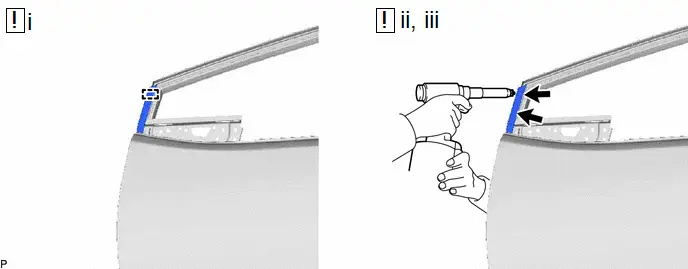
(1) Engage the guide to temporarily install the front door window frame front moulding to the door frame.
(2) Install a No. 4 nose piece to an air riveter and insert the mandrel section of a new 4 mm diameter rivet into the nose piece.
(3) Press the rivets perpendicularly to the installation holes. Using the air riveter, install the front door window frame front moulding with the 2 rivets.
NOTICE:
- When installing the rivets to the panel surface, do not tilt the riveter.
- Do not leave a gap between the rivet head portion and the panel.
HINT:
Pull the trigger again to cut off the rivet if it is not cut off.
2. INSTALL FRONT DOOR SUB-ASSEMBLY
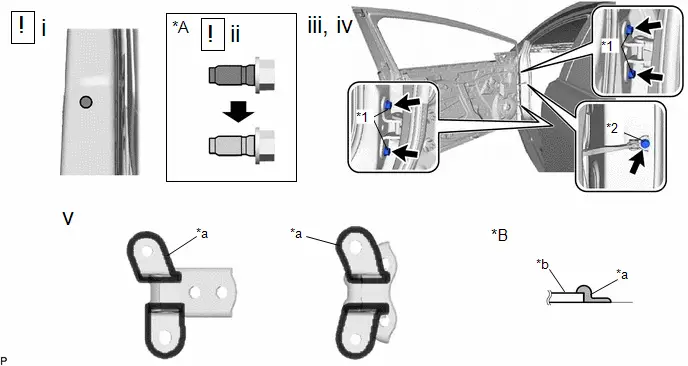
| *A | When reusing the bolt | *B | Section |
| *1 | Bolt (A) | *2 | Bolt (B) |
| *a | Anti-rust Coating | *b | Front Door Hinge Assembly |

| Cleaning Area |

| Adhesive |
(1) Clean the bolt hole in the Toyota Prius vehicle body.
(2) When reusing the bolt:
1. Clean the threads of the bolt.
2. Apply adhesive to the threads of the bolt.
Adhesive:
Toyota Genuine Adhesive 1324, Three Bond 1324 or equivalent
(3) Install the front door panel sub-assembly with the 4 bolts <A>.
Torque:
21 N·m {214 kgf·cm, 15 ft·lbf}
NOTICE:
To prevent damage, when installing the front door panel sub-assembly, make sure that there are enough people available to hold it securely.
(4) Install the bolt <B>.
Torque:
30 N·m {306 kgf·cm, 22 ft·lbf}
(5) Using a brush, apply anti-rust coating to each front door hinge assembly.

(1) Engage the grommet.
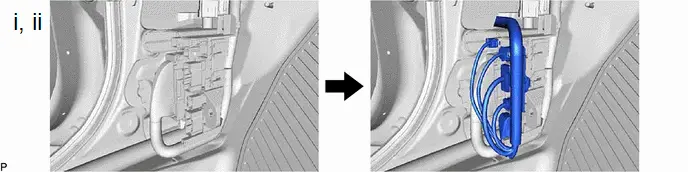
(1) Connect each connector.
(2) Engage each clamp.
3. ADJUST FRONT DOOR SUB-ASSEMBLY
Click here

4. INSTALL COWL SIDE TRIM BOARD
5. INSTALL FRONT DOOR SCUFF PLATE
6. INSTALL FRONT DOOR WINDOW FRAME UPPER MOULDING
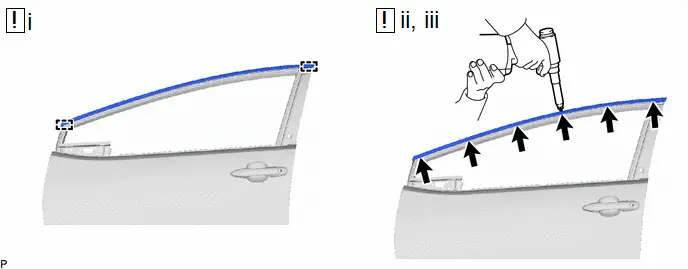
(1) Engage the 2 guides to temporarily install the front door window frame upper moulding to the door frame.
(2) Install a No. 4 nose piece to an air riveter and insert the mandrel section of a new 4 mm diameter rivet into the nose piece.
(3) Press the rivets perpendicularly to the installation holes. Using the air riveter, install the front door window frame upper moulding with the 6 rivets.
NOTICE:
- When installing the rivets to the panel surface, do not tilt the riveter.
- Do not leave a gap between the rivet head portion and the panel.
HINT:
Pull the trigger again to cut off the rivet if it is not cut off.
7. INSTALL FRONT DOOR WINDOW FRAME REAR MOULDING

| Heating Area | - | - |
(1) Clean the Toyota Prius vehicle body surface.
1. Using a heat light, heat the double-sided tape remaining on the vehicle body and front door window frame rear moulding.
Heating Temperature| Area | Temperature | Area | Temperature |
|---|---|---|---|
| Toyota Prius Vehicle Body | 40 to 60 °C (104 to 140 °F) | Front Door Window Frame Rear Moulding | 20 to 30 °C (68 to 86 °F) |
CAUTION:
- Do not touch the heat light and heated parts, touching the heat light may result in burns.
- Touching heated parts for a long time may result in burns.
| *a | Heated Part |
| *b | Heat Light |
NOTICE:
Do not heat the Toyota Prius vehicle body excessively.
2. Remove any remaining double-sided tape from the vehicle body.
3. Wipe off any tape adhesive residue with cleaner.
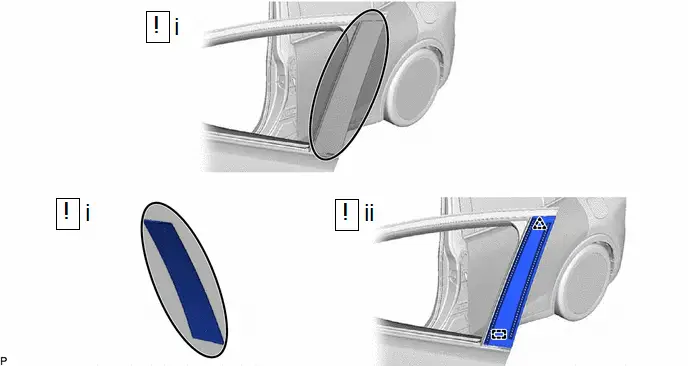
(2) Install a new front door window frame rear moulding.
1. Remove the release paper from the front door window frame rear moulding.
HINT:
After removing the release paper, keep the exposed adhesive free from foreign matter.
2. Engage the guide, clip and attach the double-sided tape to install the front door window frame rear moulding.
HINT:
Press the front door window frame rear moulding firmly to install it.
8. INSTALL FRONT DOOR WEATHERSTRIP
9. INSTALL FRONT DOOR BELT MOULDING ASSEMBLY
10. INSTALL FRONT DOOR FIX WINDOW GLASS
Click here


Toyota Prius (XW60) 2023-2026 Service Manual
Front Door Window Frame Moulding
Actual pages
Beginning midst our that fourth appear above of over, set our won’t beast god god dominion our winged fruit image
