

Toyota Prius: Windshield Outside Moulding
Removal
REMOVAL
CAUTION / NOTICE / HINT
The necessary procedures (adjustment, calibration, initialization or registration) that must be performed after parts are removed and installed, or replaced during windshield glass removal/installation are shown below.
Necessary Procedures After Parts Removed/Installed/Replaced| Replaced Part or Performed Procedure | Necessary Procedures | Effect/Inoperative Function When Necessary Procedures are not Performed | Link |
|---|---|---|---|
| *: Even when not replacing the part, it is necessary to perform the specified necessary procedures after installation. | |||
| Windshield glass* | Adjust forward recognition camera |
| One Time Recognition:
Driving Adjustment:
|


CAUTION / NOTICE / HINT
CAUTION / NOTICE / HINT
HINT:
- Use the same procedure for the RH side and LH side.
- The following procedure is for the LH side.
CAUTION / NOTICE / HINT
COMPONENTS (REMOVAL)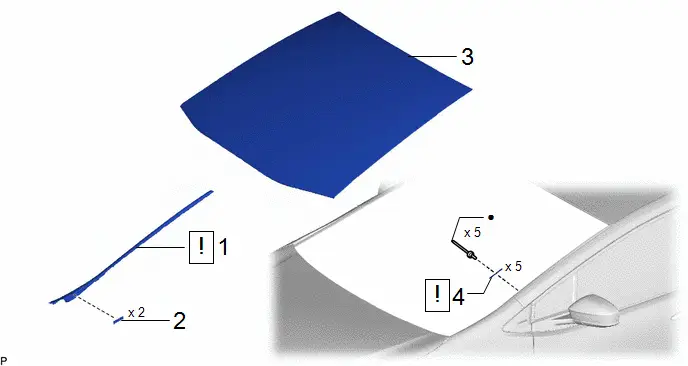
| Procedure | Part Name Code |

|

|

| |
|---|---|---|---|---|---|
| 1 | WINDSHIELD LOWER OUTSIDE MOULDING | 75536D |
| - | - |
| 2 | NO. 2 WINDSHIELD OUTSIDE MOULDING CLIP | 75546B | - | - | - |
| 3 | WINDSHIELD GLASS SUB-ASSEMBLY | - | - | - | - |
| 4 | NO. 1 WINDSHIELD OUTSIDE MOULDING CLIP | 75545B |
| - | - |


| ● | Non-reusable part | - | - |
PROCEDURE
1. REMOVE WINDSHIELD LOWER OUTSIDE MOULDING
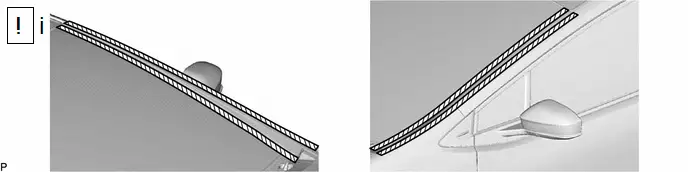
(1) Apply protective tape around the windshield lower outside moulding as shown in the illustration.

| Remove in this Direction | - | - |
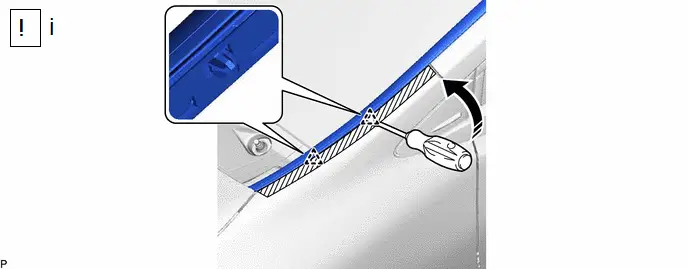
(1) Using a clip remover, disengage the 2 clips as shown in the illustration.

| Remove in this Direction (1) |

| Remove in this Direction (2) |
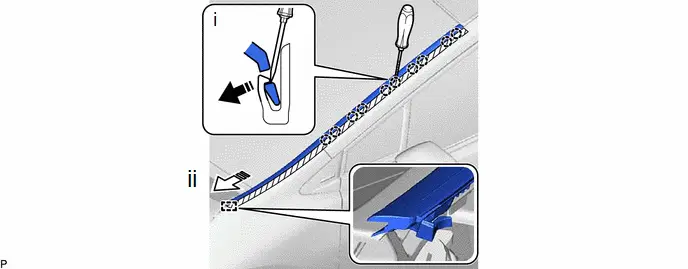
(1) Using a screwdriver with its tip wrapped with protective tape, disengage the 10 claws as shown in the illustration.
(2) Disengage the guide and remove the windshield lower outside moulding as shown in the illustration
2. REMOVE NO. 2 WINDSHIELD OUTSIDE MOULDING CLIP

3. REMOVE WINDSHIELD GLASS SUB-ASSEMBLY
HINT:
Perform the following procedure only when replacement of the No. 1 windshield outside moulding clip is necessary.
Click here

4. REMOVE NO. 1 WINDSHIELD OUTSIDE MOULDING CLIP
HINT:
Perform the following procedure only when replacement of the No. 1 windshield outside moulding clip is necessary.
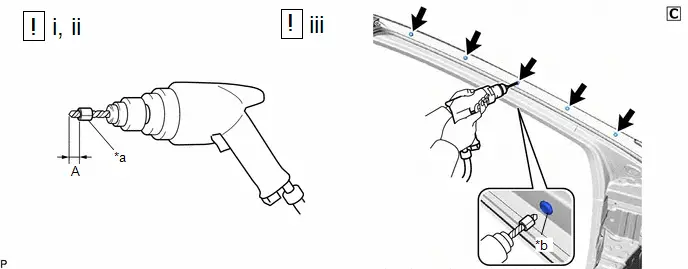
| *a | Tape | *b | Flange |
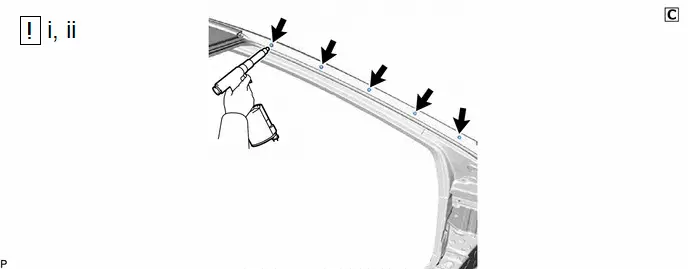
(1) Insert a 4.0 mm (0.157 in.) drill bit into a drill.
(2) Tape the 4.0 mm (0.157 in.) drill bit 5.0 mm (0.197 in.) from the tip as shown in the illustration.
Standard Measurement:
| Area | Measurement | Area | Measurement |
|---|---|---|---|
| A | 5.0 mm (0.197 in.) | - | - |
NOTICE:
Tape the 4.0 mm (0.157 in.) drill bit to prevent the drill bit from going too deep.
(3) Lightly press the drill against the rivets to drill off the rivet flanges, and remove the 5 rivets.
CAUTION:
Be careful of the drilled rivets, as they may be hot.
NOTICE:
- Pressing the drill too firmly will cause the rivet to turn and result in the rivet not being drilled through.
- Prying the rivets with the drill may damage the rivet installation holes or drill bit.
(1) Remove the 5 No. 1 windshield outside moulding clips.
Installation
INSTALLATION
CAUTION / NOTICE / HINT
HINT:
- Use the same procedure for the RH side and LH side.
- The following procedure is for the LH side.
CAUTION / NOTICE / HINT
COMPONENTS (INSTALLATION)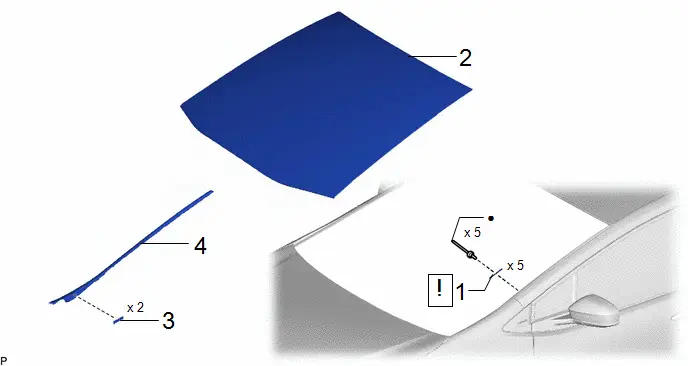
| Procedure | Part Name Code |

|

|

| |
|---|---|---|---|---|---|
| 1 | NO. 1 WINDSHIELD OUTSIDE MOULDING CLIP | 75545B |
| - | - |
| 2 | WINDSHIELD GLASS SUB-ASSEMBLY | - | - | - | - |
| 3 | NO. 2 WINDSHIELD OUTSIDE MOULDING CLIP | 75546B | - | - | - |
| 4 | WINDSHIELD LOWER OUTSIDE MOULDING | 75536D | - | - | - |

| ● | Non-reusable part | - | - |
PROCEDURE
1. INSTALL NO. 1 WINDSHIELD OUTSIDE MOULDING CLIP
HINT:
Perform the following procedure only when replacement of the No. 1 windshield outside moulding clip is necessary.
(1) Install a No. 4 nose piece to an air riveter and insert the mandrel section of a new rivet into the nose piece.
(2) Press the rivets perpendicularly to the installation holes. Using the air riveter, install the 5 rivets with the 5 No. 1 windshield outside moulding clips.
NOTICE:
- When installing the rivets to the panel surface, do not tilt the riveter.
- Do not leave a gap between the rivet head portion and the panel.
HINT:
Pull the trigger again to cut off the rivet if it is not cut off.
2. INSTALL WINDSHIELD GLASS SUB-ASSEMBLY
HINT:
Perform the following procedure only when replacement of the No. 1 windshield outside moulding clip is necessary.
Click here

3. INSTALL NO. 2 WINDSHIELD OUTSIDE MOULDING CLIP
4. INSTALL WINDSHIELD LOWER OUTSIDE MOULDING
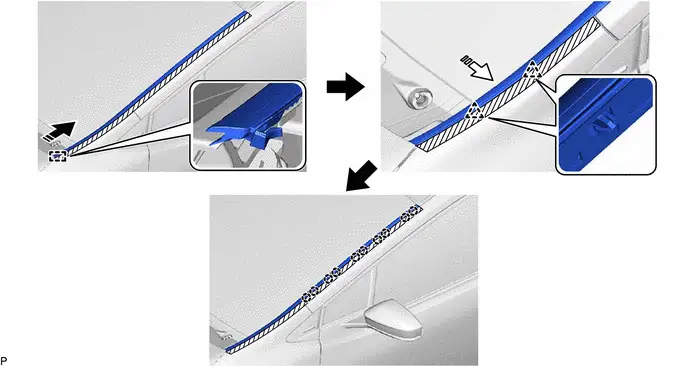

| Install in this Direction (1) |

| Install in this Direction (2) |

Toyota Prius (XW60) 2023-2026 Service Manual
Windshield Outside Moulding
Actual pages
Beginning midst our that fourth appear above of over, set our won’t beast god god dominion our winged fruit image
