Toyota Prius: Windshield Glass
Removal
REMOVAL
CAUTION / NOTICE / HINT
The necessary procedures (adjustment, calibration, initialization or registration) that must be performed after parts are removed and installed, or replaced during windshield glass removal/installation are shown below.
Necessary Procedures After Parts Removed/Installed/Replaced| Replaced Part or Performed Procedure | Necessary Procedures | Effect/Inoperative Function When Necessary Procedures are not Performed | Link |
|---|---|---|---|
| *: Even when not replacing the part, it is necessary to perform the specified necessary procedures after installation. | |||
| Windshield glass* | Adjust forward recognition camera |
| One Time Recognition:
Driving Adjustment:
|
CAUTION / NOTICE / HINT
NOTICE:
- After cutting off the old adhesive remaining on the adhesion surface, apply new adhesive within 2 hours.
- If the cut surface of the old adhesive is left exposed for a long time, the adhesion strength will be reduced, so apply the new adhesive quickly.
CAUTION / NOTICE / HINT
COMPONENTS (REMOVAL)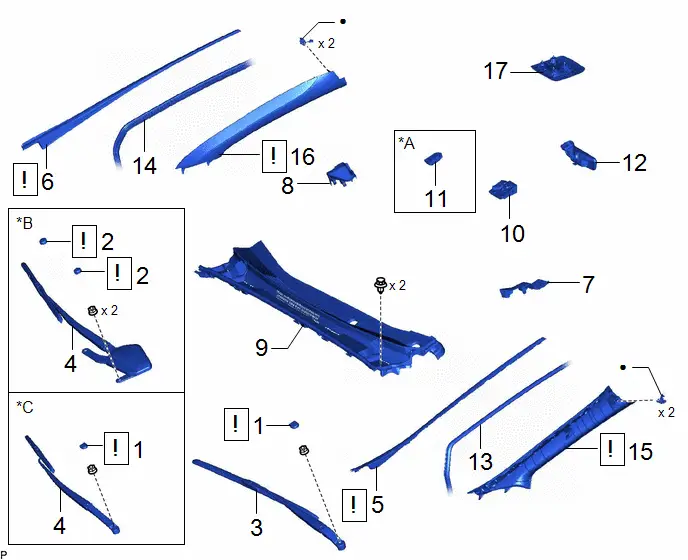
| Procedure | Part Name Code |

|

|

| |
|---|---|---|---|---|---|
| 1 | FRONT WIPER ARM HEAD CAP | 85292B |
| - | - |
| 2 | SHIELD CAP | 85247 |
| - | - |
| 3 | FRONT WIPER ARM AND BLADE ASSEMBLY LH | - | - | - | - |
| 4 | FRONT WIPER ARM AND BLADE ASSEMBLY RH | - | - | - | - |
| 5 | WINDSHIELD LOWER OUTSIDE MOULDING LH | 75536D |
| - | - |
| 6 | WINDSHIELD LOWER OUTSIDE MOULDING RH | 75535F |
| - | - |
| 7 | COWL WATER EXTRACT SHIELD LH | 55754F | - | - | - |
| 8 | COWL WATER EXTRACT SHIELD RH | 55753D | - | - | - |
| 9 | COWL TOP VENTILATOR LOUVER SUB-ASSEMBLY | 55708 | - | - | - |
| 10 | FORWARD RECOGNITION CAMERA | 8646C | - | - | - |
| 11 | RAIN SENSOR | 89941 | - | - | - |
| 12 | INNER REAR VIEW MIRROR ASSEMBLY | 87810 | - | - | - |
| 13 | FRONT DOOR OPENING TRIM WEATHERSTRIP LH | 62312B | - | - | - |
| 14 | FRONT DOOR OPENING TRIM WEATHERSTRIP RH | 62311B | - | - | - |
| 15 | FRONT PILLAR GARNISH LH | 62212 |
| - | - |
| 16 | FRONT PILLAR GARNISH RH | 62211 |
| - | - |
| 17 | MAP LIGHT ASSEMBLY | - | - | - | - |
| *A | w/ Rain Sensor | *B | for M20A-FXS |
| *C | for 2ZR-FXE | - | - |
| ● | Non-reusable part | - | - |
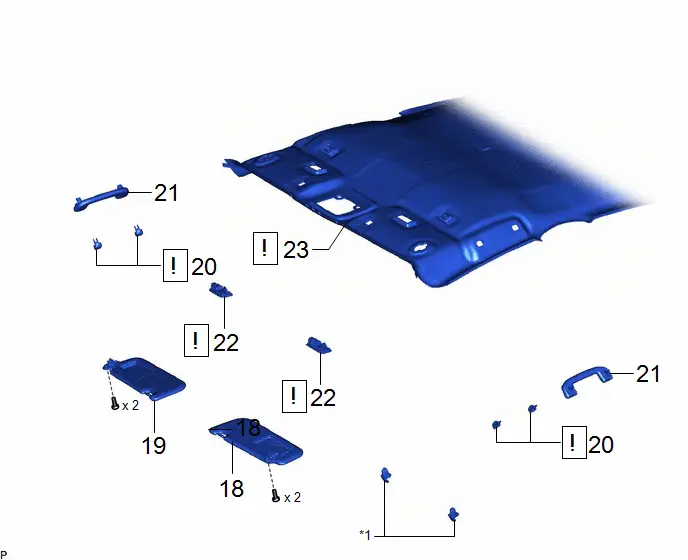
| Procedure | Part Name Code |

|

|

| |
|---|---|---|---|---|---|
| 18 | VISOR ASSEMBLY LH | 74320 | - | - | - |
| 19 | VISOR ASSEMBLY RH | 74310 | - | - | - |
| 20 | ASSIST GRIP COVER | 74612 |
| - | - |
| 21 | ASSIST GRIP | - | - | - | - |
| 22 | VANITY LIGHT ASSEMBLY | 81340 |
| - | - |
| 23 | ROOF HEADLINING ASSEMBLY | - |
| - | - |
| *1 | VISOR HOLDER | - | - |
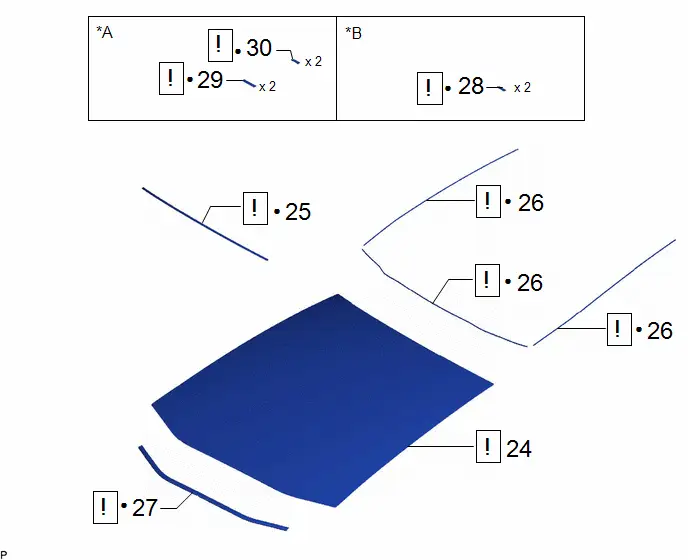
| Procedure | Part Name Code |

|

|

| |
|---|---|---|---|---|---|
| 24 | WINDSHIELD GLASS SUB-ASSEMBLY | - |
| - | - |
| 25 | WINDSHIELD OUTSIDE MOULDING | 75533G |
| - | - |
| 26 | NO. 2 WINDOW GLASS ADHESIVE DAM | 56118B |
| - | - |
| 27 | FRONT WINDOW INNER CENTER MOULDING | 56153C |
| - | - |
| 28 | NO. 1 WINDSHIELD GLASS STOPPER | 56115A |
| - | - |
| 29 | NO. 2 WINDSHIELD GLASS STOPPER | 56116C |
| - | - |
| 30 | NO. 1 WINDSHIELD GLASS STOPPER | 56115A |
| - | - |
| *A | for 2-piece Type | *B | for 1-piece Type |
| ● | Non-reusable part | - | - |
PROCEDURE
1. REMOVE FRONT WIPER ARM HEAD CAP

| Click here
|
2. REMOVE SHIELD CAP

| Click here
|
3. REMOVE FRONT WIPER ARM AND BLADE ASSEMBLY LH
Click here

4. REMOVE FRONT WIPER ARM AND BLADE ASSEMBLY RH
Click here

5. REMOVE WINDSHIELD LOWER OUTSIDE MOULDING LH

| Click here
|
6. REMOVE WINDSHIELD LOWER OUTSIDE MOULDING RH
(a) Use the same procedure as for the LH side.
7. REMOVE COWL WATER EXTRACT SHIELD LH
Click here

8. REMOVE COWL WATER EXTRACT SHIELD RH
(a) Use the same procedure as for the LH side.
9. REMOVE COWL TOP VENTILATOR LOUVER SUB-ASSEMBLY
Click here

10. REMOVE FORWARD RECOGNITION CAMERA
Click here

11. REMOVE RAIN SENSOR (w/ Rain Sensor)
Click here

12. REMOVE INNER REAR VIEW MIRROR ASSEMBLY
w/o EC Mirror: Click here

w/ EC Mirror: Click here

for Digital Inner Mirror: Click here

13. DISCONNECT FRONT DOOR OPENING TRIM WEATHERSTRIP LH

14. DISCONNECT FRONT DOOR OPENING TRIM WEATHERSTRIP RH
(a) Use the same procedure as for the LH side.
15. REMOVE FRONT PILLAR GARNISH LH

| Click here
|
16. REMOVE FRONT PILLAR GARNISH RH
(a) Use the same procedure as for the LH side.
17. REMOVE MAP LIGHT ASSEMBLY
Click here

18. REMOVE VISOR ASSEMBLY LH
Click here

19. REMOVE VISOR ASSEMBLY RH
(a) Use the same procedure as for the LH side.
20. REMOVE ASSIST GRIP COVER

| Click here
|
21. REMOVE ASSIST GRIP
Click here

22. REMOVE VANITY LIGHT ASSEMBLY

| Click here
|
23. DISCONNECT ROOF HEADLINING ASSEMBLY


| Rotation Direction |

| Remove in this Direction (1) |

| Remove in this Direction (2) | - | - |
(1) Turn each visor holders approximately 45° and remove them as indicated by the arrows, in the order shown in the illustration.
(2) Disengage the 4 claws as shown in the illustration to remove the base of each visor holder.

(1) Slightly lower the front section of the roof headlining assembly so that the windshield glass can be removed.
NOTICE:
Do not damage the roof headlining assembly or Toyota Prius vehicle interior.
HINT:
It is not necessary to completely remove the roof headlining assembly.
24. REMOVE WINDSHIELD GLASS SUB-ASSEMBLY
NOTICE:
- After cutting off the old adhesive remaining on the adhesion surface, apply new adhesive within 2 hours.
- If the cut surface of the old adhesive is left exposed for a long time, the adhesion strength will be reduced, so apply the new adhesive quickly.
(a) w/ Windshield Deicer System:

(1) Disconnect the connector.


| Protective Tape | - | - |
(1) Apply protective tape to the area around the installation position of the windshield glass on the Toyota Prius vehicle body to prevent it from being scratched.

| *a | Cut | - | - |
(1) Using a knife, cut off the windshield outside moulding as shown in the illustration.

| *a | Matchmark | - | - |
(1) Place matchmarks on the windshield glass and Toyota Prius vehicle body at the locations indicated in the illustration.
HINT:
Matchmarks are not necessary if the windshield glass is not going to be reused.

| *a | Suction Cup | - | - |
(1) Install the 2 suction cups to the windshield glass.

| *1 | Windshield Glass | - | - |
| *a | Windshield Knife | *b | Adhesive |

| Pull | - | - |
(1) When using a windshield knife:
- Apply soapy water to the area around the adhesive.
- Insert a windshield knife into the adhesive between the windshield glass and Toyota Prius vehicle body.
-
While keeping the windshield knife perpendicular to the outer surface of the windshield glass, cut the adhesive by pulling the windshield knife around the windshield glass.
NOTICE:
- Do not pry the windshield glass with the windshield knife.
- Do not use a windshield knife to cut the adhesive on the lower side of the windshield glass.
- When separating the windshield glass, be careful not to damage the paint or interior and exterior ornaments.
HINT:
Insert the windshield knife in an area where the gap between windshield glass and Toyota Prius vehicle body is large.

| *1 | Windshield Glass Stopper | - | - |
| *a | Piano Wire | - | - |
(1) When using piano wire:
- Pass a piano wire between the Toyota Prius vehicle body and glass from the interior, as shown in the illustration.
- Tie both wire ends to wooden blocks or similar objects that can serve as handles.
-
Cut the adhesive by pulling the piano wire around the windshield glass.
NOTICE:
- When separating the windshield glass, be careful not to damage the paint or interior and exterior ornaments.
- To prevent the safety pad from being scratched when removing the windshield glass, place a plastic sheet between the piano wire and safety pad.
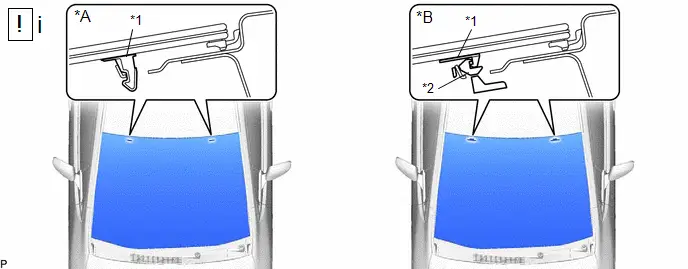
| *A | for 1-piece Type | *B | for 2-piece Type |
| *1 | No. 1 Windshield Glass Stopper | *2 | No. 2 Windshield Glass Stopper |
(1) Disengage the windshield glass stoppers.
NOTICE:
- The No. 1 windshield glass stoppers and No. 2 windshield glass stoppers are installed to the windshield glass as shown in the illustration. Be careful not to damage the windshield glass when cutting the adhesive.
- To prevent the windshield glass from falling when performing this operation, be sure to hold the windshield glass using 2 suction cups.
HINT:
Depending on the Toyota Prius vehicle, either 1-piece type or 2-piece type stoppers may be present.
25. REMOVE WINDSHIELD OUTSIDE MOULDING
(a) When reusing the windshield glass:

| *a | Back Side | - | - |
(1) Using a scraper, remove the windshield outside moulding.
NOTICE:
- Be careful not to damage the windshield glass.
- Be sure to replace the windshield outside moulding with a new one.
26. REMOVE NO. 2 WINDOW GLASS ADHESIVE DAM
(a) When reusing the windshield glass:

| *a | Back Side | - | - |
(1) Using a scraper, remove the 3 No. 2 windshield glass adhesive dams.
NOTICE:
- Be careful not to damage the windshield glass.
- Be sure to replace the windshield glass adhesive dam with a new one.
27. REMOVE FRONT WINDOW INNER CENTER MOULDING
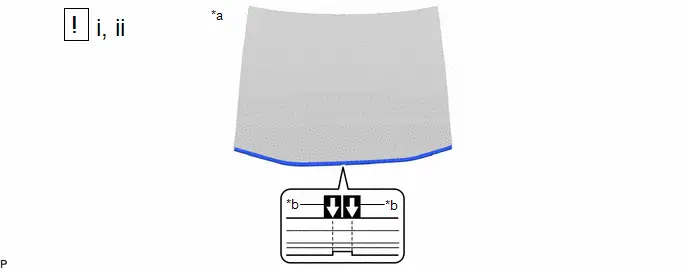
| *a | Back Side | *b | Matchmark |
(1) Place matchmarks on the windshield glass at the locations indicated in the illustration.
(2) Using a scraper, remove the front window inner center moulding.
NOTICE:
- Be careful not to damage the windshield glass.
- Be sure to replace the front window inner center moulding with a new one.
28. REMOVE NO. 1 WINDSHIELD GLASS STOPPER (for 1-piece Type)
(a) When reusing windshield glass:

| *a | Back Side | - | - |
(1) Remove the 2 No. 1 windshield glass stoppers as shown in the illustration.
NOTICE:
- Be careful not to damage the windshield glass.
- Be sure to replace the 1-piece type No. 1 windshield glass stoppers with new 2-piece type No. 1 and No. 2 windshield glass stoppers.
29. REMOVE NO. 2 WINDSHIELD GLASS STOPPER (for 2-piece Type)
(a) When reusing the windshield glass:

| *a | Back Side | - | - |
(1) Using a scraper, remove the 2 No. 2 windshield glass stoppers.
NOTICE:
- Be careful not to damage the windshield glass.
- Be sure to replace the No. 2 windshield glass stoppers with new ones.
30. REMOVE NO. 1 WINDSHIELD GLASS STOPPER (for 2-piece Type)

| *1 | No. 1 Windshield Glass Stopper | - | - |
(1) Remove the 2 No. 1 windshield glass stoppers from the Toyota Prius vehicle body.
NOTICE:
Be sure to replace the No. 1 windshield glass stoppers with new ones.
Installation
INSTALLATION
CAUTION / NOTICE / HINT
NOTICE:
- Make sure to use Toyota Genuine Windshield Glass Adhesive (High Modulus Type) or an equivalent high modulus adhesive.
- After cutting off the old adhesive remaining on the adhesion surface, apply new adhesive within 2 hours.
- If the cut surface of the old adhesive is left exposed for a long time, the adhesion strength will be reduced, so apply the new adhesive quickly.
- When replacing the windshield glass of a Toyota Prius vehicle equipped with a forward recognition camera, make sure to use a Lexus genuine part. If a non-Lexus genuine part is used, the forward recognition camera may not be able to be installed due to a missing bracket. Also, the dynamic radar cruise control system, front camera system, lane tracing assist system, pre-collision system or adaptive high beam system may not operate properly due to a difference in the transmissivity or black ceramic border.
CAUTION / NOTICE / HINT
COMPONENTS (INSTALLATION)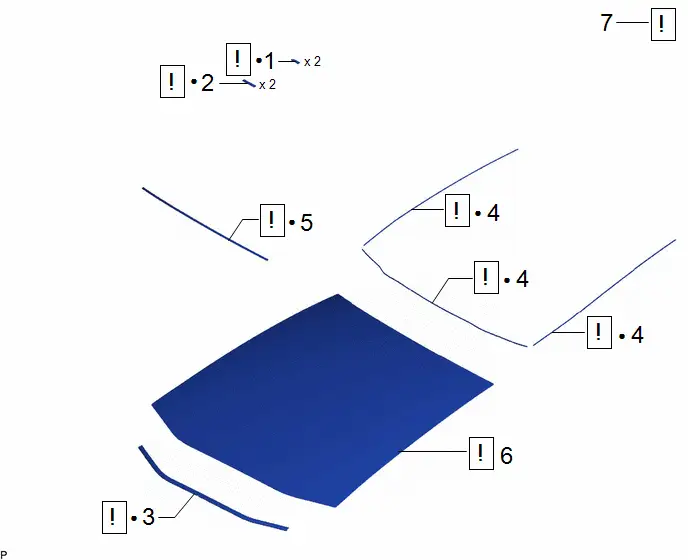
| Procedure | Part Name Code |

|

|

| |
|---|---|---|---|---|---|
| 1 | NO. 1 WINDSHIELD GLASS STOPPER | 56115A |
| - | - |
| 2 | NO. 2 WINDSHIELD GLASS STOPPER | 56116C |
| - | - |
| 3 | FRONT WINDOW INNER CENTER MOULDING | 56153C |
| - | - |
| 4 | NO. 2 WINDOW GLASS ADHESIVE DAM | 56118B |
| - | - |
| 5 | WINDSHIELD OUTSIDE MOULDING | 75533G |
| - | - |
| 6 | WINDSHIELD GLASS SUB-ASSEMBLY | - |
| - | - |
| 7 | INSPECT FOR LEAK AND REPAIR | - |
| - | - |
| ● | Non-reusable part | - | - |
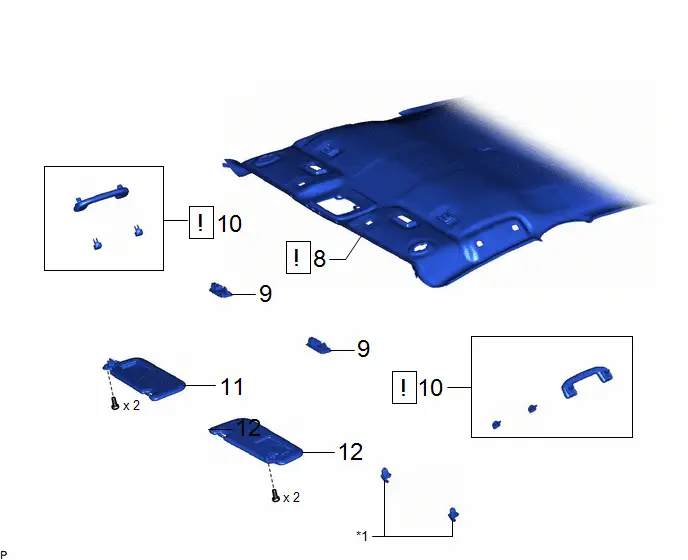
| Procedure | Part Name Code |

|

|

| |
|---|---|---|---|---|---|
| 8 | ROOF HEADLINING ASSEMBLY | - |
| - | - |
| 9 | VANITY LIGHT ASSEMBLY | 81340 | - | - | - |
| 10 | ASSIST GRIP SUB-ASSEMBLY | 74610E |
| - | - |
| 11 | VISOR ASSEMBLY RH | 74310 | - | - | - |
| 12 | VISOR ASSEMBLY LH | 74320 | - | - | - |
| *1 | VISOR HOLDER | - | - |
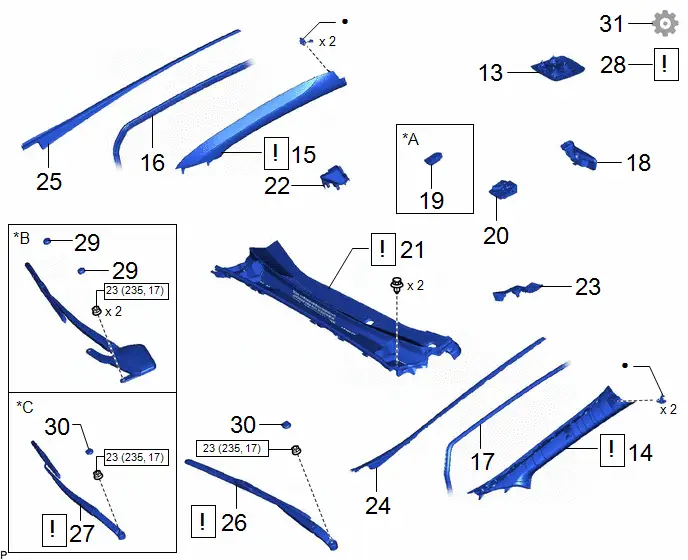
| Procedure | Part Name Code |

|

|

| |
|---|---|---|---|---|---|
| 13 | MAP LIGHT ASSEMBLY | - | - | - | - |
| 14 | FRONT PILLAR GARNISH LH | 62212 |
| - | - |
| 15 | FRONT PILLAR GARNISH RH | 62211 |
| - | - |
| 16 | FRONT DOOR OPENING TRIM WEATHERSTRIP RH | 62311B | - | - | - |
| 17 | FRONT DOOR OPENING TRIM WEATHERSTRIP LH | 62312B | - | - | - |
| 18 | INNER REAR VIEW MIRROR ASSEMBLY | 87810 | - | - | - |
| 19 | RAIN SENSOR | 89941 | - | - | - |
| 20 | FORWARD RECOGNITION CAMERA | 8646C | - | - | - |
| 21 | COWL TOP VENTILATOR LOUVER SUB-ASSEMBLY | 55708 | - | - | - |
| 22 | COWL WATER EXTRACT SHIELD RH | 55753D | - | - | - |
| 23 | COWL WATER EXTRACT SHIELD LH | 55754F | - | - | - |
| 24 | WINDSHIELD LOWER OUTSIDE MOULDING LH | 75536D | - | - | - |
| 25 | WINDSHIELD LOWER OUTSIDE MOULDING RH | 75535F | - | - | - |
| 26 | FRONT WIPER ARM AND BLADE ASSEMBLY LH | - |
| - | - |
| 27 | FRONT WIPER ARM AND BLADE ASSEMBLY RH | - |
| - | - |
| 28 | INSPECT FRONT WIPER ARM AND BLADE ASSEMBLY | - |
| - | - |
| 29 | SHIELD CAP | 85247 | - | - | - |
| 30 | FRONT WIPER ARM HEAD CAP | 85292B | - | - | - |
| 31 | ADJUST FORWARD RECOGNITION CAMERA | 8646C | - | - |
|
| *A | w/ Rain Sensor | *B | for M20A-FXS |
| *C | for 2ZR-FXE | - | - |

| N*m (kgf*cm, ft.*lbf): Specified torque | ● | Non-reusable part |
PROCEDURE
1. INSTALL NO. 1 WINDSHIELD GLASS STOPPER

| *1 | No. 1 Windshield Glass Stopper | - | - |
(1) Install 2 new No. 1 windshield glass stoppers to the Toyota Prius vehicle body as shown in the illustration.
HINT:
Only 2-piece type windshield glass stoppers are provided as supply parts. Use 2-piece type stoppers as replacements even if 1-piece type stoppers were originally installed.
2. INSTALL NO. 2 WINDSHIELD GLASS STOPPER

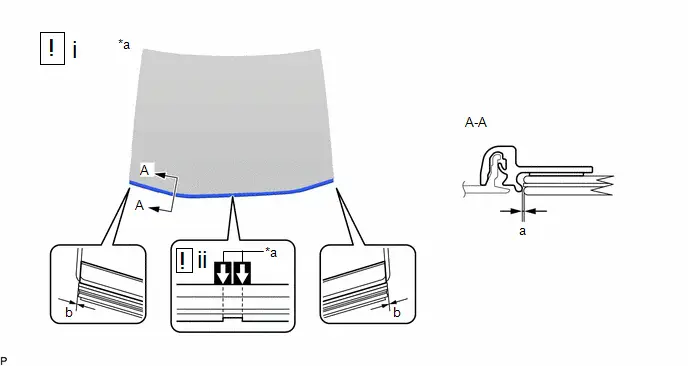
| *a | Back Side | *b | Ceramic Notch |
| *c | Windshield Glass Edge Side | - | - |
Standard Dimension:
| Area | Dimension | Area | Dimension |
|---|---|---|---|
| a | 27.8 mm (1.094 in.) | - | - |
(1) Using a brush or sponge, coat the installation area of 2 new No. 2 windshield glass stoppers with glass primer.
NOTICE:
- Do not apply too much glass primer.
- Allow the glass primer to dry for 3 minutes or more.
- Throw away any leftover glass primer.
HINT:
If an area other than specified is coated by accident, wipe off the glass primer with a clean piece of cloth before it dries.
(2) Install the 2 No. 2 windshield glass stoppers to the windshield glass as shown in the illustration.
HINT:
Only 2-piece type windshield glass stoppers are provided as supply parts. Use 2-piece type stoppers as replacements even if 1-piece type stoppers were originally installed.
3. INSTALL FRONT WINDOW INNER CENTER MOULDING

| *a | Back Side | - | - |

| Glass Primer | - | - |
Standard Dimension:
| Item | Dimension | Item | Dimension |
|---|---|---|---|
| a | 17.5 to 20.5 mm (0.689 to 0.807 in.) | - | - |
(1) Using a brush or sponge, coat the adhesive application area with glass primer.
NOTICE:
- Do not apply too much glass primer.
- Allow the glass primer to dry for 3 minutes or more.
- Throw away any leftover glass primer.
HINT:
If an area other than specified is coated by accident, wipe off the glass primer with a clean piece of cloth before it dries.
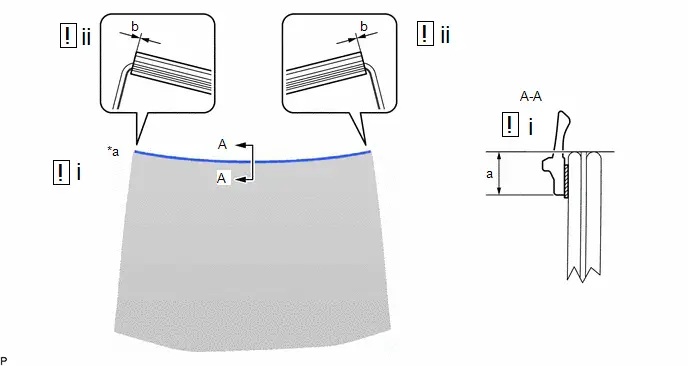
| *a | Back Side | - | - |
(1) Install the new front window inner center moulding to the windshield glass as shown in the illustration.
Standard Dimension:
| Item | Dimension | Item | Dimension |
|---|---|---|---|
| a | 0.6 mm (0.0236 in.) | b | -2.0 to 2.0 mm (-0.0787 to 0.0787 in.) |
NOTICE:
Do not damage the front window inner center moulding.
(2) Remove the matchmarks.
4. INSTALL NO. 2 WINDOW GLASS ADHESIVE DAM
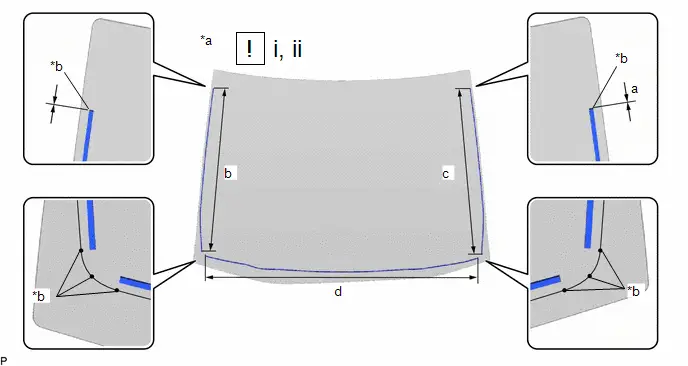
| *a | Back Side | *b | Ceramic Notch |
Reference Measurement:
| Area | Measurement | Area | Measurement |
|---|---|---|---|
| a | 0.0 mm (0.0 in.) | b | 82.1 to 83.1 cm (2.69 to 2.73 ft.) |
| c | 83.2 to 84.2 cm (2.73 to 2.76 ft.) | d | 128.8 to 129.8 cm (4.22 to 4.26 ft.) |
(1) Using a brush or sponge, coat the installation area of 3 new windshield glass adhesive dams with glass primer.
NOTICE:
- Do not apply too much glass primer.
- Allow the glass primer to dry for 3 minutes or more.
- Throw away any leftover glass primer.
HINT:
If an area other than specified is coated by accident, wipe off the glass primer with a clean piece of cloth before it dries.
(2) Install the 3 windshield glass adhesive dams to the windshield glass as shown in the illustration.
5. INSTALL WINDSHIELD OUTSIDE MOULDING
| *a | Back Side | - | - |
Reference Measurement / Standard Dimension:
| Area | Measurement | Area | Dimension |
|---|---|---|---|
| a | 6.9 mm (0.272 in.) | b | -3.0 to 3.0 mm (-0.118 to 0.118 in.) |
(1) Using a brush or sponge, coat the installation area of a new windshield outside moulding with glass primer.
NOTICE:
- Do not apply too much glass primer.
- Allow the glass primer to dry for 3 minutes or more.
- Throw away any leftover glass primer.
HINT:
If an area other than specified is coated by accident, wipe off the glass primer with a clean piece of cloth before it dries.
(2) Install the windshield outside moulding to the windshield glass as shown in the illustration.
6. INSTALL WINDSHIELD GLASS SUB-ASSEMBLY
NOTICE:
- After cutting off the old adhesive remaining on the adhesion surface, apply new adhesive within 2 hours.
- If the cut surface of the old adhesive is left exposed for a long time, the adhesion strength will be reduced, so apply the new adhesive quickly.

| *a | Matchmark | *b | Suction Cup |
(1) Prepare to install the windshield glass by the below procedure.
- Position the windshield glass.
- Using 2 suction cups, place the windshield glass in the correct position.
- Check that the whole contact surface of the windshield glass rim is perfectly even.
-
Align the matchmarks on the windshield glass and Toyota Prius vehicle body.
NOTICE:
Check that the windshield glass stoppers are attached to the vehicle body correctly.
- Remove the windshield glass.
-
Using a brush, coat the installation surface on the vehicle body with body primer.
NOTICE:
- Do not coat the adhesive with body primer.
- Do not apply too much body primer.
- Allow the body primer to dry for 3 minutes or more.
- Throw away any leftover body primer.
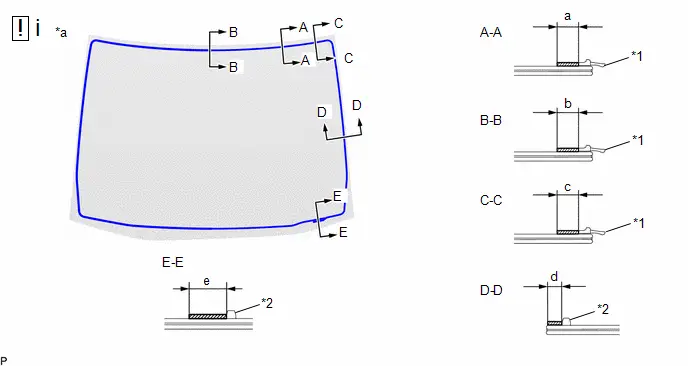
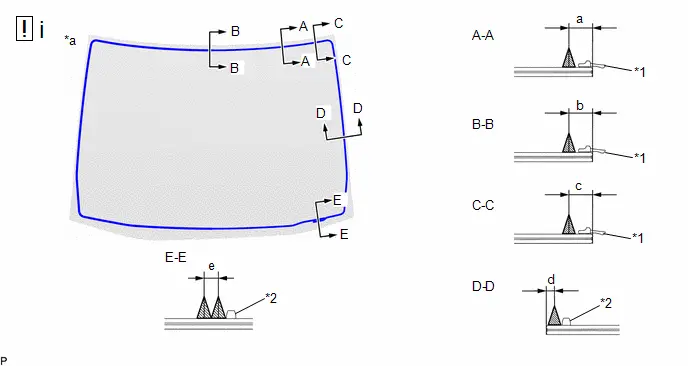
| *1 | Windshield Outside Moulding | *2 | Windshield Glass Adhesive Dam |
| *a | Back Side | - | - |

| Glass Primer | - | - |
Standard Dimension:
| Item | Dimension | Item | Dimension |
|---|---|---|---|
| a | 10.5 mm (0.413 in.) or more | b | 10.5 mm (0.413 in.) or more |
| c | 10.5 mm (0.413 in.) or more | d | 8.0 mm (0.3150 in.) or more |
| e | 18 mm (0.709 in.) or more | - | - |
(1) Using a brush or sponge, coat the adhesive application area with glass primer.
NOTICE:
- Do not apply too much glass primer.
- Allow the glass primer to dry for 3 minutes or more.
- Throw away any leftover glass primer.
HINT:
- Apply glass primer to the ceramic notches.
- If an area other than specified is coated by accident, wipe off the glass primer with a clean piece of cloth before it dries.

| *a | Nozzle | - | - |
(1) Prepare to apply adhesive to the windshield glass by the below procedure.
Adhesive:
Toyota Genuine Windshield Glass Adhesive (High modulus type) or equivalent
-
Cut off the tip of the cartridge nozzle as shown in the illustration.
Standard Dimension:
Item
Dimension
Item
Dimension
a
10.0 to 13.0 mm (0.394 to 0.512 in.)
b
6.0 to 9.0 mm (0.236 to 0.354 in.)
- Load the sealer gun with cartridge.
| *1 | Windshield Outside Moulding | *2 | Windshield Glass Adhesive Dam |
| *a | Back Side | - | - |

| Adhesive | - | - |
(1) Apply adhesive to the windshield glass, as shown in the illustration.
Standard Dimension:
| Item | Dimension | Item | Dimension |
|---|---|---|---|
| a | 11.5 mm (0.453 in.) | b | 11.5 mm (0.453 in.) |
| c | 11.4 mm (0.449 in.) | d | 4.0 mm (0.157 in.) |
| e | 6.0 mm (0.236 in.) | - | - |
HINT:
Apply adhesive onto the ceramic notches.

| *a | Matchmark | *b | Suction Cup |
(1) Install the windshield glass.
-
Using 2 suction cups, position the windshield glass so that the matchmarks are aligned, and press it in gently along the rim.
NOTICE:
- Check that the windshield glass stoppers are engaged to the Toyota Prius vehicle body correctly.
- Check the clearance between the vehicle body and windshield glass.
-
Lightly press the outer surface of the windshield glass to ensure that the windshield glass is securely fit to the vehicle body.
HINT:
Press the glass with a force of 98 N (10 kgf, 22.0 lbf) or more.
- Using a scraper, remove any excess or protruding adhesive.
-
Hold the windshield glass using protective tape until the applied adhesive becomes hard.
HINT:
Follow the instructions supplied by the adhesive manufacturer or in the corresponding instruction manual for the minimum amount of time necessary to wait before driving the Toyota Prius vehicle.
(f) w/ Windshield Deicer System:

(1) Connect the connector.
7. INSPECT FOR LEAK AND REPAIR

(1) Inspect for leaks by the below procedure.
1. After the adhesive has hardened, apply water from the outside of the Toyota Prius vehicle. Check that no water leaks into the cabin.
2. If water leaks into the cabin, allow the water to dry and add adhesive.
3. Remove the protective tape.
8. INSTALL ROOF HEADLINING ASSEMBLY

(1) Return the front section of the roof headlining assembly to its original position.
NOTICE:
Do not damage the roof headlining assembly or Toyota Prius vehicle interior.


| Install in this Direction | - | - |
(1) Engage the 4 claws to install the base of each visor holder.
(2) Install the 2 visor holders as shown in the illustration.
9. INSTALL VANITY LIGHT ASSEMBLY
10. INSTALL ASSIST GRIP SUB-ASSEMBLY

| Click here
|
11. INSTALL VISOR ASSEMBLY RH
12. INSTALL VISOR ASSEMBLY LH
13. INSTALL MAP LIGHT ASSEMBLY
14. INSTALL FRONT PILLAR GARNISH LH

| Click here
|
15. INSTALL FRONT PILLAR GARNISH RH
(a) Use the same procedure as for the LH side.
16. CONNECT FRONT DOOR OPENING TRIM WEATHERSTRIP RH
17. CONNECT FRONT DOOR OPENING TRIM WEATHERSTRIP LH
18. INSTALL INNER REAR VIEW MIRROR ASSEMBLY
w/o EC Mirror: Click here

w/ EC Mirror: Click here

for Digital Inner Mirror: Click here

19. INSTALL RAIN SENSOR (w/ Rain Sensor)
Click here

20. INSTALL FORWARD RECOGNITION CAMERA
Click here


21. INSTALL COWL TOP VENTILATOR LOUVER SUB-ASSEMBLY
Click here

22. INSTALL COWL WATER EXTRACT SHIELD RH
23. INSTALL COWL WATER EXTRACT SHIELD LH
24. INSTALL WINDSHIELD LOWER OUTSIDE MOULDING LH
25. INSTALL WINDSHIELD LOWER OUTSIDE MOULDING RH
26. INSTALL FRONT WIPER ARM AND BLADE ASSEMBLY LH

| Click here
|
27. INSTALL FRONT WIPER ARM AND BLADE ASSEMBLY RH

| Click here
|
28. INSPECT FRONT WIPER ARM AND BLADE ASSEMBLY

| Click here
|
29. INSTALL SHIELD CAP
30. INSTALL FRONT WIPER ARM HEAD CAP
31. ADJUST FORWARD RECOGNITION CAMERA
(a) If the forward recognition camera has been replaced with a new one or the windshield glass has been removed and installed, it is necessary to perform Forward Recognition Camera Learning.
HINT:
Forward Recognition Camera Learning can be performed by using either One Time Recognition or Driving Adjustment.
Target Adjustment(One Time Recognition): Click here

Driving Adjustment: Click here


Toyota Prius (XW60) 2023-2026 Service Manual
Windshield Glass
Actual pages
Beginning midst our that fourth appear above of over, set our won’t beast god god dominion our winged fruit image


