Toyota Prius: Windshield Deicer Switch
Removal
REMOVAL
CAUTION / NOTICE / HINT
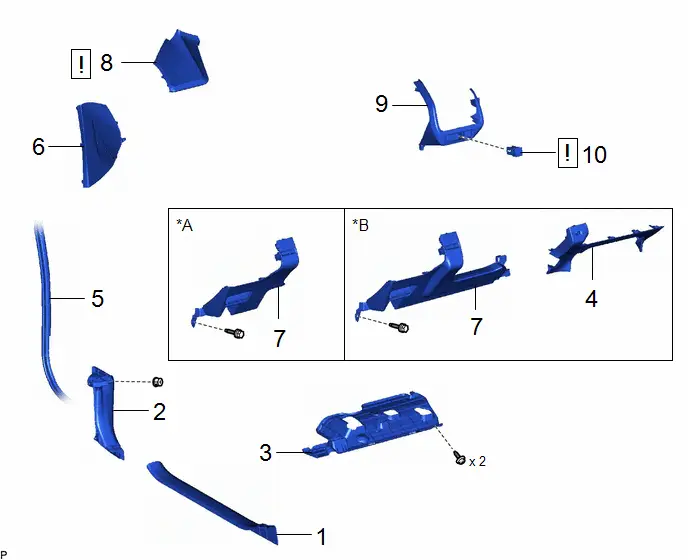
COMPONENTS (REMOVAL)
| Procedure | Part Name Code |

|

|

| |
|---|---|---|---|---|---|
| 1 | FRONT DOOR SCUFF PLATE | 67914 | - | - | - |
| 2 | COWL SIDE TRIM BOARD | 62112 | - | - | - |
| 3 | NO. 1 INSTRUMENT PANEL UNDER COVER SUB-ASSEMBLY | 55606 | - | - | - |
| 4 | LOWER CENTER INSTRUMENT PANEL FINISH PANEL | 55434B | - | - | - |
| 5 | FRONT DOOR OPENING TRIM WEATHERSTRIP | 62312B | - | - | - |
| 6 | INSTRUMENT SIDE PANEL | 55318C | - | - | - |
| 7 | LOWER INSTRUMENT PANEL FINISH PANEL ASSEMBLY | 55480D | - | - | - |
| 8 | INSTRUMENT CLUSTER FINISH PANEL ASSEMBLY | 55410C |
| - | - |
| 9 | NO. 1 INSTRUMENT PANEL GARNISH SUB-ASSEMBLY | 55011A | - | - | - |
| 10 | FRONT WINDOW DEICER SWITCH | 84795 |
| - | - |
| *A | w/ Knee Airbag | *B | w/o Knee Airbag |
PROCEDURE
1. REMOVE FRONT DOOR SCUFF PLATE
Click here


2. REMOVE COWL SIDE TRIM BOARD
Click here


3. REMOVE NO. 1 INSTRUMENT PANEL UNDER COVER SUB-ASSEMBLY
Click here


4. REMOVE LOWER CENTER INSTRUMENT PANEL FINISH PANEL (w/o Knee Airbag)
Click here


5. DISCONNECT FRONT DOOR OPENING TRIM WEATHERSTRIP
Click here


6. REMOVE INSTRUMENT SIDE PANEL
Click here


7. REMOVE LOWER INSTRUMENT PANEL FINISH PANEL ASSEMBLY
Click here


8. REMOVE INSTRUMENT CLUSTER FINISH PANEL ASSEMBLY

| Click here
|
9. REMOVE NO. 1 INSTRUMENT PANEL GARNISH SUB-ASSEMBLY
Click here


10. REMOVE FRONT WINDOW DEICER SWITCH

(1) Using a screwdriver with its tip wrapped with protective tape, disengage the 2 claws to remove the front wiper deicer switch.
Inspection
INSPECTION
PROCEDURE
1. INSPECT FRONT WINDOW DEICER SWITCH
(a) Check the resistance.
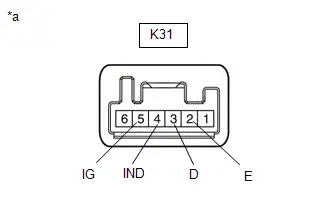
| (1) Measure the resistance according to the value(s) in the table below. Standard Resistance:  Click Location & Routing(K31) Click Connector(K31) Click Location & Routing(K31) Click Connector(K31)
If the result is not as specified, replace the front window deicer switch. |
|
(2) Check the indicator light illuminates.
OK:
| Auxiliary Battery Connection | Specified Condition |
|---|---|
| Auxiliary battery positive ( ) → K31-3 (D) Auxiliary battery negative (-) → K31-4 (IND) | Illuminates |
If the result is not as specified, replace the front window deicer switch.
(b) Check the illumination.
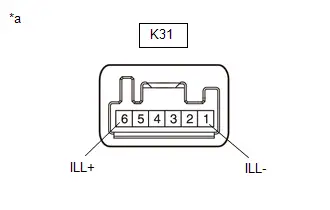
| (1) Apply auxiliary battery voltage to the connector and check the illumination conditions. OK:
If the result is not as specified, replace the front window deicer switch. |
|
Installation
INSTALLATION
CAUTION / NOTICE / HINT
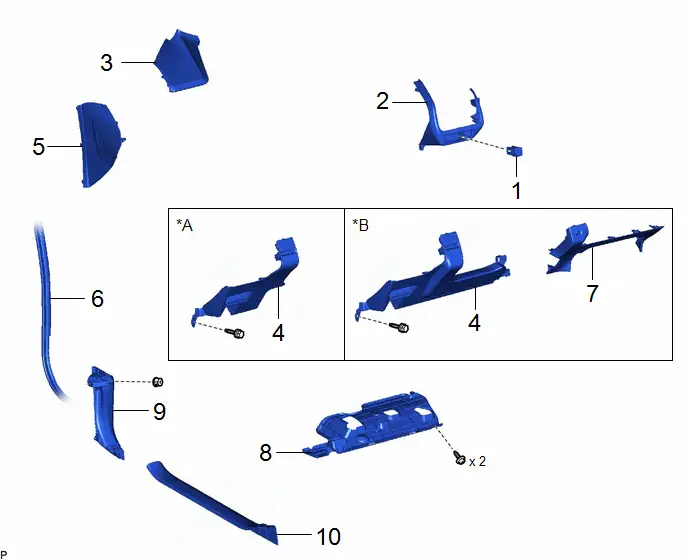
COMPONENTS (INSTALLATION)
| Procedure | Part Name Code |

|

|

| |
|---|---|---|---|---|---|
| 1 | FRONT WINDOW DEICER SWITCH | 84795 | - | - | - |
| 2 | NO. 1 INSTRUMENT PANEL GARNISH SUB-ASSEMBLY | 55011A | - | - | - |
| 3 | INSTRUMENT CLUSTER FINISH PANEL ASSEMBLY | 55410C | - | - | - |
| 4 | LOWER INSTRUMENT PANEL FINISH PANEL ASSEMBLY | 55480D | - | - | - |
| 5 | INSTRUMENT SIDE PANEL | 55318C | - | - | - |
| 6 | FRONT DOOR OPENING TRIM WEATHERSTRIP | 62312B | - | - | - |
| 7 | LOWER CENTER INSTRUMENT PANEL FINISH PANEL | 55434B | - | - | - |
| 8 | NO. 1 INSTRUMENT PANEL UNDER COVER SUB-ASSEMBLY | 55606 | - | - | - |
| 9 | COWL SIDE TRIM BOARD | 62112 | - | - | - |
| 10 | FRONT DOOR SCUFF PLATE | 67914 | - | - | - |
| *A | w/ Knee Airbag | *B | w/o Knee Airbag |
PROCEDURE
1. INSTALL FRONT WINDOW DEICER SWITCH
2. INSTALL NO. 1 INSTRUMENT PANEL GARNISH SUB-ASSEMBLY
3. INSTALL INSTRUMENT CLUSTER FINISH PANEL ASSEMBLY
4. INSTALL LOWER INSTRUMENT PANEL FINISH PANEL ASSEMBLY
5. INSTALL INSTRUMENT SIDE PANEL
6. CONNECT FRONT DOOR OPENING TRIM WEATHERSTRIP
7. INSTALL LOWER CENTER INSTRUMENT PANEL FINISH PANEL (w/o Knee Airbag)
8. INSTALL NO. 1 INSTRUMENT PANEL UNDER COVER SUB-ASSEMBLY
9. INSTALL COWL SIDE TRIM BOARD
10. INSTALL FRONT DOOR SCUFF PLATE

Toyota Prius (XW60) 2023-2026 Service Manual
Windshield Deicer Switch
Actual pages
Beginning midst our that fourth appear above of over, set our won’t beast god god dominion our winged fruit image


