

Toyota Prius: Washer Motor
Removal
REMOVAL
CAUTION / NOTICE / HINT
The necessary procedures (adjustment, calibration, initialization, or registration) that must be performed after parts are removed and installed, or replaced during washer motor removal/installation are shown below.
Necessary Procedures After Parts Removed/Installed/Replaced| Replaced Part or Performed Procedure | Necessary Procedure | Effect/Inoperative Function when Necessary Procedure not Performed | Link |
|---|---|---|---|
|
*1: Also necessary after performing a tire rotation.
*2: It is not necessary to perform this procedure if the tire pressure warning valve and transmitters are installed to the same location. *3: The Toyota Prius vehicle height changes because of tire replacement. | |||
| Tires |
| Tire Pressure Warning System | Refer to Procedures Necessary When Replacing Parts (for Tire Pressure Warning System)
|
| Rear television camera assembly optical axis (Back camera position setting)*3 | Parking Assist Monitor System |
| |
| Parking assist ECU initialization*3 | Panoramic View Monitor System |
| |
| Advanced Park |
| ||


CAUTION / NOTICE / HINT
COMPONENTS (REMOVAL)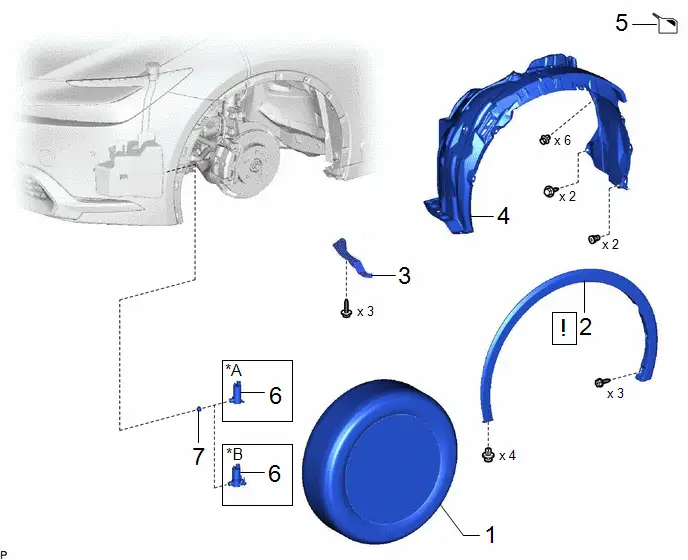
| Procedure | Part Name Code |

|

|

| |
|---|---|---|---|---|---|
| 1 | FRONT WHEEL RH | - | - | - | - |
| 2 | FRONT FENDER MOULDING SUB-ASSEMBLY LH | 75602A |
| - | - |
| 3 | FRONT WHEEL OPENING EXTENSION PAD LH | 53852B | - | - | - |
| 4 | FRONT FENDER LINER LH | 53876A | - | - | - |
| 5 | DRAIN WASHER FLUID | - | - |
| - |
| 6 | WINDSHIELD WASHER MOTOR AND PUMP ASSEMBLY | 85310 | - | - | - |
| 7 | WINDSHIELD WASHER JAR PACKING | 85336D | - | - | - |


| *A | for Type A | *B | for Type B |
PROCEDURE
1. REMOVE FRONT WHEEL RH
Click here

2. REMOVE FRONT FENDER MOULDING SUB-ASSEMBLY LH

| Click here
|

3. REMOVE FRONT WHEEL OPENING EXTENSION PAD LH
Click here

4. REMOVE FRONT FENDER LINER LH
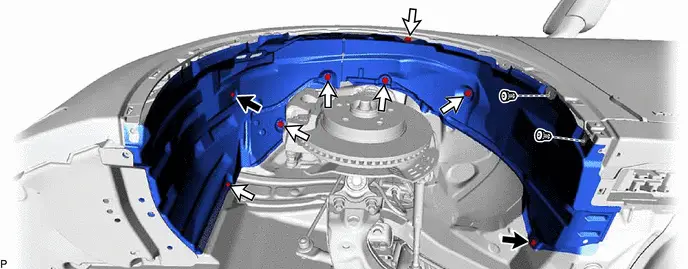

| Screw |

| Clip |
5. DRAIN WASHER FLUID
(a) for Type A:
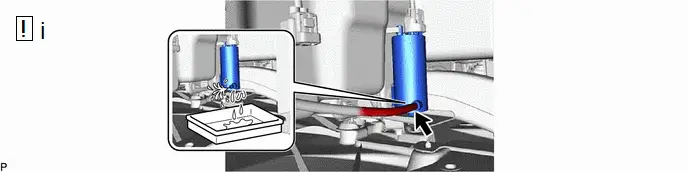
(1) Disconnect the washer hose from the windshield washer motor and pump assembly, and drain the washer fluid.
HINT:
Use a container to collect the washer fluid.
(b) for Type B:
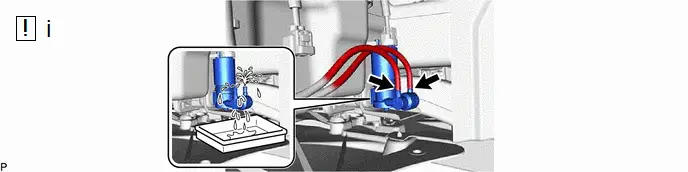
(1) Disconnect the 2 washer hoses from the windshield washer motor and pump assembly, and drain the washer fluid.
HINT:
Use a container to collect the washer fluid.
6. REMOVE WINDSHIELD WASHER MOTOR AND PUMP ASSEMBLY
(a) for Type A:


| Remove in this Direction | - | - |
(b) for Type B:


| Remove in this Direction | - | - |
7. REMOVE WINDSHIELD WASHER JAR PACKING
HINT:
Perform this procedure only when replacement of the windshield washer jar packing is necessary.

Inspection
INSPECTION
PROCEDURE
1. INSPECT WINDSHIELD WASHER MOTOR AND PUMP ASSEMBLY
(a) Check the washer operation
(1) This check should be performed with the windshield washer motor and pump assembly installed to the windshield washer jar assembly and fill the washer jar with washer fluid.
| (2) Apply auxiliary battery voltage to the windshield washer motor and pump assembly and check that the washer fluid flows from the washer jar. OK: Front Washer
If the result is not as specified, replace the windshield washer motor and pump assembly. |
|
Installation
INSTALLATION
CAUTION / NOTICE / HINT
COMPONENTS (INSTALLATION)
| Procedure | Part Name Code |

|

|

| |
|---|---|---|---|---|---|
| 1 | WINDSHIELD WASHER JAR PACKING | 85336D | - | - | - |
| 2 | WINDSHIELD WASHER MOTOR AND PUMP ASSEMBLY | 85310 | - | - | - |
| 3 | ADD WASHER FLUID | - | - |
| - |
| 4 | FRONT FENDER LINER LH | 53876A | - | - | - |
| 5 | FRONT WHEEL OPENING EXTENSION PAD LH | 53852B | - | - | - |
| 6 | FRONT FENDER MOULDING SUB-ASSEMBLY LH | 75602A | - | - | - |
| 7 | FRONT WHEEL RH | - | - | - | - |

| *A | for Type A | *B | for Type B |
PROCEDURE
1. INSTALL WINDSHIELD WASHER JAR PACKING
HINT:
Perform this procedure only when replacement of the windshield washer jar packing is necessary.
2. INSTALL WINDSHIELD WASHER MOTOR AND PUMP ASSEMBLY
3. ADD WASHER FLUID
4. INSTALL FRONT FENDER LINER LH
5. INSTALL FRONT WHEEL OPENING EXTENSION PAD LH
6. INSTALL FRONT FENDER MOULDING SUB-ASSEMBLY LH
7. INSTALL FRONT WHEEL RH
Click here


Toyota Prius (XW60) 2023-2026 Service Manual
Washer Motor
Actual pages
Beginning midst our that fourth appear above of over, set our won’t beast god god dominion our winged fruit image
