

Toyota Prius: Solar Roof
Removal
REMOVAL
CAUTION / NOTICE / HINT
COMPONENTS (REMOVAL)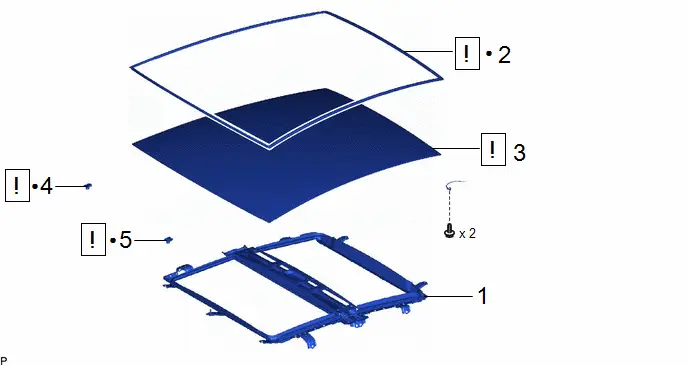
| Procedure | Part Name Code |

|

|

| |
|---|---|---|---|---|---|
| 1 | SUNSHADE HOUSING ASSEMBLY | 63250H | - | - | - |
| 2 | ROOF WINDOW UPPER MOULDING | 63215A |
| - | - |
| 3 | NO. 1 ROOF WINDOW GLASS SUB-ASSEMBLY | - |
| - | - |
| 4 | ROOF WINDOW LOWER CLIP | 63227M |
| - | - |
| 5 | ROOF WINDOW SIDE CLIP | 63228N |
| - | - |


| ● | Non-reusable part | - | - |
PROCEDURE
1. REMOVE SUNSHADE HOUSING ASSEMBLY
Click here

2. REMOVE ROOF WINDOW UPPER MOULDING

| Click here
|

3. REMOVE NO. 1 ROOF WINDOW GLASS SUB-ASSEMBLY
NOTICE:
- To prevent the No. 1 roof window glass sub-assembly from falling when performing this operation, be sure to hold the windshield glass using suction cups from outside of the Toyota Prius vehicle.
- Depending on the condition or location to be cut, use a windshield knife or piano wire.
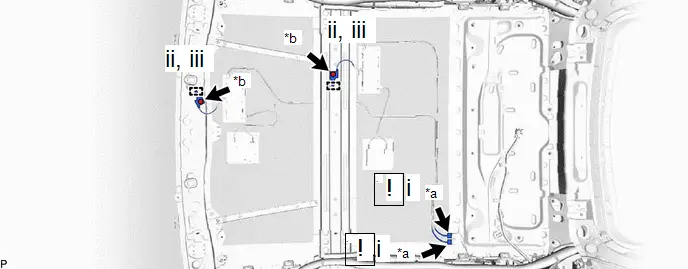
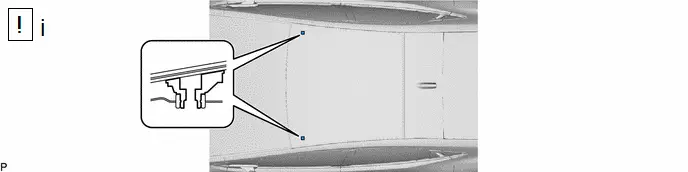
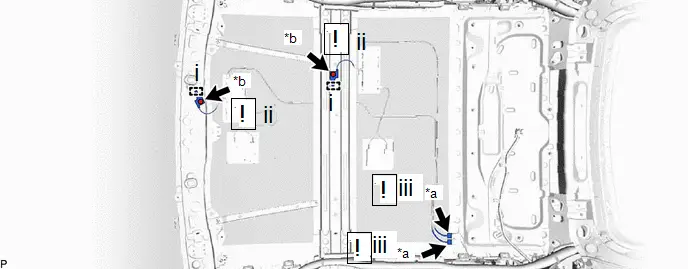
| *a | Connector | *b | Bolt |
(1) Disconnect the 2 connectors.
NOTICE:
Do not touch the positive and negative terminals. If the solar roof is exposed to light, it may cause short-circuit.
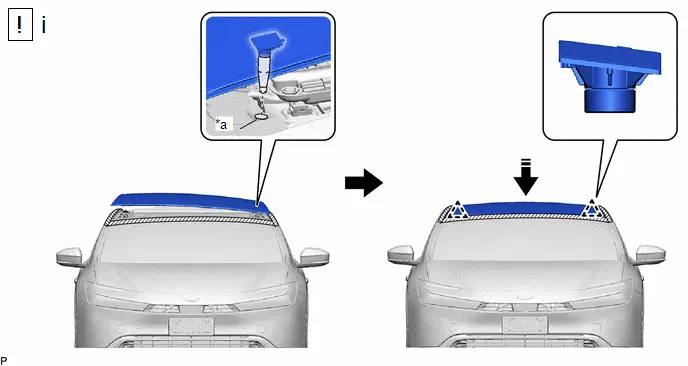
(2) Remove the 2 bolts.
(3) Disengage the 2 guides.
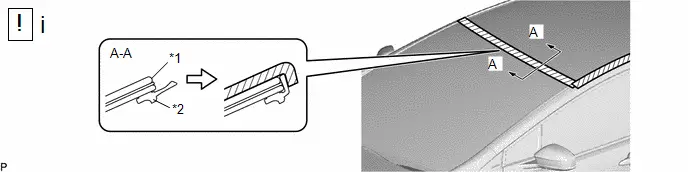
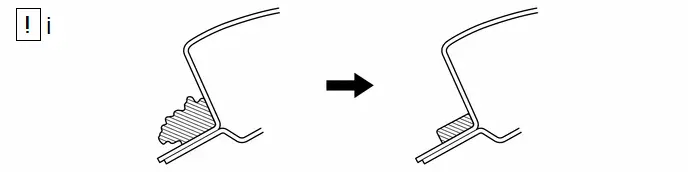
| *1 | Windshield Glass | *2 | Windshield Outside Moulding |

| Protective Tape | - | - |
(1) Pull back the windshield outside moulding and secure it with tape as shown in the illustration.
NOTICE:
Be careful not to damage the windshield outside moulding.
HINT:
- Use wide tape to ensure strong enough adhesion.
- Use non-residue tape.
- If necessary, clean the windshield outside moulding before securing it with tape.

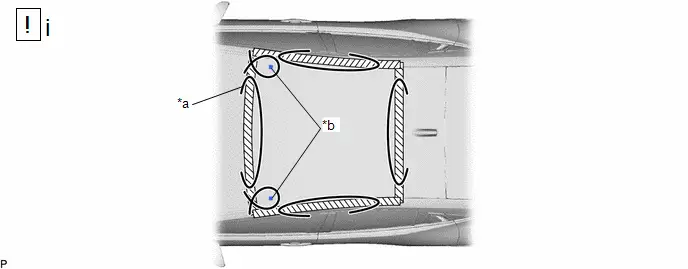
| *a | Suction Cup | - | - |
(1) Install the 2 suction cups to the No. 1 roof window glass sub-assembly.

| *1 | No. 1 Roof Window Glass Sub-assembly | - | - |
| *a | Windshield Knife | *b | Adhesive |

| Pull | - | - |
(1) When using a windshield knife:
- Apply soapy water to the area around the adhesive.
- Insert a windshield knife into the adhesive between the No. 1 roof window glass sub-assembly and Toyota Prius vehicle body.
-
While keeping the windshield knife perpendicular to the outer surface of the No. 1 roof window glass sub-assembly, cut the adhesive by pulling the windshield knife around the No. 1 roof window glass sub-assembly.
NOTICE:
- Do not pry the No. 1 roof window glass sub-assembly with the windshield knife.
- Do not use a windshield knife to cut the adhesive on the lower side of the No. 1 roof window glass sub-assembly.
- When separating the No. 1 roof window glass sub-assembly, be careful not to damage the paint or interior and exterior ornaments.
HINT:
Insert the windshield knife in an area where the gap between No. 1 roof window glass sub-assembly and Toyota Prius vehicle body is large.
| *a | Piano Wire | *b | Clip |
(1) Using piano wire, pass a piano wire between the Toyota Prius vehicle body and No. 1 roof window glass sub-assembly from the interior.
1. Tie both wire ends to wooden blocks or similar objects that can serve as handles.
2. Cut off the adhesive by pulling the piano wire as shown in the illustration.
NOTICE:
- When separating the No. 1 roof window glass sub-assembly, be careful not to damage the paint or interior and exterior ornaments.
- When cutting the adhesive, take care not to damage the harness on the No. 1 roof window glass sub-assembly.
(1) Using 2 suction cups, remove the No. 1 roof window glass sub-assembly.
NOTICE:
- Be careful not to drop the No. 1 roof window glass sub-assembly.
- Leave as much adhesive on the Toyota Prius vehicle body as possible when removing the No. 1 roof window glass sub-assembly.
4. REMOVE ROOF WINDOW LOWER CLIP

| Click here
|

5. REMOVE ROOF WINDOW SIDE CLIP
HINT:
Use the same procedure as for the roof window lower clip.
Installation
INSTALLATION
CAUTION / NOTICE / HINT
NOTICE:
- Make sure to use Toyota Genuine Windshield Glass Adhesive (High Modulus Type) or an equivalent high modulus adhesive.
- After cutting off the old adhesive remaining on the adhesion surface, apply new adhesive within 2 hours.
- If the cut surface of the old adhesive is left exposed for a long time, the adhesion strength will be reduced, so apply the new adhesive quickly.

| Procedure | Part Name Code |

|

|

| |
|---|---|---|---|---|---|
| 1 | CLEAN NO. 1 ROOF WINDOW GLASS SUB-ASSEMBLY | - |
| - | - |
| 2 | ROOF WINDOW LOWER CLIP | 63227M |
| - | - |
| 3 | ROOF WINDOW SIDE CLIP | 63228N |
| - | - |
| 4 | ROOF WINDOW UPPER MOULDING | 63215A |
| - | - |
| 5 | NO. 1 ROOF WINDOW GLASS SUB-ASSEMBLY | - |
| - | - |
| 6 | INSPECT FOR LEAK | - |
| - | - |
| 7 | SUNSHADE HOUSING ASSEMBLY | 63250H | - | - | - |


| N*m (kgf*cm, ft.*lbf): Specified torque | ● | Non-reusable part |
CAUTION / NOTICE / HINT
PROCEDURE
1. CLEAN NO. 1 ROOF WINDOW GLASS SUB-ASSEMBLY

| Click here
|

2. INSTALL ROOF WINDOW LOWER CLIP

| Click here
|

3. INSTALL ROOF WINDOW SIDE CLIP
(a) Use the same procedure as for the roof window lower clip.
4. INSTALL ROOF WINDOW UPPER MOULDING

| Click here
|

5. INSTALL NO. 1 ROOF WINDOW GLASS SUB-ASSEMBLY

| Adhesive | - | - |
(1) Clean and shape the contact surface of the Toyota Prius vehicle body.
1. Using a knife, cut away excess adhesive on the contact surface of the vehicle body as shown in the illustration.
HINT:
Leave as much adhesive on the vehicle body as possible.
2. Clean the contact surface of the vehicle body with a piece of cloth saturated with non-residue solvent.
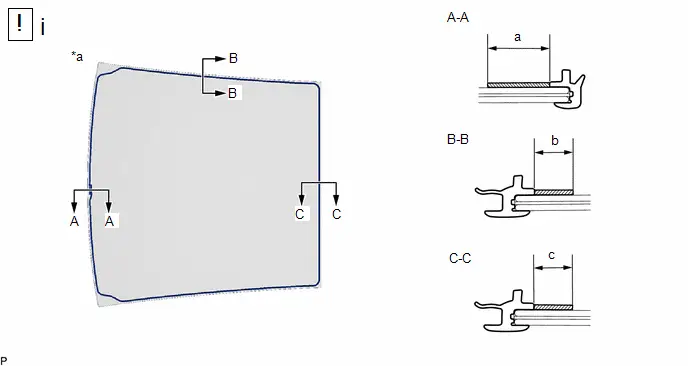
| *a | Back Side | - | - |

| Glass Primer | - | - |
(1) Using a brush or sponge, coat the adhesive application area with glass primer.
Standard Dimension:| Area | Dimension | Area | Dimension |
|---|---|---|---|
| a | 19.0 mm (0.748 in.) or more | b | 11.0 mm (0.433 in.) or more |
| c | 11.0 mm (0.433 in.) or more | - | - |
NOTICE:
- Do not coat the adhesive with glass primer.
- Do not apply too much glass primer.
- Allow the glass primer to dry for 3 minutes or more.
- Throw away any leftover glass primer.
HINT:
If an area other than specified is coated by accident, wipe off the glass primer with a clean piece of cloth before it dries.

| *a | Nozzle | - | - |
Adhesive:
Toyota Genuine Windshield Glass Adhesive (High modulus type) or equivalent
(1) Apply adhesive to the No. 1 roof window glass sub-assembly.
-
Cut off the tip of the cartridge nozzle as shown in the illustration.
Standard Dimension:
Area
Dimension
Area
Dimension
a
12.0 to 15.0 mm (0.472 to 0.591 in.)
b
8.0 to 11.0 mm (0.315 to 0.433 in.)
- Load the sealer gun with cartridge.
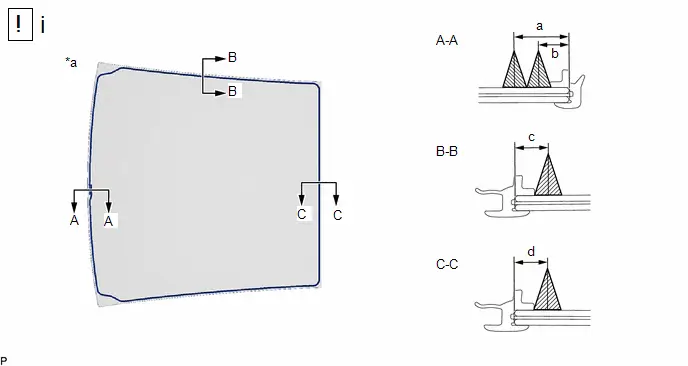
| *a | Back Side | - | - |

| Glass Primer | - | - |
(1) Apply adhesive to the No. 1 roof window glass sub-assembly as shown in the illustration.
Standard Dimension:| Area | Dimension | Area | Dimension |
|---|---|---|---|
| a | 18.0 mm (0.709 in.) | b | 10.0 mm (0.394 in.) |
| c | 10.0 mm (0.394 in.) | d | 10.0 mm (0.394 in.) |
| *a | Insertion Hole of Roof Window Clip | - | - |
(1) Install the No. 1 roof window glass sub-assembly.
1. Using suction cups, align the end of roof window lower clip and roof window side clip with the insertion hole of the roof window clip as shown in the illustration and engage the roof window lower clip and roof window side clip to install the No. 1 roof window glass sub-assembly.
NOTICE:
Make sure to install the No. 1 roof window glass sub-assembly only after the body primer on the Toyota Prius vehicle body has dried.
2. Lightly push the No. 1 roof window glass sub-assembly from the outside of the vehicle so that it is in full contact with the vehicle body.
HINT:
Press the glass with force of 98 N (10 kgf, 22.0 lbf) or more.
3. Using a scraper, remove any excess or protruding adhesive.
NOTICE:
Remove any excess or protruding adhesive before it becomes hard.
4. Hold the sliding roof glass sub-assembly using protective tape until the applied adhesive becomes hard.
HINT:
Follow the instructions supplied by the adhesive manufacturer or in the corresponding instruction manual for the minimum amount of time necessary to wait before driving the Toyota Prius vehicle.
| *a | Connector | *b | Bolt |
(1) Engage the 2 guides.
(2) Install the 2 bolts.
Torque:
10 N·m {102 kgf·cm, 7 ft·lbf}
NOTICE:
Do not touch the ground terminal without work gloves to prevent oil and dirt from adhering.
(3) Connect the 2 connectors.
NOTICE:
Do not touch the positive and negative terminals. If the solar roof is exposed to light, it may cause short-circuit.
6. INSPECT FOR LEAK

| Click here
|

7. INSTALL SUNSHADE HOUSING ASSEMBLY
Click here


Toyota Prius (XW60) 2023-2026 Service Manual
Solar Roof
Actual pages
Beginning midst our that fourth appear above of over, set our won’t beast god god dominion our winged fruit image
