

Toyota Prius: Roof Window Fix Glass
Removal
REMOVAL
CAUTION / NOTICE / HINT
The necessary procedures (adjustment, calibration, initialization, or registration) that must be performed after parts are removed and installed, or replaced during No. 1 roof window glass sub-assembly removal/installation are shown below.
CAUTION / NOTICE / HINT
NOTICE:
- When disconnecting a wire harness of any component connected to the supply power of the integrated capacitor (integration control supply) or when removing the integrated capacitor (integration control supply), make sure to wait 5 minutes or more after turning the ignition switch off for self-diagnosis to complete and the voltage of the integrated capacitor (integration control supply) to discharge. (for Driver Side)
-
After the ignition switch is turned off, the radio and display receiver assembly recordsvarious types of memory and settings. As a result, after turning the ignition switch off,make sure to wait at least 3 minutes before disconnecting the cable from the negative(-) auxiliary battery terminal.
Click here

- When the cable is disconnected from the negative (-) auxiliary battery terminal and thesecurity lock setting has been enabled, multi-display operations will be disabled uponnext startup unless the password is entered. Be sure to check the security lock settingbefore disconnecting the cable from the negative (-) auxiliary battery terminal.
CAUTION / NOTICE / HINT
HINT:
When the cable is disconnected / reconnected to the auxiliary battery terminal, systems temporarily stop operating. However, each system has a function that completes learning the first time the system is used.
Learning completes when Toyota Prius vehicle is driven| Effect/Inoperative Function When Necessary Procedures are not Performed | Necessary Procedures | Link |
|---|---|---|
| Front Camera System | Drive the Toyota Prius vehicle straight ahead at 35 km/h (22 mph) or more for 5 seconds or more. |
|

| Effect/Inoperative Function When Necessary Procedures are not Performed | Necessary Procedures | Link |
|---|---|---|
|
*1: w/o Power Back Door System
*2: w/ Power Back Door System | ||
| Power Door Lock Control System*1
| Perform door unlock operation with door control switch or electrical key transmitter sub-assembly switch. |
|
| Power Back Door System*2 | Reset back door close position |
|
| Air Conditioning System | After the ignition switch is turned to ON, the servo motor standard position is recognized. | - |


CAUTION / NOTICE / HINT
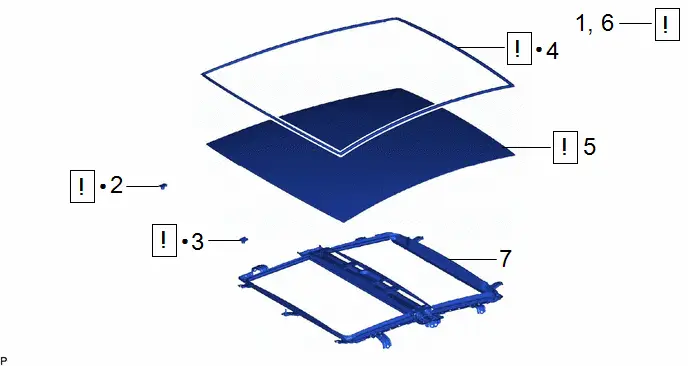
COMPONENTS (REMOVAL)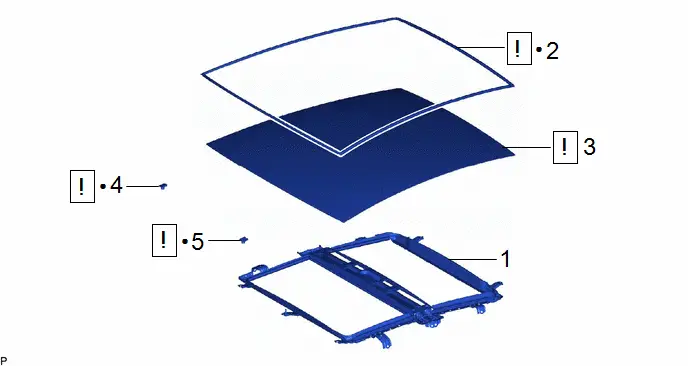
| Procedure | Part Name Code |

|

|

| |
|---|---|---|---|---|---|
| 1 | SUNSHADE HOUSING ASSEMBLY | 63250H | - | - | - |
| 2 | ROOF WINDOW UPPER MOULDING | 63215A |
| - | - |
| 3 | NO. 1 ROOF WINDOW GLASS SUB-ASSEMBLY | - |
| - | - |
| 4 | ROOF WINDOW LOWER CLIP | 63227M |
| - | - |
| 5 | ROOF WINDOW SIDE CLIP | 63228N |
| - | - |


| ● | Non-reusable part | - | - |
PROCEDURE
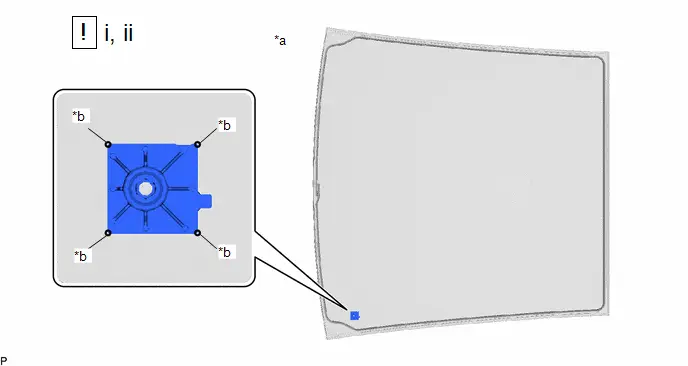
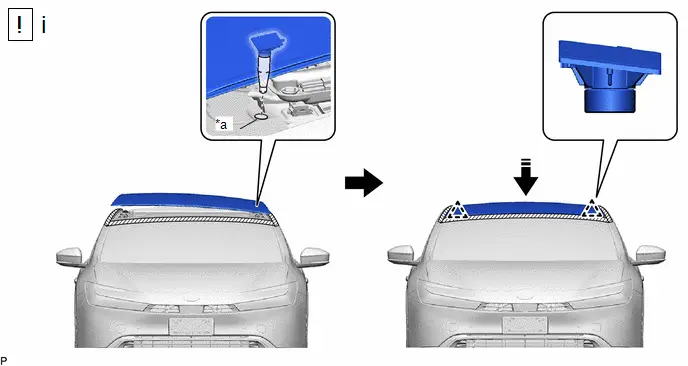
1. REMOVE SUNSHADE HOUSING ASSEMBLY
Click here

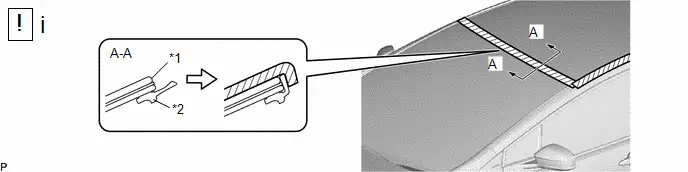
2. REMOVE ROOF WINDOW UPPER MOULDING


| Protective Tape | - | - |
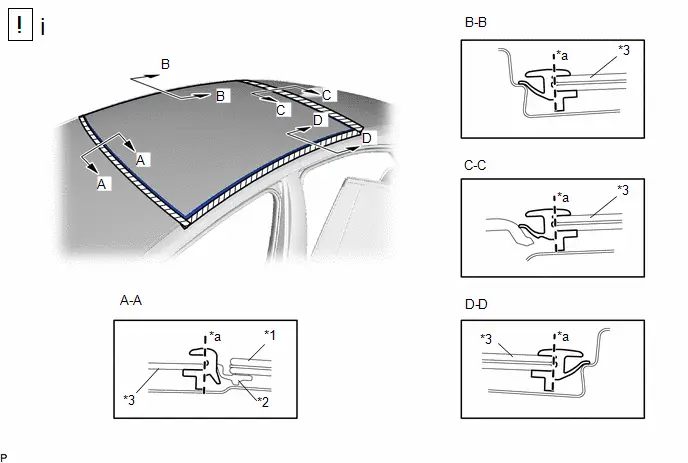
(1) Apply protective tape to the area around the installation position of the No. 1 roof window glass sub-assembly on the Toyota Prius vehicle body to prevent it from being scratched.

| *1 | Windshield Glass | *2 | Windshield Outside Moulding |
| *3 | No. 1 Roof Window Glass Sub-assembly | - | - |
| *a | Cut | - | - |
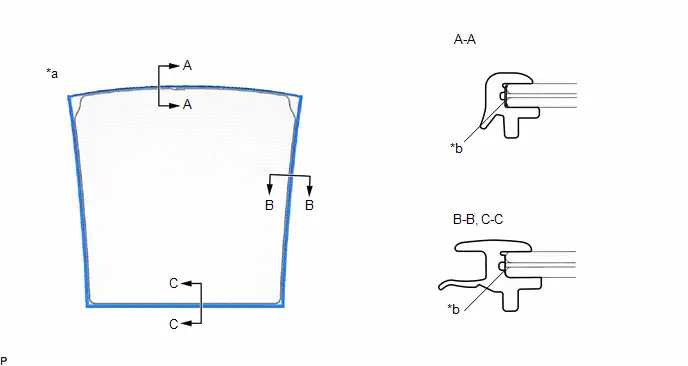
(1) Using a knife, cut off the roof window upper moulding as shown in the illustration.
NOTICE:
Be careful not to damage the No. 1 roof window glass sub-assembly, windshield outside moulding and Toyota Prius vehicle body.
3. REMOVE NO. 1 ROOF WINDOW GLASS SUB-ASSEMBLY
NOTICE:
- To prevent the No. 1 roof window glass sub-assembly from falling when performing this operation, be sure to hold the windshield glass using suction cups from outside of the vehicle.
- Depending on the condition or location to be cut, use a windshield knife or piano wire.

| *1 | Windshield Glass | *2 | Windshield Outside Moulding |

| Protective Tape | - | - |
(1) Pull back the windshield outside moulding and secure it with tape as shown in the illustration.
NOTICE:
Be careful not to damage the windshield outside moulding.
HINT:
- Use wide tape to ensure strong enough adhesion.
- Use non-residue tape.
- If necessary, clean the windshield outside moulding before securing it with tape.

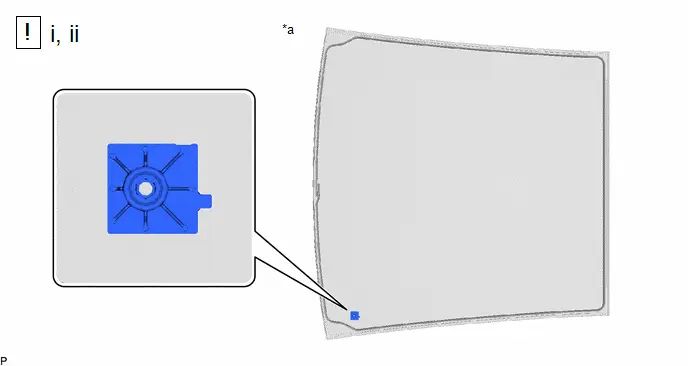
| *a | Suction Cup | - | - |
(1) Install the 2 suction cups to the No. 1 roof window glass sub-assembly.

| *1 | Back Door Glass | - | - |
| *a | Windshield Knife | *b | Adhesive |

| Pull | - | - |
(1) When using a windshield knife:
- Apply soapy water to the area around the adhesive.
- Insert a windshield knife into the adhesive between the back door glass and Toyota Prius vehicle body.
-
While keeping the windshield knife perpendicular to the outer surface of the back door glass, cut the adhesive by pulling the windshield knife around the back door glass.
NOTICE:
- Do not pry the back door glass with the windshield knife.
- Do not use a windshield knife to cut the adhesive on the lower side of the back door glass.
- When separating the back door glass, be careful not to damage the paint or interior and exterior ornaments.
HINT:
Insert the windshield knife in an area where the gap between back door glass and Toyota Prius vehicle body is large.
| *a | Piano Wire | *b | Clip |
(1) Using piano wire, pass a piano wire between the Toyota Prius vehicle body and No. 1 roof window glass sub-assembly from the interior.
1. Tie both wire ends to wooden blocks or similar objects that can serve as handles.
2. Cut off the adhesive by pulling the piano wire as shown in the illustration.
NOTICE:
- When separating the No. 1 roof window glass sub-assembly, be careful not to damage the paint or interior and exterior ornaments.
- When cutting the adhesive, take care not to damage the harness on the No. 1 roof window glass sub-assembly.
(1) Using 2 suction cups, remove the No. 1 roof window glass sub-assembly.
NOTICE:
- Be careful not to drop the No. 1 roof window glass sub-assembly.
- Leave as much adhesive on the Toyota Prius vehicle body as possible when removing the No. 1 roof window glass sub-assembly.
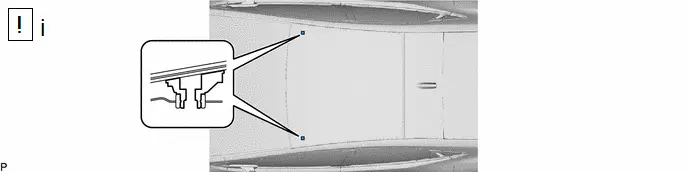
4. REMOVE ROOF WINDOW LOWER CLIP
(a) When reusing the No. 1 roof window glass sub-assembly:

| *a | Back Side | - | - |

| Adhesive Tape | - | - |
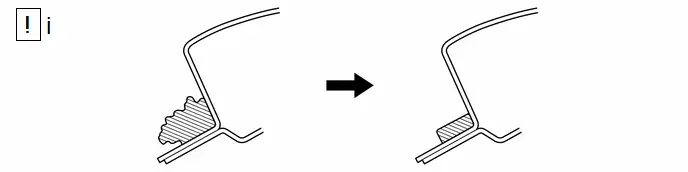
(1) Apply adhesive tape to the area around the installation position of the roof window lower clip on the No. 1 roof window glass sub-assembly.
(2) Using a scraper, remove the roof window lower clip.
NOTICE:
- Be careful not to damage the No. 1 roof window glass sub-assembly.
- Be sure to replace the roof window lower clip.
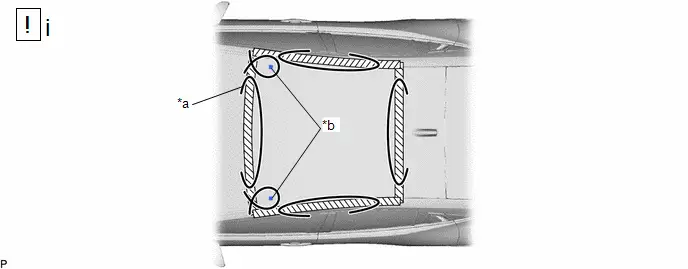
5. REMOVE ROOF WINDOW SIDE CLIP
HINT:
Use the same procedure as for the roof window lower clip.
Removal
REMOVAL
CAUTION / NOTICE / HINT
The necessary procedures (adjustment, calibration, initialization, or registration) that must be performed after parts are removed and installed, or replaced during No. 1 roof window glass sub-assembly removal/installation are shown below.
CAUTION / NOTICE / HINT
NOTICE:
- When disconnecting a wire harness of any component connected to the supply power of the integrated capacitor (integration control supply) or when removing the integrated capacitor (integration control supply), make sure to wait 5 minutes or more after turning the ignition switch off for self-diagnosis to complete and the voltage of the integrated capacitor (integration control supply) to discharge. (for Driver Side)
-
After the ignition switch is turned off, the radio and display receiver assembly recordsvarious types of memory and settings. As a result, after turning the ignition switch off,make sure to wait at least 3 minutes before disconnecting the cable from the negative(-) auxiliary battery terminal.
Click here

- When the cable is disconnected from the negative (-) auxiliary battery terminal and thesecurity lock setting has been enabled, multi-display operations will be disabled uponnext startup unless the password is entered. Be sure to check the security lock settingbefore disconnecting the cable from the negative (-) auxiliary battery terminal.
CAUTION / NOTICE / HINT
HINT:
When the cable is disconnected / reconnected to the auxiliary battery terminal, systems temporarily stop operating. However, each system has a function that completes learning the first time the system is used.
Learning completes when Toyota Prius vehicle is driven| Effect/Inoperative Function When Necessary Procedures are not Performed | Necessary Procedures | Link |
|---|---|---|
| Front Camera System | Drive the Toyota Prius vehicle straight ahead at 35 km/h (22 mph) or more for 5 seconds or more. |
|

| Effect/Inoperative Function When Necessary Procedures are not Performed | Necessary Procedures | Link |
|---|---|---|
|
*1: w/o Power Back Door System
*2: w/ Power Back Door System | ||
| Power Door Lock Control System*1
| Perform door unlock operation with door control switch or electrical key transmitter sub-assembly switch. |
|
| Power Back Door System*2 | Reset back door close position |
|
| Air Conditioning System | for HEV Model:
for PHEV Model:
| - |


CAUTION / NOTICE / HINT
COMPONENTS (REMOVAL)
| Procedure | Part Name Code |

|

|

| |
|---|---|---|---|---|---|
| 1 | SUNSHADE HOUSING ASSEMBLY | 63250H | - | - | - |
| 2 | ROOF WINDOW UPPER MOULDING | 63215A |
| - | - |
| 3 | NO. 1 ROOF WINDOW GLASS SUB-ASSEMBLY | - |
| - | - |
| 4 | ROOF WINDOW LOWER CLIP | 63227M |
| - | - |
| 5 | ROOF WINDOW SIDE CLIP | 63228N |
| - | - |


| ● | Non-reusable part | - | - |
PROCEDURE
1. REMOVE SUNSHADE HOUSING ASSEMBLY
Click here

2. REMOVE ROOF WINDOW UPPER MOULDING


| Protective Tape | - | - |
(1) Apply protective tape to the area around the installation position of the No. 1 roof window glass sub-assembly on the Toyota Prius vehicle body to prevent it from being scratched.
| *1 | Windshield Glass | *2 | Windshield Outside Moulding |
| *3 | No. 1 Roof Window Glass Sub-assembly | - | - |
| *a | Cut | - | - |
(1) Using a knife, cut off the roof window upper moulding as shown in the illustration.
NOTICE:
Be careful not to damage the No. 1 roof window glass sub-assembly, windshield outside moulding and Toyota Prius vehicle body.
3. REMOVE NO. 1 ROOF WINDOW GLASS SUB-ASSEMBLY
NOTICE:
- To prevent the No. 1 roof window glass sub-assembly from falling when performing this operation, be sure to hold the windshield glass using suction cups from outside of the vehicle.
- Depending on the condition or location to be cut, use a windshield knife or piano wire.
| *1 | Windshield Glass | *2 | Windshield Outside Moulding |

| Protective Tape | - | - |
(1) Pull back the windshield outside moulding and secure it with tape as shown in the illustration.
NOTICE:
Be careful not to damage the windshield outside moulding.
HINT:
- Use wide tape to ensure strong enough adhesion.
- Use non-residue tape.
- If necessary, clean the windshield outside moulding before securing it with tape.

| *a | Suction Cup | - | - |
(1) Install the 2 suction cups to the No. 1 roof window glass sub-assembly.

| *1 | Back Door Glass | - | - |
| *a | Windshield Knife | *b | Adhesive |

| Pull | - | - |
(1) When using a windshield knife:
- Apply soapy water to the area around the adhesive.
- Insert a windshield knife into the adhesive between the back door glass and Toyota Prius vehicle body.
-
While keeping the windshield knife perpendicular to the outer surface of the back door glass, cut the adhesive by pulling the windshield knife around the back door glass.
NOTICE:
- Do not pry the back door glass with the windshield knife.
- Do not use a windshield knife to cut the adhesive on the lower side of the back door glass.
- When separating the back door glass, be careful not to damage the paint or interior and exterior ornaments.
HINT:
Insert the windshield knife in an area where the gap between back door glass and Toyota Prius vehicle body is large.

| *a | Piano Wire | *b | Clip |
(1) Using piano wire, pass a piano wire between the Toyota Prius vehicle body and No. 1 roof window glass sub-assembly from the interior.
1. Tie both wire ends to wooden blocks or similar objects that can serve as handles.
2. Cut off the adhesive by pulling the piano wire as shown in the illustration.
NOTICE:
- When separating the No. 1 roof window glass sub-assembly, be careful not to damage the paint or interior and exterior ornaments.
- When cutting the adhesive, take care not to damage the harness on the No. 1 roof window glass sub-assembly.

(1) Using 2 suction cups, remove the No. 1 roof window glass sub-assembly.
NOTICE:
- Be careful not to drop the No. 1 roof window glass sub-assembly.
- Leave as much adhesive on the Toyota Prius vehicle body as possible when removing the No. 1 roof window glass sub-assembly.
4. REMOVE ROOF WINDOW LOWER CLIP
(a) When reusing the No. 1 roof window glass sub-assembly:
| *a | Back Side | - | - |

| Adhesive Tape | - | - |
(1) Apply adhesive tape to the area around the installation position of the roof window lower clip on the No. 1 roof window glass sub-assembly.
(2) Using a scraper, remove the roof window lower clip.
NOTICE:
- Be careful not to damage the No. 1 roof window glass sub-assembly.
- Be sure to replace the roof window lower clip.
5. REMOVE ROOF WINDOW SIDE CLIP
HINT:
Use the same procedure as for the roof window lower clip.
Installation
INSTALLATION
CAUTION / NOTICE / HINT
NOTICE:
- Make sure to use Toyota Genuine Windshield Glass Adhesive (High Modulus Type) or an equivalent high modulus adhesive.
- After cutting off the old adhesive remaining on the adhesion surface, apply new adhesive within 2 hours.
- If the cut surface of the old adhesive is left exposed for a long time, the adhesion strength will be reduced, so apply the new adhesive quickly.
| Procedure | Part Name Code |

|

|

| |
|---|---|---|---|---|---|
| 1 | CLEAN NO. 1 ROOF WINDOW GLASS SUB-ASSEMBLY | - |
| - | - |
| 2 | ROOF WINDOW LOWER CLIP | 63227M |
| - | - |
| 3 | ROOF WINDOW SIDE CLIP | 63228N |
| - | - |
| 4 | ROOF WINDOW UPPER MOULDING | 63215A |
| - | - |
| 5 | NO. 1 ROOF WINDOW GLASS SUB-ASSEMBLY | - |
| - | - |
| 6 | INSPECT FOR LEAK | - |
| - | - |
| 7 | SUNSHADE HOUSING ASSEMBLY | 63250H | - | - | - |


| ● | Non-reusable part | - | - |
CAUTION / NOTICE / HINT
PROCEDURE
1. CLEAN NO. 1 ROOF WINDOW GLASS SUB-ASSEMBLY
(a) When reusing the No. 1 roof window glass sub-assembly:
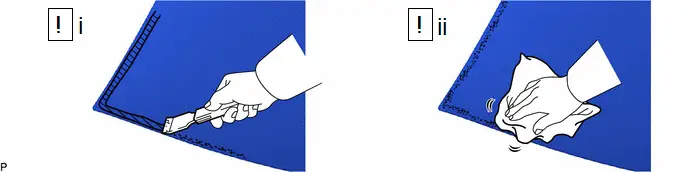
(1) Using a scraper, remove any remaining double-sided tape and adhesive residue from the No. 1 roof window glass sub-assembly.
NOTICE:
Be careful not to damage the No. 1 roof window glass sub-assembly.
(2) Clean the No. 1 roof window glass sub-assembly with a non-residue solvent.
NOTICE:
Make sure to clean the No. 1 roof window glass sub-assembly even if it is a new part.
2. INSTALL ROOF WINDOW LOWER CLIP
(a) When reusing the No. 1 roof window glass sub-assembly:
| *a | Back Side | *b | Marking |
(1) Using a brush or sponge, coat the installation area of a new roof window lower clip with glass primer.
NOTICE:
- Do not apply too much glass primer.
- Allow the glass primer to dry for 3 minutes or more.
- Throw away any leftover glass primer.
HINT:
If an area other than specified is coated by accident, wipe off the glass primer with a clean piece of cloth before it dries.
(2) Install a new roof window lower clip to the No. 1 roof window glass sub-assembly as shown in the illustration.
3. INSTALL ROOF WINDOW SIDE CLIP
(a) Use the same procedure as for the roof window lower clip.
4. INSTALL ROOF WINDOW UPPER MOULDING
(a) When reusing the back door glass:
| *a | Back Side | *b | Double-sided Tape |
(1) Apply new double-sided tape to the installation area of the front moon roof moulding on the No. 1 roof window glass sub-assembly.
(2) Without touching the contact surface of the double-sided tape, remove the release paper and install a new roof window upper moulding to the No. 1 roof window glass sub-assembly at the position shown in the illustration.
5. INSTALL NO. 1 ROOF WINDOW GLASS SUB-ASSEMBLY

| Adhesive | - | - |
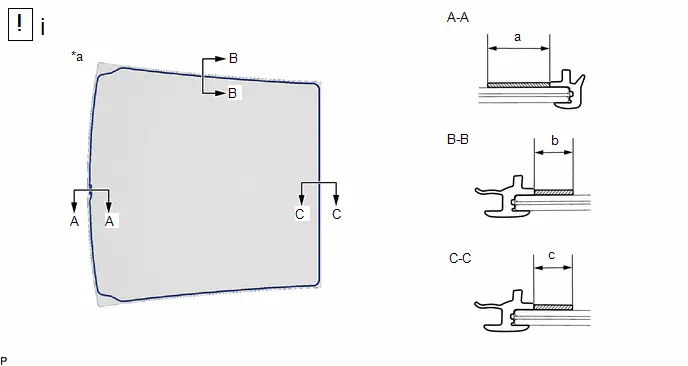
(1) Clean and shape the contact surface of the Toyota Prius vehicle body.
1. Using a knife, cut away excess adhesive on the contact surface of the vehicle body as shown in the illustration.
HINT:
Leave as much adhesive on the vehicle body as possible.
2. Clean the contact surface of the vehicle body with a piece of cloth saturated with non-residue solvent.
| *a | Back Side | - | - |

| Glass Primer | - | - |
(1) Using a brush or sponge, coat the adhesive application area with glass primer.
Standard Dimension:| Area | Dimension | Area | Dimension |
|---|---|---|---|
| a | 19.0 mm (0.748 in.) or more | b | 11.0 mm (0.433 in.) or more |
| c | 11.0 mm (0.433 in.) or more | - | - |
NOTICE:
- Do not coat the adhesive with glass primer.
- Do not apply too much glass primer.
- Allow the glass primer to dry for 3 minutes or more.
- Throw away any leftover glass primer.
HINT:
If an area other than specified is coated by accident, wipe off the glass primer with a clean piece of cloth before it dries.

| *a | Nozzle | - | - |
Adhesive:
Toyota Genuine Windshield Glass Adhesive (High modulus type) or equivalent
(1) Apply adhesive to the No. 1 roof window glass sub-assembly.
-
Cut off the tip of the cartridge nozzle as shown in the illustration.
Standard Dimension:
Area
Dimension
Area
Dimension
a
12.0 to 15.0 mm (0.472 to 0.591 in.)
b
8.0 to 11.0 mm (0.315 to 0.433 in.)
- Load the sealer gun with cartridge.

| *a | Back Side | - | - |

| Glass Primer | - | - |
(1) Apply adhesive to the No. 1 roof window glass sub-assembly as shown in the illustration.
Standard Dimension:| Area | Dimension | Area | Dimension |
|---|---|---|---|
| a | 18.0 mm (0.709 in.) | b | 10.0 mm (0.394 in.) |
| c | 10.0 mm (0.394 in.) | d | 10.0 mm (0.394 in.) |
| *a | Insertion Hole of Roof Window Clip | - | - |
(1) Install the No. 1 roof window glass sub-assembly.
1. Using suction cups, align the end of roof window lower clip and roof window side clip with the insertion hole of the roof window clip as shown in the illustration and engage the roof window lower clip and roof window side clip to install the No. 1 roof window glass sub-assembly.
NOTICE:
Make sure to install the No. 1 roof window glass sub-assembly only after the body primer on the Toyota Prius vehicle body has dried.
2. Lightly push the No. 1 roof window glass sub-assembly from the outside of the vehicle so that it is in full contact with the vehicle body.
HINT:
Press the glass with force of 98 N (10 kgf, 22.0 lbf) or more.
3. Using a scraper, remove any excess or protruding adhesive.
NOTICE:
Remove any excess or protruding adhesive before it becomes hard.
4. Hold the sliding roof glass sub-assembly using protective tape until the applied adhesive becomes hard.
HINT:
Follow the instructions supplied by the adhesive manufacturer or in the corresponding instruction manual for the minimum amount of time necessary to wait before driving the Toyota Prius vehicle.
6. INSPECT FOR LEAK
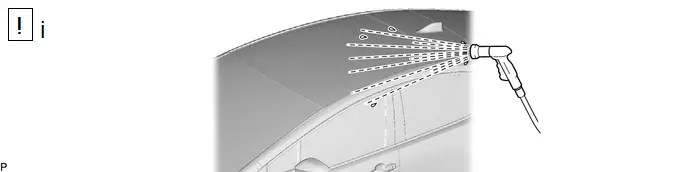
(1) Inspect for leaks by the below procedure.
1. After the adhesive has hardened, apply water from the outside of the vehicle. Check that no water leaks into the cabin.
2. If water leaks into the cabin, allow the water to dry and add adhesive.
3. Remove the protective tape.
7. INSTALL SUNSHADE HOUSING ASSEMBLY
Click here


Toyota Prius (XW60) 2023-2026 Service Manual
Roof Window Fix Glass
Actual pages
Beginning midst our that fourth appear above of over, set our won’t beast god god dominion our winged fruit image
