

Toyota Prius: Pcv Valve
Removal
REMOVAL
CAUTION / NOTICE / HINT
The necessary procedures (adjustment, calibration, initialization or registration) that must be performed after parts are removed and installed, or replaced during PCV valve (ventilation valve sub-assembly) removal/installation are shown below.
Necessary Procedures After Parts Removed/Installed/Replaced| Replaced Part or Performed Procedure | Necessary Procedure | Effect/Inoperative Function when Necessary Procedure not Performed | Link |
|---|---|---|---|
| Inspection after repair |
|
|

CAUTION / NOTICE / HINT
COMPONENTS (REMOVAL)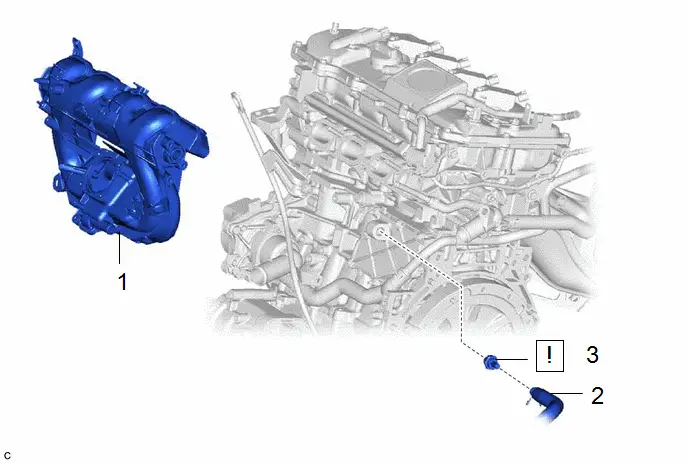
| Procedure | Part Name Code |

|

|

| |
|---|---|---|---|---|---|
| 1 | INTAKE MANIFOLD | 17111 | - | - | - |
| 2 | VENTILATION HOSE | 12261 | - | - | - |
| 3 | PCV VALVE (VENTILATION VALVE SUB-ASSEMBLY) | 12204 |
| - | - |

| ★ | Precoated part | - | - |
PROCEDURE
1. REMOVE INTAKE MANIFOLD
Click here

2. DISCONNECT VENTILATION HOSE

3. REMOVE PCV VALVE (VENTILATION VALVE SUB-ASSEMBLY)
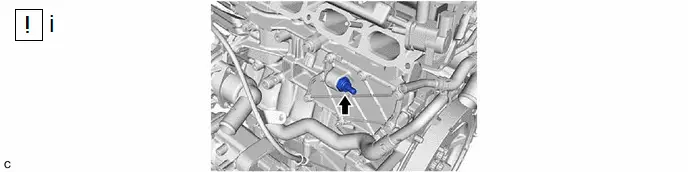
(1) Using a 22 mm ball joint lock nut wrench, remove the PCV valve (ventilation valve sub-assembly) from the No. 1 ventilation case.
Inspection
INSPECTION
PROCEDURE
1. INSPECT PCV VALVE (VENTILATION VALVE SUB-ASSEMBLY)
Pre-procedure1
(a) Install a clean hose to the PCV valve (ventilation valve sub-assembly).
Procedure1
(b) Check the PCV valve (ventilation valve sub-assembly) operation.
(1) Blow air into the No. 1 ventilation case side, and check that air passes through easily.
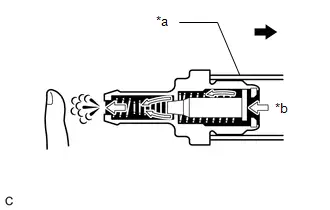
| *a | Hose |
| *b | Air |

| No. 1 Ventilation Case Side |
CAUTION:
Do not suck air through the valve.
Petroleum substances inside the valve are hazardous to your health.
If the result is not as specified, replace the PCV valve (ventilation valve sub-assembly).
(2) Blow air into the intake manifold side, and check that air passes through with difficulty.
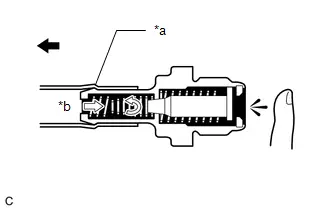
| *a | Hose |
| *b | Air |

| Intake Manifold Side |
CAUTION:
Do not suck air through the valve.
Petroleum substances inside the valve are hazardous to your health.
If the result is not as specified, replace the PCV valve (ventilation valve sub-assembly).
Post-procedure1
(c) Remove the hose from the PCV valve (ventilation valve sub-assembly).
Installation
INSTALLATION
CAUTION / NOTICE / HINT
COMPONENTS (INSTALLATION)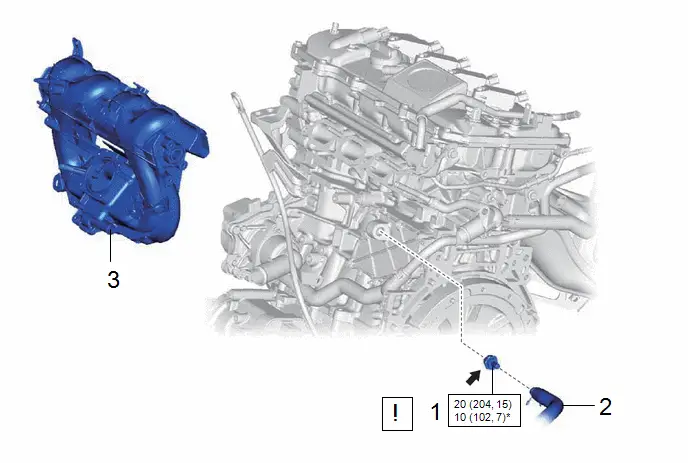
| Procedure | Part Name Code |

|

|

| |
|---|---|---|---|---|---|
| 1 | PCV VALVE (VENTILATION VALVE SUB-ASSEMBLY) | 12204 |
| - | - |
| 2 | VENTILATION HOSE | 12261 | - | - | - |
| 3 | INTAKE MANIFOLD | 17111 | - | - | - |


| N*m (kgf*cm, ft.*lbf): Specified torque | * | For use with a 22 mm ball joint lock nut wrench |

| Adhesive 1324 | ★ | Precoated part |
PROCEDURE
1. INSTALL PCV VALVE (VENTILATION VALVE SUB-ASSEMBLY)
| *a | Adhesive 1324 | *b | Torque Wrench Fulcrum Length |
(1) Apply adhesive to the PCV valve (ventilation valve sub-assembly).
Adhesive:
Toyota Genuine Adhesive 1324, Three Bond 1324 or equivalent
(2) Using a 22 mm ball joint lock nut wrench, install the PCV valve (ventilation valve sub-assembly) to the No. 1 ventilation case.
Torque:
Specified tightening torque :
20 N·m {204 kgf·cm, 15 ft·lbf}
NOTICE:
Do not start the engine for at least 1 hour after installation.
HINT:
-
Calculate the torque wrench reading when changing the fulcrum length of the torque wrench.
Click here


- When using a 22 mm ball joint lock nut wrench (fulcrum length of 149.75 mm (5.90 in.)) torque wrench (fulcrum length of 162 mm (6.38 in.)): 10 N*m (102 kgf*cm, 7 ft.*lbf)
2. CONNECT VENTILATION HOSE
3. INSTALL INTAKE MANIFOLD
Click here


Toyota Prius (XW60) 2023-2026 Service Manual
Actual pages
Beginning midst our that fourth appear above of over, set our won’t beast god god dominion our winged fruit image
