

Toyota Prius: Cooler (for Phev Model)
Removal
REMOVAL
CAUTION / NOTICE / HINT
The necessary procedures (adjustment, calibration, initialization or registration) that must be performed after parts are removed and installed, or replaced during No. 1 traction battery cooler conductor removal/installation are shown below.
CAUTION:
-
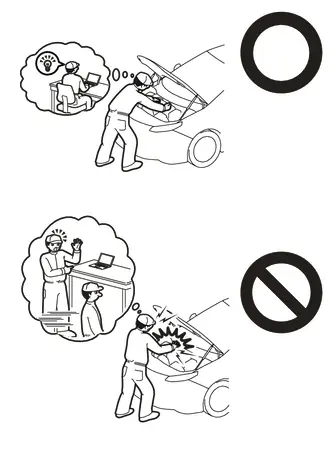
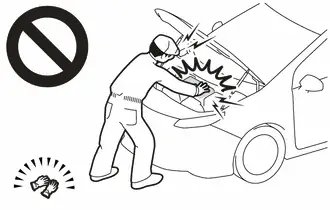
Orange wire harnesses and connectors indicate high-voltage circuits. To prevent electric shock, always follow the procedure described in the repair manual.
Click here

-
To prevent electric shock, wear insulated gloves when working on wire harnesses and components of the high voltage system.
NOTICE:
After turning the ignition switch off, waiting time may be required before disconnecting the cable from the negative (-) auxiliary battery terminal.
Click here

HINT:
When the cable is disconnected / reconnected to the auxiliary battery terminal, systems temporarily stop operating. However, each system has a function that completes learning the first time the system is used.
Items for which learning is completed by driving the Toyota Prius vehicle| Effect/Inoperative Function when Necessary Procedure not Performed | Necessary Procedure | Link |
|---|---|---|
| Front Camera System | Drive the Toyota Prius vehicle straight ahead at 35 km/h (22 mph) or more for 5 seconds or more. |
|

| Effect/Inoperative Function when Necessary Procedure not Performed | Necessary Procedure | Link |
|---|---|---|
|
*1: w/o Power Back Door System
*2: w/ Power Back Door System | ||
| Power Door Lock Control System*1
| Perform door unlock operation with door control switch or electrical key transmitter sub-assembly switch. |
|
| Power Back Door System*2 | Reset back door close position |
|
| Air Conditioning System | After the ignition switch is turned to ON, the servo motor and expansion valve standard position is recognized. | - |


CAUTION / NOTICE / HINT
COMPONENTS (REMOVAL)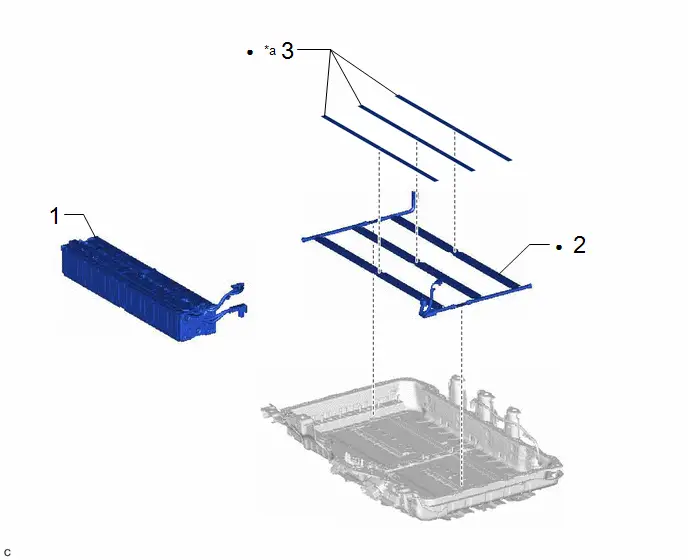
| Procedure | Part Name Code |

|

|

| |
|---|---|---|---|---|---|
| 1 | HV SUPPLY STACK SUB-ASSEMBLY | - | - | - | - |
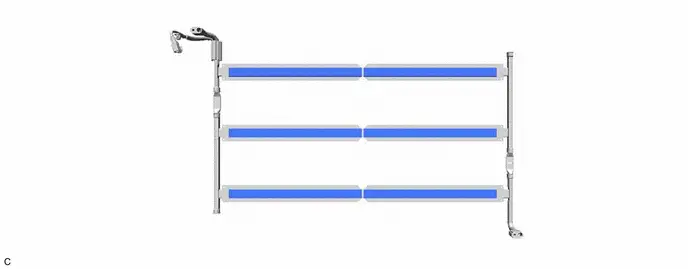
| 2 | NO. 1 TRACTION BATTERY COOLER CONDUCTOR | - | - | - | - |
| 3 | NO. 1 TRACTION BATTERY COOLER SHEET | G96NA | - | - | - |
| *a | Parts requiring replacement with new ones when replacing the No. 1 traction battery cooler conductor | - | - |
| ● | Non-reusable part |

| Compressor oil ND-OIL 11 or equivalent |
PROCEDURE
1. REMOVE HV SUPPLY STACK SUB-ASSEMBLY
Click here

2. REMOVE NO. 1 TRACTION BATTERY COOLER CONDUCTOR
3. REMOVE NO. 1 TRACTION BATTERY COOLER SHEET
Installation
INSTALLATION
CAUTION / NOTICE / HINT
COMPONENTS (INSTALLATION)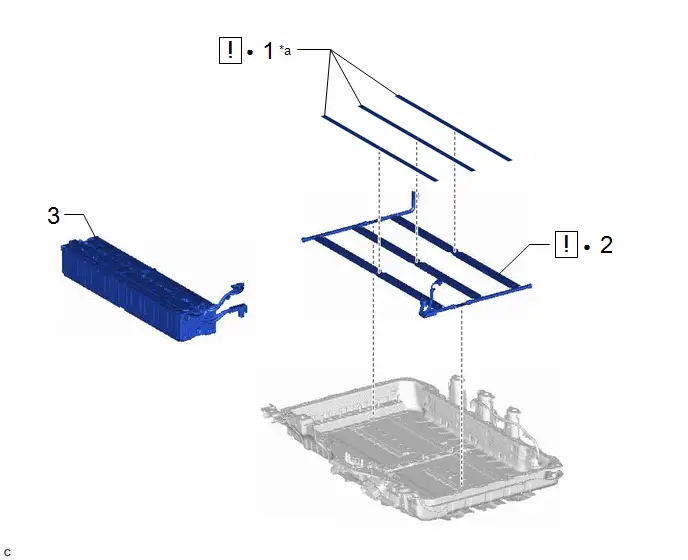
| Procedure | Part Name Code |

|

|

| |
|---|---|---|---|---|---|
| 1 | NO. 1 TRACTION BATTERY COOLER SHEET | G96NA |
| - | - |
| 2 | NO. 1 TRACTION BATTERY COOLER CONDUCTOR | - |
| - | - |
| 3 | HV SUPPLY STACK SUB-ASSEMBLY | - | - | - | - |


| *a | Parts requiring replacement with new ones when replacing the No. 1 traction battery cooler conductor | - | - |
| ● | Non-reusable part |

| Compressor oil ND-OIL 11 or equivalent |
PROCEDURE
1. INSTALL NO. 1 TRACTION BATTERY COOLER SHEET

| NOTICE:
|
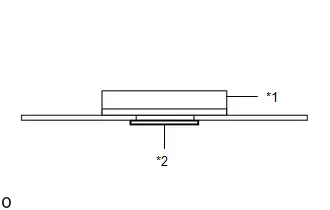
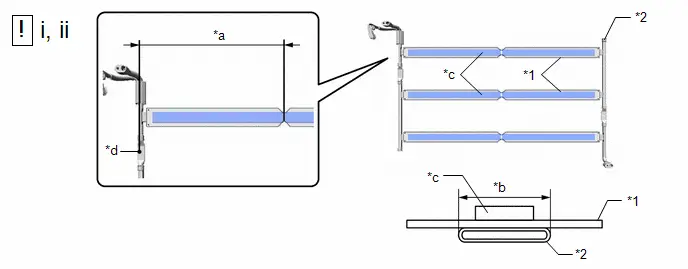
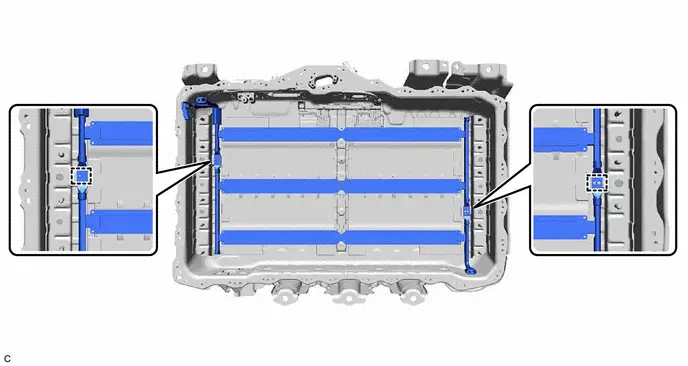
| *1 | No. 1 Traction Battery Cooler Sheet | *2 | No. 1 Traction Battery Cooler Conductor |
| *a | 394.1 to 400.9 mm (15.516 to 15.783 in.) | *b | 23.5 mm (0.925 in.) |
| *c | Thermally Conduction Part | *d | Reference Point |

| Front of Toyota Prius Vehicle | - | - |
(1) Clean and degrease the surface of the new No. 1 traction battery cooler conductor.
(2) Attach the new No. 1 traction battery cooler sheet to the No. 1 traction battery cooler conductor in the position shown in the illustration.
2. INSTALL NO. 1 TRACTION BATTERY COOLER CONDUCTOR

| NOTICE: The No. 1 traction battery cooler conductor and No. 1 traction battery cooler sheet cannot be reused after removing and installing each HV supply stack sub-assembly. |
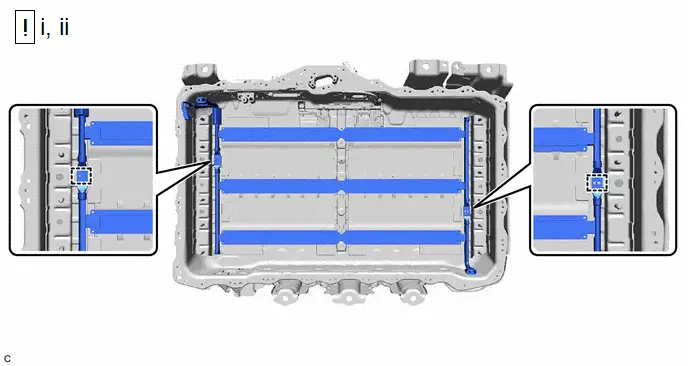
(1) Engage the 2 guides to install the No. 1 traction battery cooler conductor.
(2) Fill the No. 1 traction battery cooler conductor with the included compressor oil.
Required Amount(HINT):
10 g (0.353 oz)
3. INSTALL HV SUPPLY STACK SUB-ASSEMBLY
Click here


Toyota Prius (XW60) 2023-2026 Service Manual
Cooler (for Phev Model)
Actual pages
Beginning midst our that fourth appear above of over, set our won’t beast god god dominion our winged fruit image
