

Toyota Prius: Charge Cable (for Phev Model)
On-vehicle Inspection
ON-VEHICLE INSPECTION
PROCEDURE
1. INSPECT ELECTRIC VEHICLE CHARGER CABLE ASSEMBLY (for Type A)
HINT:
- When inspecting the electric vehicle charger cable assembly provided with the vehicle, use a known good AC power source and electric Toyota Prius vehicle charger cable assembly.
- If a malfunction is detected, the CCID relay will turn off immediately to stop the supply of power to the vehicle.
- Before checking the plug-in charging function, make sure that the SOC of the HV battery is less than 70%.
- If the SOC of the HV battery is 70% or more and the electric Toyota Prius vehicle charger cable assembly is connected to the inlet AC charger cable to perform plug-in charging, the charging indicator of the electric charger cable assembly will not illuminate and the charging indicator (EV charger lid indicator assembly) will illuminate for several seconds and then turn off.
- While performing plug-in charging, if the electric Toyota Prius vehicle charger cable assembly (charging connector) is shaken, charging will be suspended for safety.
- The electric vehicle charger cable assembly is unrelated to the display of the EV driving distance.
(a) Check the plug-in charging function:
(1) Connect the electric Toyota Prius vehicle charger cable assembly and perform plug-in charging.
NOTICE:
- Make sure to use a known good AC power source.
- Make sure to use a known good electric vehicle charger cable assembly.
- If the malfunction cannot be reproduced, perform [#1].
-
If the malfunction can be reproduced, inspect the Toyota Prius vehicle.
HINT:
Click here

(b) If the malfunction cannot be reproduced [#1]:
(1) Connect the electric vehicle charger cable assembly and perform plug-in charging.
NOTICE:
- Make sure to use a known good AC power source.
- Make sure to use the electric Toyota Prius vehicle charger cable assembly that the customer used when the malfunction occurred.
-
If the malfunction cannot be reproduced, check the condition of the AC power source and charging conditions when the malfunction occurred based on the interview with the customer.
HINT:
Click here

- If the malfunction is reproduced, perform [#2].
(c) If the malfunction is reproduced [#2]:
(1) Compare the state of the power indicator, charging indicator and error indicator of the electric Toyota Prius vehicle charger cable assembly while performing plug-in charging with the following table.
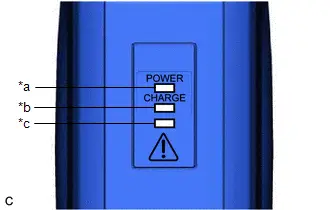
| *a | Power Indicator |
| *b | Charging Indicator |
| *c | Error Warning Indicator |
| Power Indicator | Charging Indicator | Error Warning Indicator | Content | Detection Condition | Socket Connection | Charging Inlet Connection | Procedure |
|---|---|---|---|---|---|---|---|
| Illuminated | - | Off | Voltage is applied to the plug. | - | ○ | - | - |
| Off | - | Off | Voltage is not applied to the plug. | - | x | - |
|
| CCID internal malfunction. | The CCID internal electronic does not turn on. | ○ | - | Replace the electric Toyota Prius vehicle charger cable assembly. | |||
| Illuminated | Off | Flashes (once) | CCID relay stuck closed error | The conditions to close the CCID relay are not met but the relay is closed. | ○ | - | Replace the electric Toyota Prius vehicle charger cable assembly. |
| Illuminated | Off | Flashes (twice) | CCID relay stuck open error | The conditions to close the CCID relay are met but the relay is open. | ○ | - | Replace the electric Toyota Prius vehicle charger cable assembly. |
| Illuminated | Off | Flashes (3 times) | Electricity leakage detected | The electricity leakage detection function is operating.
| ○ | - | Check the operation at several different electrical outlets.
|
| Illuminated | Off | Flashes (4 times) | CPLT (duty) error | The duty ratio is less than 5% or 40% or more. | ○ | ○ | Replace the electric Toyota Prius vehicle charger cable assembly. |
| Illuminated | Off | Flashes (5 times) | CPLT (-12V) error | -12 V cannot be detected while the duty waveform is output. | ○ | ○ | Replace the electric Toyota Prius vehicle charger cable assembly. |
| Illuminated | Off | Flashes (6 times) | Electricity leakage self diagnosis error | The electricity leakage self-diagnosis function is abnormal. | ○ | ○ | Check the operation at several different electrical outlets.
|
| Flashes (interval of 0.25 seconds) | - | Off | Abnormally high power source plug (electrical outlet) temperature detected | Abnormally high power source plug (electrical outlet) temperature detected
| ○ | - | Check the operation at several different electrical outlets. HINT: Make sure that the plug is fully inserted into the outlet.
|
| Flashes (interval of 0.25 seconds) | - | Flashes (interval of 0.25 seconds) | Power source plug temperature detection malfunction |
| ○ | - | Check that the electric vehicle charger assembly is locked correctly.
|
| Illuminated | - | Flashes (interval of 0.25 seconds) | Advance notice of end of service life | The number of charging cycles has reached a specific number. | ○ | - | - |
| Illuminated | - | Illuminated | End of service life reached | The maximum number of charging cycles has been reached. | ○ | - | Replace the electric Toyota Prius vehicle charger cable assembly. |

- ○: Correct
- x: Incorrect
HINT:
-
In the case of an electricity leakage error:
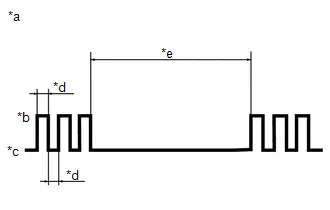
*a
Flashing 3 times
*b
Illuminated
*c
Off
*d
0.5 seconds
*e
2.5 seconds
The power indicator flashes in the pattern shown in the illustration.
-
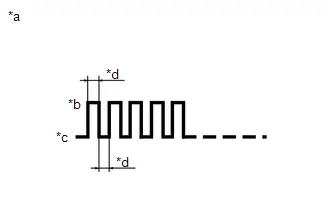
In the case of a power source plug temperature detection malfunction:*a
Flashing at interval of 0.25 seconds
*b
Illuminated
*c
Off
*d
0.25 seconds
The power indicator and error indicator flash in the pattern shown in the illustration.
- If a certain number of charging cycles is reached, CCID relay operation will be suspended.
- The end of service life advance notice and end of service life reached warnings are displayed when charging has completed and a corresponding number of charging cycles has been performed.
2. INSPECT ELECTRIC Toyota Prius Vehicle CHARGER CABLE ASSEMBLY (for Type B)
HINT:
- When inspecting the electric vehicle charger cable assembly provided with the vehicle, use a known good AC power source and electric vehicle charger cable assembly.
- If a malfunction is detected, the CCID relay will turn off immediately to stop the supply of power to the Toyota Prius vehicle.
- Before checking the plug-in charging function, make sure that the SOC of the HV battery is less than 70%.
- If the SOC of the HV battery is 70% or more and the electric vehicle charger cable assembly is connected to the inlet AC charger cable to perform plug-in charging, the charging indicator of the electric charger cable assembly will not illuminate and the charging indicator (EV charger lid indicator assembly) will illuminate for several seconds and then turn off.
- While performing plug-in charging, if the electric Toyota Prius vehicle charger cable assembly (charging connector) is shaken, charging will be suspended for safety.
- The electric vehicle charger cable assembly is unrelated to the display of the EV driving distance.
(a) Check the plug-in charging function:
(1) Connect the electric Toyota Prius vehicle charger cable assembly and perform plug-in charging.
NOTICE:
- Make sure to use a known good AC power source.
- Make sure to use a known good electric vehicle charger cable assembly.
- If the malfunction cannot be reproduced, perform [#1].
-
If the malfunction can be reproduced, inspect the Toyota Prius vehicle.
HINT:
Click here

(b) If the malfunction cannot be reproduced [#1]:
(1) Connect the electric vehicle charger cable assembly and perform plug-in charging.
NOTICE:
- Make sure to use a known good AC power source.
- Make sure to use the electric Toyota Prius vehicle charger cable assembly that the customer used when the malfunction occurred.
-
If the malfunction cannot be reproduced, check the condition of the AC power source and charging conditions when the malfunction occurred based on the interview with the customer.
HINT:
Click here

- If the malfunction is reproduced, perform [#2].
(c) If the malfunction is reproduced [#2]:
(1) Compare the state of the power indicator, charging indicator and error indicator of the electric Toyota Prius vehicle charger cable assembly while performing plug-in charging with the following table.
| Power Indicator | Charging Indicator | Error Warning Indicator | Content | Detection Condition | Socket Connection | Charging Inlet Connection | Procedure |
|---|---|---|---|---|---|---|---|
| Illuminated | - | Off | Voltage is applied to the plug. | - | ○ | - | - |
| Off | - | Off | Voltage is not applied to the plug. | - | x | - |
|
| CCID internal malfunction. | The CCID internal electronic does not turn on. | ○ | - | Replace the EV charger cable assembly. | |||
| Flashes (interval of 0.25 seconds) | - | Illuminated | The applied voltage / frequency are beyond the specified range | The voltage operating range is 85V to 265V and frequency range is 45Hz to 65Hz | ○ | - | Check the operation at several different electrical outlets.
HINT: Make sure to use an outlet other than one used by the customer. |
| Flashes (interval of 0.25 seconds) | - | Illuminated | Ground loss error detected | The grid side ground connection between plug and socket outlet is lost | ○ | - | Check the operation at several different electrical outlets.
HINT: Make sure to use an outlet other than one used by the customer. |
| Off | Off | Illuminated | CCID relay stuck closed error | The conditions to close the CCID relay are not met but the relay is closed. | ○ | - | Replace the EV charging cable assembly. |
| Off | Off | Illuminated | CCID relay stuck open error | The conditions to close the CCID relay are met but the relay is closed. | ○ | - | Replace the EV charging cable assembly. |
| Off | Off | Illuminated | Electricity leakage detected | The electricity leakage detection function is operating.
| ○ | - | Check the operation at several different electrical outlets.
|
| Off | Off | Illuminated | CPLT (duty) error | The duty ratio is less than 9% or more 17% | ○ | ○ | Replace the EV charging cable assembly. |
| Off | Off | Illuminated | CPLT (-12 V) error | -12 V cannot be detected while the duty waveform is output. | ○ | ○ | Replace the EV charging cable assembly. |
| Off | Off | Illuminated | Electricity leakage self-diagnosis error | The electricity leakage self-diagnosis function is abnormal. | ○ | - | Check the operation at several different electrical outlets.
|
| Off | Off | Illuminated | Abnormally high power source plug (electrical outlet) temperature detected (over temperature detection) | Abnormally high power source plug (electrical outlet) temperature detected
| ○ | - | Check the operation at several different electrical outlets. HINT: Make sure that the plug is fully inserted into the outlet.
|
| Flashes (interval of 0.25 seconds) | Flashes (interval of 0.25 seconds) | Off | Power source plug temperature detection malfunction |
| - | - | Check that the electric vehicle charger assembly is locked correctly.
HINT: Protect the charging equipment from direct sunlight. |
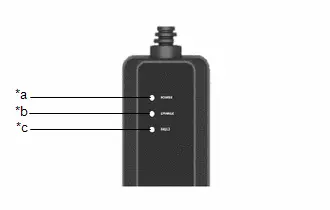
| *a | Power Indicator |
| *b | Charging Indicator |
| *c | Error Warning Indicator |
- ○: Correct
- x: Incorrect
HINT:
-
In the case of an electricity leakage error:
Indication will be as follow:
Power Indicator
Charging Indicator
Error Warning Indicator
Off
Off
On
-

In the case of a power source plug temperature detection malfunction:*a
Flashing at interval of 0.25 seconds
*b
Illuminated
*c
Off
*d
0.25 seconds
The power indicator and charging indicator flash in the pattern shown in the illustration.
Inspection
INSPECTION
PROCEDURE
1. INSPECT ELECTRIC VEHICLE CHARGER CABLE ASSEMBLY
(a) Visual inspection (*A):
HINT:
- When performing a visual inspection, compare the electric vehicle charger cable assembly with a known good one.
- If the power source plug is damaged, replace the cable EV charger plug assembly.
- Due to the characteristics of the electric Toyota Prius vehicle charger cable assembly, it may become stiff or twisted. This is not a malfunction.
- If the electric vehicle charger cable assembly is would tightly or repeatedly folded for storage, twists may form more easily and can lead to an open-circuit.
| (1) Check that the electric Toyota Prius vehicle charger cable assembly (charging connector side) is free of foreign matter. HINT: If there is foreign matter in the charging connector which prevents it from being securely connected, charging will not be performed. |
|
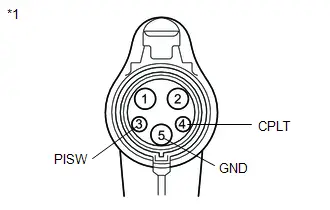
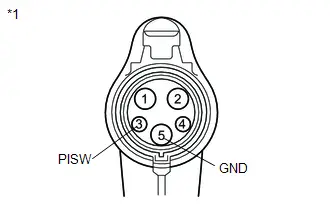
(b) Check the latch release button (PISW):
| (1) Check that the latch release button (PISW) can be pressed with no abnormal resistance. |
|
(c) Check connection:
(1) Check that the electric Toyota Prius vehicle charger cable assembly and inlet AC charger cable (charging inlet side) can be connected smoothly.
OK:
The electric vehicle charger cable assembly and inlet AC charger cable (charging inlet side) connects smoothly.
HINT:
If the result is not as specified, perform the visual inspection (*A) and the following procedure.
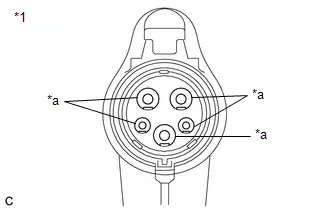
| (2) Check that the terminals of the electric Toyota Prius vehicle charger cable assembly (charging connector side) are not bent or deformed. OK: The terminals are not bent or deformed. HINT: If the result is not as specified, replace the electric vehicle charger cable assembly. |
|
(d) Check for short:
CAUTION:
Wear insulated gloves.
(1) Plug in the electric Toyota Prius vehicle charger cable assembly to a socket.
HINT:
Make sure not to connect electric vehicle charger cable assembly to the inlet AC charger cable (charging inlet side).
| (2) Measure the voltage according to the value(s) in the table below. Standard Voltage:
|
|
(e) Check for open:
| (1) Measure the resistance according to the value(s) in the table below. Standard Resistance:
|
|
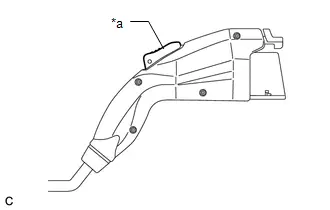
(2) Insert the plug cable EV charger key to release the lock and then turn the connector and remove the cable EV charger plug assembly from the CCID (charging circuit interrupting device).
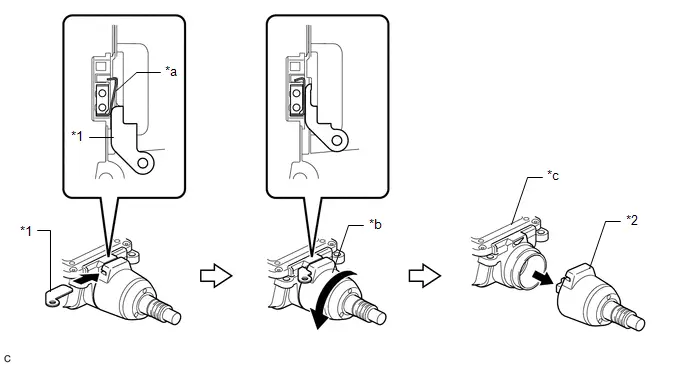
| *1 | Plug Cable EV Charger Key | *2 | Cable EV Charger Plug Assembly |
| *a | Lock | *b | Connector |
| *c | CCID (charging circuit interrupting device) | - | - |
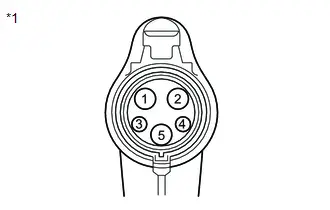
(3) Measure the resistance according to the value(s) in the table below.
Standard Resistance:
| Tester Connection | Condition | Specified Condition |
|---|---|---|
| 1 - 1' | Always | Below 1 Ω |
| 2 - 2' | Always | Below 1 Ω |
| 3 - 3' | Always | Below 1 Ω |
| 4 - 5 | Always | 130 to 660 Ω |
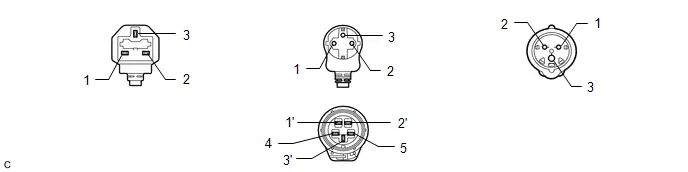
HINT:
If the result is not as specified, replace the cable EV charger plug assembly.

Toyota Prius (XW60) 2023-2026 Service Manual
Charge Cable (for Phev Model)
Actual pages
Beginning midst our that fourth appear above of over, set our won’t beast god god dominion our winged fruit image
